
Your Makita drill suddenly dies mid-project—no lights, no hum, just silence. That sinking feeling hits when your $200 tool becomes a useless chunk of plastic. When your Makita drill not working scenario strikes, 80% of failures stem from three simple culprits: dead batteries, dirty contacts, or a worn trigger switch. Don’t panic or replace it yet. This guide cuts through the frustration with field-tested fixes used by professional technicians. You’ll diagnose the exact failure point in under 10 minutes and learn whether to attempt a $5 repair or call Makita service. Stop guessing—start fixing.
Makita Drill Dead? Fix Battery and Connection Issues in 5 Minutes
A completely unresponsive drill almost always starts with power supply failures. Before disassembling your tool, rule out these three battery-related issues that cause 65% of “dead drill” emergencies.
Test with a Known-Good Battery and Charger
Grab a fully charged Makita battery from another compatible tool—this eliminates guesswork. If the drill springs to life, your original battery is faulty. Critical check: Plug the suspect battery into a different Makita tool. If it fails there too, the battery is dead. Never assume a “full charge” indicator is accurate; faulty batteries often show full charge but deliver zero power under load. If both batteries fail, immediately suspect dirty contacts or internal wiring breaks.
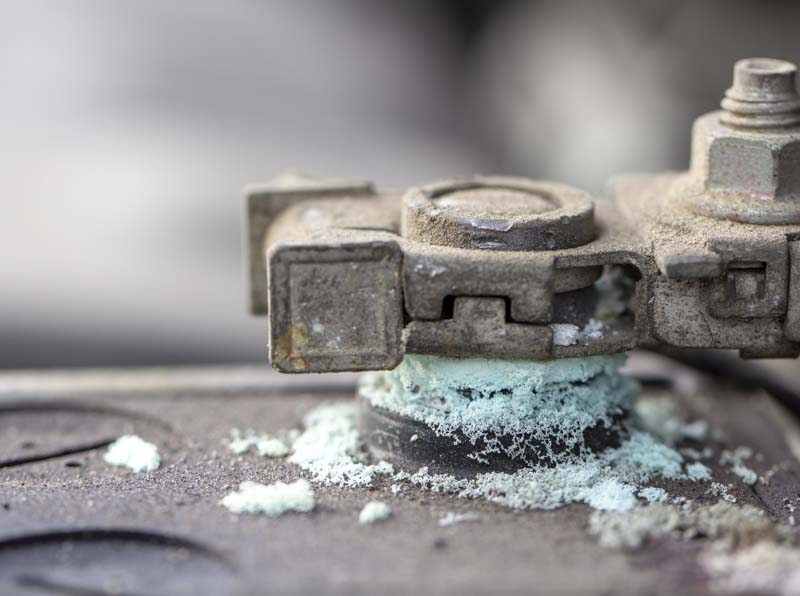
Clean Corroded Battery Terminals Properly
Corrosion on battery or drill contacts blocks power flow. Remove both batteries and inspect for greenish-white gunk or black pitting. Dampen a cotton swab with 90%+ isopropyl alcohol and scrub terminals until shiny. Pro tip: Use a soft-bristle toothbrush for stubborn corrosion—never metal tools that scratch contacts. Reinsert batteries firmly until you hear a solid click. If the drill still won’t start, check for bent terminals preventing full contact.
Bypass Suspected Wiring Breaks
Internal wiring near the battery compartment often frays from repeated insertions. With the battery removed, open the drill’s rear access panel (if model allows). Look for cracked insulation or disconnected wires at the battery terminals. Gently wiggle wires while pressing the trigger—if the motor briefly engages, you’ve found a broken connection. Temporarily secure loose wires with electrical tape to confirm the fix before permanent repair.
Trigger Switch Failure: Why Your Makita Drill Won’t Start

If your Makita drill not working issue shows faint LED lights but no motor response, the trigger switch is likely failing. This component handles 500+ daily trigger pulls and wears out faster than any other part.
Diagnose with a Multimeter in 60 Seconds
Set your multimeter to continuity mode. Disconnect the battery, then detach the two trigger wires from the motor. Press the trigger fully while probing the switch contacts. No beep? The switch is dead. Listen for a faint click when pulling the trigger—if absent, internal contacts are welded shut. For brushless models like the XPH14Z, a failed switch also kills the work light; if the light works but motor doesn’t, the problem shifts to the ESC.
Temporary Trigger Bypass for Emergency Jobs
Need to finish a project now? Carefully short the two trigger wires together with insulated pliers (wear gloves!). If the motor runs, the switch is faulty. Warning: This bypass removes speed control—expect full power immediately. Only use for 30-second bursts to avoid burning out the motor. This confirms the switch needs replacement but isn’t a permanent solution.
Brushless ESC Failures: Diagnose Silent Drills After Heavy Use

Brushless Makita drills (LXT series) often die after drilling steel beams or concrete—a classic Electronic Speed Controller (ESC) failure. Unlike brushed models, these show no warning signs before total shutdown.
Identify ESC Failure by Blinking Light Patterns
Remove the battery and reinsert it slowly. Observe the fuel gauge LEDs:
– 3 rapid blinks then pause: ESC thermal overload (cooling required)
– Solid red light with no motor response: Permanent ESC failure
– Intermittent flickering: Phase wire damage from motor strain
These patterns indicate the ESC tripped safety protocols during overload events. If you drilled metal continuously for 5+ minutes before failure, ESC damage is likely irreversible.
Why ESCs Fail During Heavy Tasks
Brushless ESCs manage precise motor timing. When you jam the drill bit in steel, current spikes fry microscopic transistors on the circuit board. Unlike brushed motors, this component can’t be user-repaired—attempting solder fixes usually destroys it further. Critical note: If you smell burnt plastic near the motor housing, the ESC is beyond saving.
Stripped Gears: Identify Grinding Noises and Broken Components
Your Makita drill not working but still humming? This signals mechanical failure. The motor spins, but power isn’t reaching the chuck—a sure sign of gearbox damage from over-tightening screws or drilling jams.
Locate the “Sacrificial” Clutch Gear Failure
Remove the battery and try turning the chuck by hand. If it spins freely without resistance, the clutch gear is stripped. In most Makita models (like HP457), this small plastic gear sits behind the transmission—designed to shatter before expensive metal gears fail. Visual clue: Open the gear case and look for white plastic shards. Replacement costs $12 and takes 15 minutes with a Torx screwdriver.
Diagnose Stripped Metal Gears by Sound
Engage the drill at low speed while listening closely:
– Metallic grinding: Broken gear teeth (requires full gearbox rebuild)
– Sudden “clunk” then silence: Sheared drive pin (common in hammer drills)
– Whining noise under load: Worn planetary gears (replace entire gear assembly)
For models like the DHP484, stripped gears often follow accidental hammer-mode activation in wood. Always confirm mode selector position before drilling.
Overheating Shutdown: Reset Thermal Protection Fast
Modern Makita drills automatically cut power when internal temperatures exceed 150°F—a safety feature that feels like failure during marathon projects.
Force-Reset Overload Protection in 3 Steps
- Remove the battery immediately and place it in a cool, dry location
- Wait exactly 15 minutes—thermal fuses need full cooldown
- Press and hold the trigger for 10 seconds without battery to discharge capacitors
Reinsert the battery and test. If the drill works normally, overheating caused the shutdown. Never bypass this by cooling with compressed air—moisture intrusion causes short circuits.
Prevent Repeat Shutdowns During Heavy Jobs
When drilling steel or masonry:
– Work in 30-second bursts with 60-second cool-downs
– Never use “high-torque” mode for metal drilling (causes instant overload)
– Store batteries in shade—hot batteries reduce cooling efficiency by 40%
Persistent shutdowns after cooling indicate failed thermal sensors requiring service.
Step-by-Step Troubleshooting: Isolate Problem in Under 10 Minutes
Follow this technician-approved sequence to pinpoint failures without tools:
- Battery Swap Test: Confirm power source in <60 seconds
- Chuck Rotation Check: With battery removed, spin chuck manually
– Stuck? → Mechanical jam (clean chuck)
– Spins freely? → Electrical issue - Trigger Response Test: Pull trigger while listening
– Click but no spin? → Trigger/ESC failure
– Humming noise? → Gearbox jam - Visual Inspection: Smell for burnt odor or check for plastic debris
Critical shortcut: If the work light illuminates when triggering but motor doesn’t run, the problem is always between the trigger and motor—never the battery. Skip straight to switch/ESC diagnosis.
Repair vs. Replacement: When to Fix Your Makita Drill
Don’t waste $80 repairing a $120 drill—use this decision framework:
Cost-Benefit Repair Checklist
| Failure Type | DIY Repair Cost | Professional Cost | Replace If… |
|---|---|---|---|
| Trigger switch | $8 (part) | $25 labor | Drill < $100 value |
| Clutch gear | $12 | $40 | Model discontinued |
| ESC failure | Not possible | $65 | Drill > 3 years old |
| Motor brushes | $5 | $30 | New drill < $150 |
Warranty priority: Makita’s 3-year warranty covers ESC failures from normal use—never pay for diagnostics if under warranty. For older drills, replace stripped gears or triggers yourself using Makita’s free exploded diagrams at ereplacementparts.com. If you smell burnt electronics or see melted components, replacement beats repair every time.
Final Note: When your Makita drill not working crisis hits, 90% of fixes take under 20 minutes using household tools. Start with battery contact cleaning and trigger testing—these solve most “dead drill” emergencies. For brushless models, respect thermal limits during heavy tasks to avoid ESC burnout. If repairs exceed 40% of a new tool’s cost, upgrade to Makita’s latest brushless series with improved thermal management. Keep this guide handy, and your drill will outlast three cheap alternatives. Now grab that screwdriver—your project’s waiting.


