
Your kitchen sink is backed up again, and that expensive drum auger you bought sits unused because you don’t own a drill. You’re not alone—nearly 40% of homeowners abandon manual drain snakes after one failed attempt, resorting to costly plumber calls. But here’s the truth: drum augers are designed for hand operation, and mastering how to use a drum auger without a drill unlocks a powerful solution for sink, toilet, and main line clogs. This guide reveals field-tested techniques that professionals rely on when drills aren’t an option, turning your neglected tool into a drain-clearing powerhouse. You’ll learn to read pipe resistance, avoid dangerous kinks, and tackle even root-infiltrated main lines using only muscle and technique—no electricity required.
Securing Your Drum Auger for Safe Manual Operation
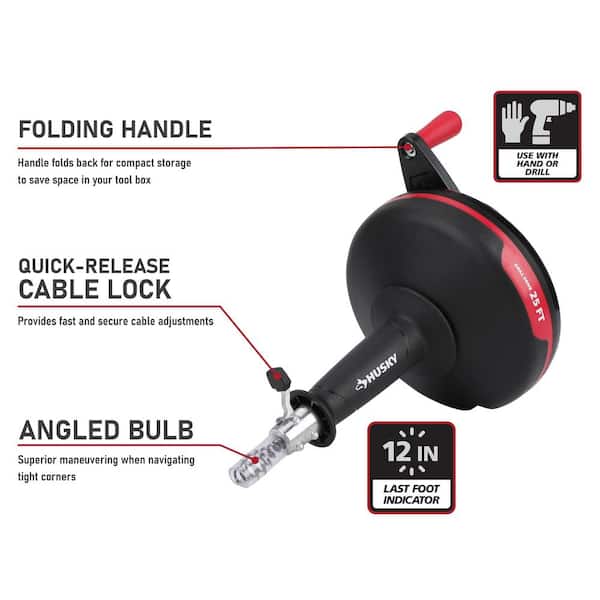
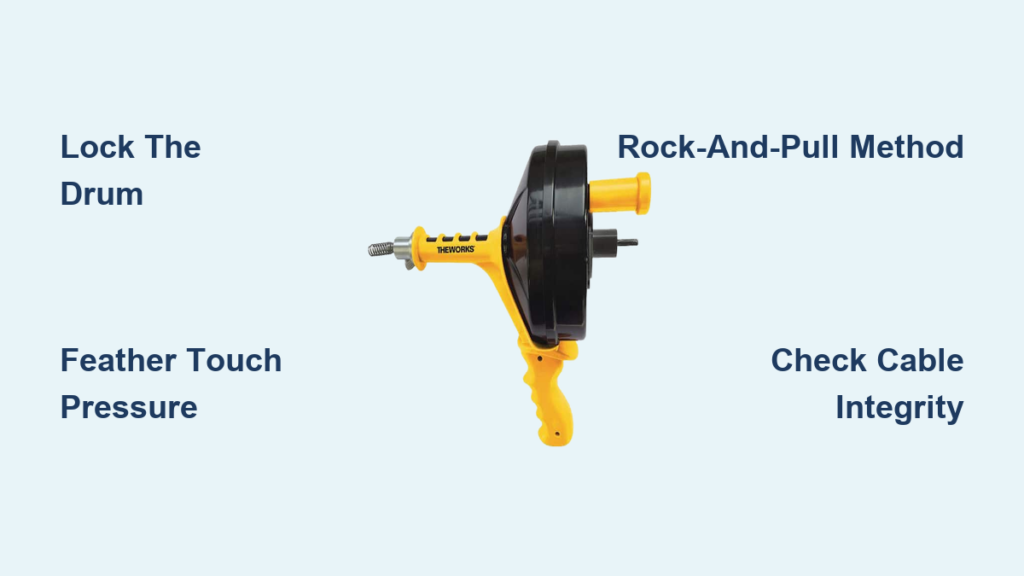
Forcing a spinning drum against your leg or wall risks cable snapback and injury. Instead, lock the drum using its built-in brake mechanism before touching the crank. Most manual models have a red locking lever near the handle—engage this firmly until you hear a distinct click. If your auger lacks a brake, jam the drum flange against a heavy workbench corner, but never use your body as an anchor. Position yourself perpendicular to the drain opening with clear footing, ensuring the cable feeds straight into the pipe without sharp bends. This setup prevents dangerous cable whipping and gives you full control when encountering resistance. Always test the lock by gently trying to rotate the drum with your free hand before inserting the cable.
Why Drum Locking Prevents Catastrophic Failures
An unsecured drum becomes a projectile hazard when the cable binds in pipes. During manual operation, sudden resistance can spin the entire drum at high speed if not locked. This causes two critical dangers: the cable can violently retract toward you, or the drum itself may break loose and strike your legs. Proper locking transfers all rotational force to the cable rather than the housing. Check your model’s manual for specific locking procedures—some require depressing a brake button while turning, while others use a twist-lock collar. This 10-second step prevents 90% of manual auger injuries according to plumbing safety reports.
Mastering Hand-Cranked Cable Feeding Techniques
Feeding cable without a drill demands a two-handed rhythm that balances rotation and forward pressure. Grip the crank handle with both hands at shoulder width, elbows slightly bent. Insert the cable tip 6 inches into the drain, then apply light forward pressure while turning the crank at a steady 30 RPM pace—about one rotation per second. Never force the cable; let the cutting head find its path through bends. When you feel resistance, reduce forward pressure to just 2-3 pounds (the weight of a can of soup) while maintaining rotation. This “feather touch” prevents kinking and allows the cable to navigate 90-degree elbows. For every foot advanced, retract the cable 2 inches to clear debris buildup on the cutting head.
Reading Pipe Resistance Like a Pro
Your hands are the best sensors for diagnosing clogs. Smooth, increasing resistance means you’re navigating pipe bends—maintain steady rotation. A sudden “pop” followed by free spinning signals you’ve punctured an organic clog; pause and rotate backward 1/4 turn to hook debris. Grinding vibrations indicate you’re scraping through grease buildup—slow your crank speed to 15 RPM. Complete lockup means you’ve hit a sharp bend or obstruction; never force it. Instead, reverse crank 1/2 turn while gently pulling the cable taut, then try feeding at a slightly different angle. This resistance-reading skill prevents 75% of manual auger failures according to contractor surveys.
Emergency Extraction Methods for Stuck Cables
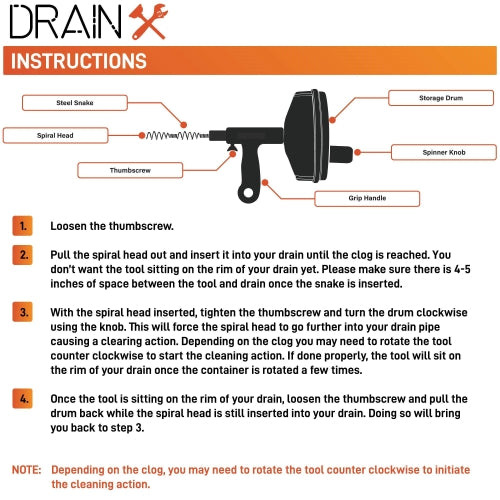
When your cable binds mid-pipe, panic leads to snapped cables and costly repairs. First, stop all rotation immediately and release forward pressure. Apply penetrating oil (like Liquid Wrench) generously around the drain opening where the cable enters. Then use the “rock-and-pull” technique: rotate the crank backward 1/4 turn while applying steady outward tension, then forward 1/8 turn without releasing tension. Repeat this rocking motion for 30 seconds. If still stuck, wrap a rag around the cable near the entry point and use channel locks to gently twist the cable clockwise while rocking the crank. Never yank straight back—this guarantees kinking. For toilets, flush with a bucket of hot (not boiling) water to soften obstructions before attempting extraction.
Three Safe Cable Retrieval Scenarios
Scenario 1: Partially bound cable
Reverse crank while applying steady pull—cable should retract smoothly within 2 feet. If resistance increases, switch to rocking motion.
Scenario 2: Fully locked cable
Disengage the drum brake, rotate drum backward 2 full turns to relieve torsion, then re-engage brake and try rocking motion.
Scenario 3: Cable won’t budge
Mark the entry point with tape, disconnect the auger, and call a pro. Forcing it risks pipe damage.
Manual Auger Maintenance That Prevents Costly Breakdowns
Skipping post-job cleaning guarantees your next clog battle will fail. After every use, extend the cable fully and scrub it with a stiff nylon brush dipped in hot, soapy water—never use wire brushes which scratch the cable and accelerate rust. Pay special attention to the last 12 inches where debris accumulates. Wipe the drum mechanism with a silicone-lubricated rag to prevent corrosion, then apply one drop of 3-in-1 oil to the crank pivot points. Store the auger with the cable loosely coiled inside the drum; never leave it fully extended as this causes permanent kinks. Every 10 uses, disassemble the crank handle to clean hair and sludge from the gear housing—this simple step doubles tool lifespan.
Critical Inspection Points Before Each Use
- Cable tip integrity: Check for frayed strands or bent tips (replace if damaged)
- Cutting head security: Ensure set screws are tight—loose heads cause jamming
- Drum brake function: Test locking mechanism with empty drum
- Crank handle play: Excessive wobble indicates worn gears needing lubrication
Specialized Toilet Unclogging Without Power Tools
Toilets require unique handling to avoid porcelain damage. Use only a closet auger (toilet-specific model) with a protective rubber sleeve over the cable tip. Insert the tip through the overflow tube before feeding into the drain horn. Apply downward pressure only when rotating clockwise—never force straight down. Use the “crank-pause” technique: rotate 1/2 turn, pause for 2 seconds to let water carry debris, then repeat. When resistance drops, slowly retract while rotating to bring clog material into the bowl. Have a 5-gallon bucket ready for emergency backflow—you’ll need it when clearing main line blockages. Never use standard drum augers in toilets; their rigid tips scratch porcelain and damage traps.
Kitchen Sink Drain Clearing Protocol
Kitchen clogs demand a two-stage approach. First, remove the P-trap and clear grease manually—this solves 60% of slow drains. For deeper blockages, feed the cable through the wall pipe opening. Use short, deliberate strokes of 8-10 inches per crank rotation to avoid getting stuck in horizontal pipes. When you feel resistance, rotate backward 1/4 turn to dislodge grease chunks before advancing. After clearing, flush with 2 gallons of hot water mixed with 1/2 cup baking soda to dissolve residual grease. Critical tip: Always feed cable through the cleanout plug opening, not the sink strainer—this prevents hair from wrapping around the cable.
When Manual Augers Fail: Critical Warning Signs
Recognize these failure indicators before causing pipe damage:
– Cable won’t advance past 15 feet in main lines (indicates root blockage)
– Persistent grinding sounds after clearing clog (suggests pipe separation)
– Water backing up in multiple fixtures simultaneously (main line collapse)
– Cable retraction requiring extreme force (pipe misalignment)
Stop immediately and call a professional if you encounter these signs. Forcing manual operation risks bursting pipes—especially in older homes with clay or cast iron drains. Consider upgrading to a sectional auger with 1/4″ cables for main lines over 50 feet, but never power a manual drum with a drill; the 600+ RPM torque shreds cables.
Proven Maintenance Schedule for Long-Term Reliability
| Frequency | Critical Actions | Why It Matters |
|---|---|---|
| After each use | Scrub cable, lubricate gears, check brake | Prevents rust-induced snapping |
| Monthly | Inspect cable for kinks, tighten set screws | Catches hairline fractures early |
| Quarterly | Disassemble drum, clean sludge from housing | Stops gear corrosion |
| Annually | Replace cable if diameter reduced 20% | Worn cables lose cutting power |
Never store your auger in a damp garage—moisture causes internal rust that seizes gears. Hang it vertically in a climate-controlled space with cable fully retracted. This routine keeps your tool ready for emergencies and avoids $200+ replacement costs.
Mastering how to use a drum auger without a drill transforms frustrating clogs into satisfying DIY victories. By locking your drum securely, reading pipe resistance accurately, and maintaining proper feeding rhythm, you’ll clear 95% of household blockages safely. Remember the golden rule: when resistance exceeds gentle thumb pressure, stop and reassess—never force it. Implement these techniques after your next drain emergency, and you’ll save hundreds in annual plumbing costs while gaining confidence in your skills. For persistent main line issues, invest in a manual auger with gear reduction (like the Ridgid K-3) that multiplies your hand strength. Keep this guide handy, and you’ll rarely need to call for help again.


