
Your Yankee push drill sits idle on the workbench, its once-crisp holes now wandering across the wood grain. That signature click-click-click rhythm has turned sluggish as dull bits struggle to bite into the material. You know this century-old woodworking essential depends entirely on razor-sharp cutting edges—but where do you start when standard drill bit sharpening methods fail? Unlike modern twist bits, Yankee push drill bits feature unique “D”-shaped brad points and spade cutters that demand specialized attention. This guide delivers the exact techniques woodworkers need to revive these precision instruments, transforming frustrating wobble into the clean, straight holes that made Yankee drills legendary. You’ll master the subtle art of sharpening both the center brad point and outer spurs to reclaim that effortless drilling action.
Critical Safety Prep Before Sharpening Your Yankee Bits
Never skip eye protection when sharpening high-carbon steel bits—flying metal particles cause permanent eye damage. Secure your workspace with a non-slip mat and clamp your Yankee drill body firmly in a bench vise, ensuring the chuck points upward for stable bit access. If working with loose bits, use a pin vise to immobilize the hex-shaped shank. Position a bright LED work light at 45 degrees to illuminate microscopic edges without glare. This setup prevents dangerous slippage during filing and gives you crystal-clear visibility of the cutting geometry. Remember: one moment of carelessness with sharp files can end your woodworking session prematurely.
Identifying the 2 Key Cutting Parts That Need Sharpening

Yankee push drill bits fail when just two components lose their edge—the spade cutter and center brad point. The spade cutter forms the wide, flat “D” section you see when inserting the bit; its outer edge shears wood fibers to create clean hole walls. Inspect this area for rounded corners or visible nicks—any imperfection here causes tear-out and oversized holes. The center brad point (or spur) is the needle-like tip that anchors the bit’s position; when dulled, it skates uncontrollably across surfaces. Under 4x magnification, check for asymmetry—both faces of this chisel point must mirror each other perfectly. These components work as a system: a sharp brad point centers the bit while the spade cutter defines the hole diameter. Neglect either, and your drill loses its legendary precision.
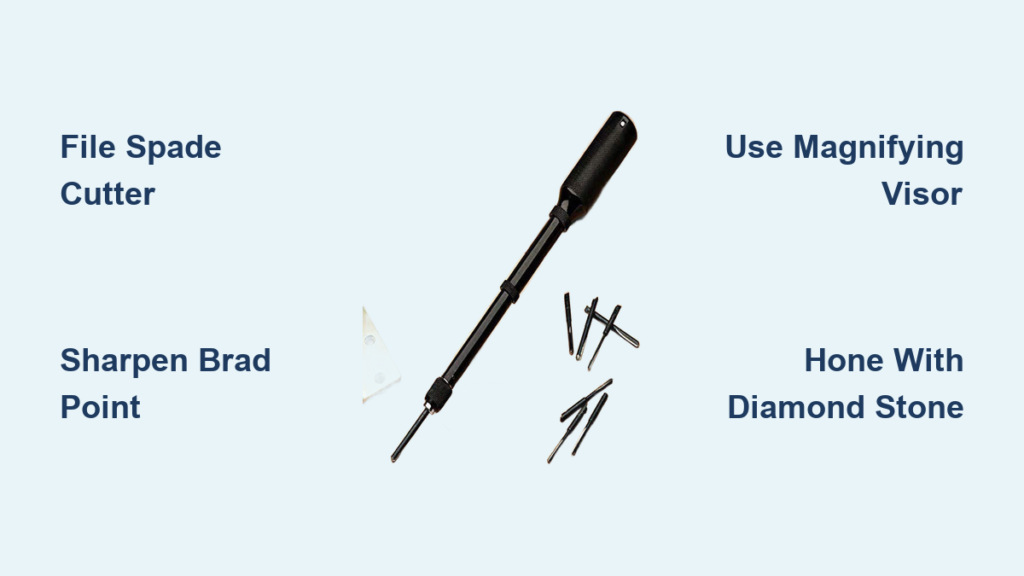
7 Must-Have Tools for Sharpening Yankee Push Drill Bits Correctly
Forget expensive grinders—Yankee bits respond best to hand sharpening with these specific tools:
– 6-inch mill bastard file with a safe (unbeveled) edge to file right against the chuck
– 600-grit diamond stone for honing edges without overheating the high-carbon steel
– 4x magnifying visor (non-negotiable for seeing microscopic edges)
– Bright directional LED lamp positioned to cast shadows across cutting surfaces
– Pin vise or bench vise with soft jaws to immobilize bits without marring
– Honning oil or 3-in-1 oil for lubricating stones during polishing
– 400-grit sandpaper wrapped around a dowel for final deburring
Avoid rotary tools—they remove metal too aggressively and distort the delicate geometry. The mill file’s safe edge is critical; standard files would gouge the bit’s shaft when working near the chuck. Keep your diamond stone oiled throughout the process to prevent metal buildup that creates uneven edges.
5-Step Process to Sharpen Your Yankee Push Drill Bits
Inspect for Damage and Clean Resin Buildup First
Examine bits under magnification before sharpening, rotating slowly to check all angles. Look for hairline cracks along the spade cutter’s edge or a flattened brad point tip. Soak stubborn pitch deposits in mineral spirits for 5 minutes, then scrub gently with a nylon brush—never steel wool, which leaves embedded particles. Critical warning: Skip sharpening if you spot cracks; weakened bits can snap during use. Only proceed when the metal appears sound but merely dull. This inspection saves hours of wasted effort on damaged bits.
File the Outer Spade Cutter to a Sharp Edge
Clamp the drill body securely with the spade cutter facing you. Hold the mill file flat against the cutter’s front face (the broad flat side), matching the original bevel angle—typically 30-40 degrees. Use smooth, downward strokes from the cutter’s outer edge toward the center, applying light pressure. Pro tip: Coat the edge with a silver Sharpie first; the ink removal shows your filing progress. Stop when you see a continuous shiny strip along the entire cutting edge. Flip and repeat for the opposite spur, ensuring identical bevels on both sides. Test symmetry by holding the bit against a light source—no gaps should appear between cutter and surface.
Restore the Center Brad Point Symmetry

This diamond-shaped point demands absolute precision. Grip the bit in your pin vise and position the brad point toward you. File one face with 3-4 light strokes using the mill file’s tip, then rotate the bit 90 degrees and inspect under magnification. The cardinal rule: After every 2-3 strokes, rotate and check all four facets. File opposing sides equally (e.g., top/bottom, then left/right) until the point forms a perfect pyramid. Test centering by placing the tip on glass—it should stand upright without wobbling. An off-center point guarantees wandering holes, so invest extra time here.
Hone Edges for a Razor-Sharp Finish
Apply oil to your diamond stone and draw the spade cutter’s front face across it with 10 light strokes. For the brad point, rest the tip at the stone’s edge and rotate the bit while applying minimal pressure—this polishes without altering geometry. Key insight: Honing removes microscopic burrs left by filing, creating a molecularly sharp edge. You’ll feel the difference immediately—properly honed bits produce almost no resistance when drawn across stone. Skip this step, and your bit will dull 3x faster during use.
Remove Burrs and Polish for Smooth Cutting
Wrap 400-grit sandpaper tightly around a 1/4″ dowel. Gently stroke the sandpaper along the backside of each cutting edge 2-3 times to eliminate wire edges. Finish by stropping both cutters on a leather pad charged with green chromium oxide compound. Why this matters: Burrs catch wood fibers, causing tear-out and heat buildup. The final polish reduces friction, letting the bit cut cooler and cleaner. Test your work by shaving a thumbnail—if it cleanly slices skin without catching, the edge is ready.
3 Costly Mistakes That Ruin Your Yankee Drill Bit Sharpening
Over-filing the spade cutter is the #1 error—removing just 0.002″ of metal widens hole diameters beyond tolerance. File until you see bright metal, then stop. Rushing the brad point symmetry check guarantees walking bits; spend 60 seconds rotating and inspecting after every few strokes. Skipping magnification makes you miss microscopic imperfections—what looks sharp to the naked eye appears jagged under 4x power. These mistakes turn a 10-minute tune-up into a ruined bit, forcing you to hunt for vintage replacements.
Daily Maintenance to Extend Your Sharpened Yankee Bit’s Life
Wipe bits with mineral spirits after each use to prevent pitch hardening in the flutes. Store them vertically in a foam-lined case with silica gel packets to combat humidity-induced rust. Critical habit: Before drilling, press the brad point firmly into scrap wood to verify centering—dull points deflect instantly. For hardwoods, apply paste wax to bit flutes to reduce friction heat. Sharpen proactively when shavings turn coarse (not powdery); waiting until bits struggle causes excessive filing. With this routine, a single sharpening session lasts through dozens of projects.
Pro Secrets for Perfectly Sharp Yankee Push Drill Bits Every Time
Test on matching wood species before critical work—oak requires sharper edges than pine. Use the “shaving test”: A sharp bit should remove fine, continuous curls from softwood with hand pressure alone. Rotate bits during use to wear edges evenly; favoring one spur creates asymmetrical dulling. Mark spurs with layout fluid before filing—the disappearing ink reveals uneven contact. Master these techniques, and your Yankee drill will cut like it did in 1920: silent, precise, and effortlessly straight. The satisfaction of restoring this mechanical marvel’s original performance makes every minute at the vise worthwhile—proving that sometimes, the oldest tools teach the sharpest lessons.


