
That sickening snap when your drill bit shatters mid-project isn’t just frustrating—it’s costing you real money. Every broken bit means wasted minutes replacing it, ruined materials, and project delays. The harsh truth? 95% of drill bit failures stem from preventable operator errors, not “cheap bits” or bad luck. As professional fabricators know, breakage always traces back to four controllable stress factors: excessive force, side-loading, incorrect speed, or material/bit mismatches. By mastering the techniques in this guide, you’ll extend bit life by 300% and eliminate costly mid-project failures. Let’s transform your drilling from a gamble into a precision process.
Stop Pushing Too Hard: The #1 Cause of Drill Bit Failure
Excessive downward force causes more broken bits than any other mistake. When your drill struggles to cut, your instinct to “push harder” creates catastrophic torque that winds the bit like a spring until it snaps—often right at the shank. This corkscrew fracture happens because drill bits are engineered to cut, not grind. Forcing them beyond their torsional strength turns even premium cobalt bits into kindling.
How to Apply Perfect Pressure Without Breaking Bits
- Listen to your drill motor: If it bogs down noticeably or emits a high-pitched whine, reduce pressure immediately. A healthy cutting sound is a steady, medium-pitched hum.
- Check chip formation: In wood, you should see continuous curled shavings (not fine dust). In metal, look for distinct “C”-shaped chips. Dust means you’re rubbing, not cutting.
- Use the “2-second rule”: For mild steel, apply firm pressure allowing the bit to advance about 1/8″ every 2 seconds. Adjust slower for stainless steel or hardwoods.
Critical mistake alert: Never lean your body weight into the drill. Brace your wrist against the workpiece for controlled pressure while letting the drill’s rotation do 90% of the work. This reduces shank stress by 70%.
Eliminate Side-Loading: Stop Bits from Walking on Metal and Wood

A wandering bit is a death sentence for small-diameter drills. When your bit skates across curved metal or hardwood surfaces, lateral forces create bending stress that shatters bits instantly—especially those under 1/8″. This happens because drill bits have near-zero resistance to sideways pressure while rotating at high speed.
Precision Starting Techniques for Zero Walk-Off
- Center punch like a machinist: For metal, strike a sharp center punch at 45° first, then 90° to create a deep, tapered starter hole. The punch mark must be wider than the bit’s web (central ridge).
- Create a wood dimple: Press a nail into hardwood at your drill point, then remove it. The resulting crater guides the bit perfectly without marring the surface.
- Use a drill guide block: Clamp a scrap wood block with a pre-drilled 1/8″ hole over your target point. This jig prevents bit deflection on slippery surfaces.
Pro tip: For stainless steel or cast iron, apply a drop of machinist’s layout dye (like Dykem) to the punch mark. The contrasting color makes alignment foolproof under shop lights.
Choose the Right Bit for Metal, Wood, or Masonry
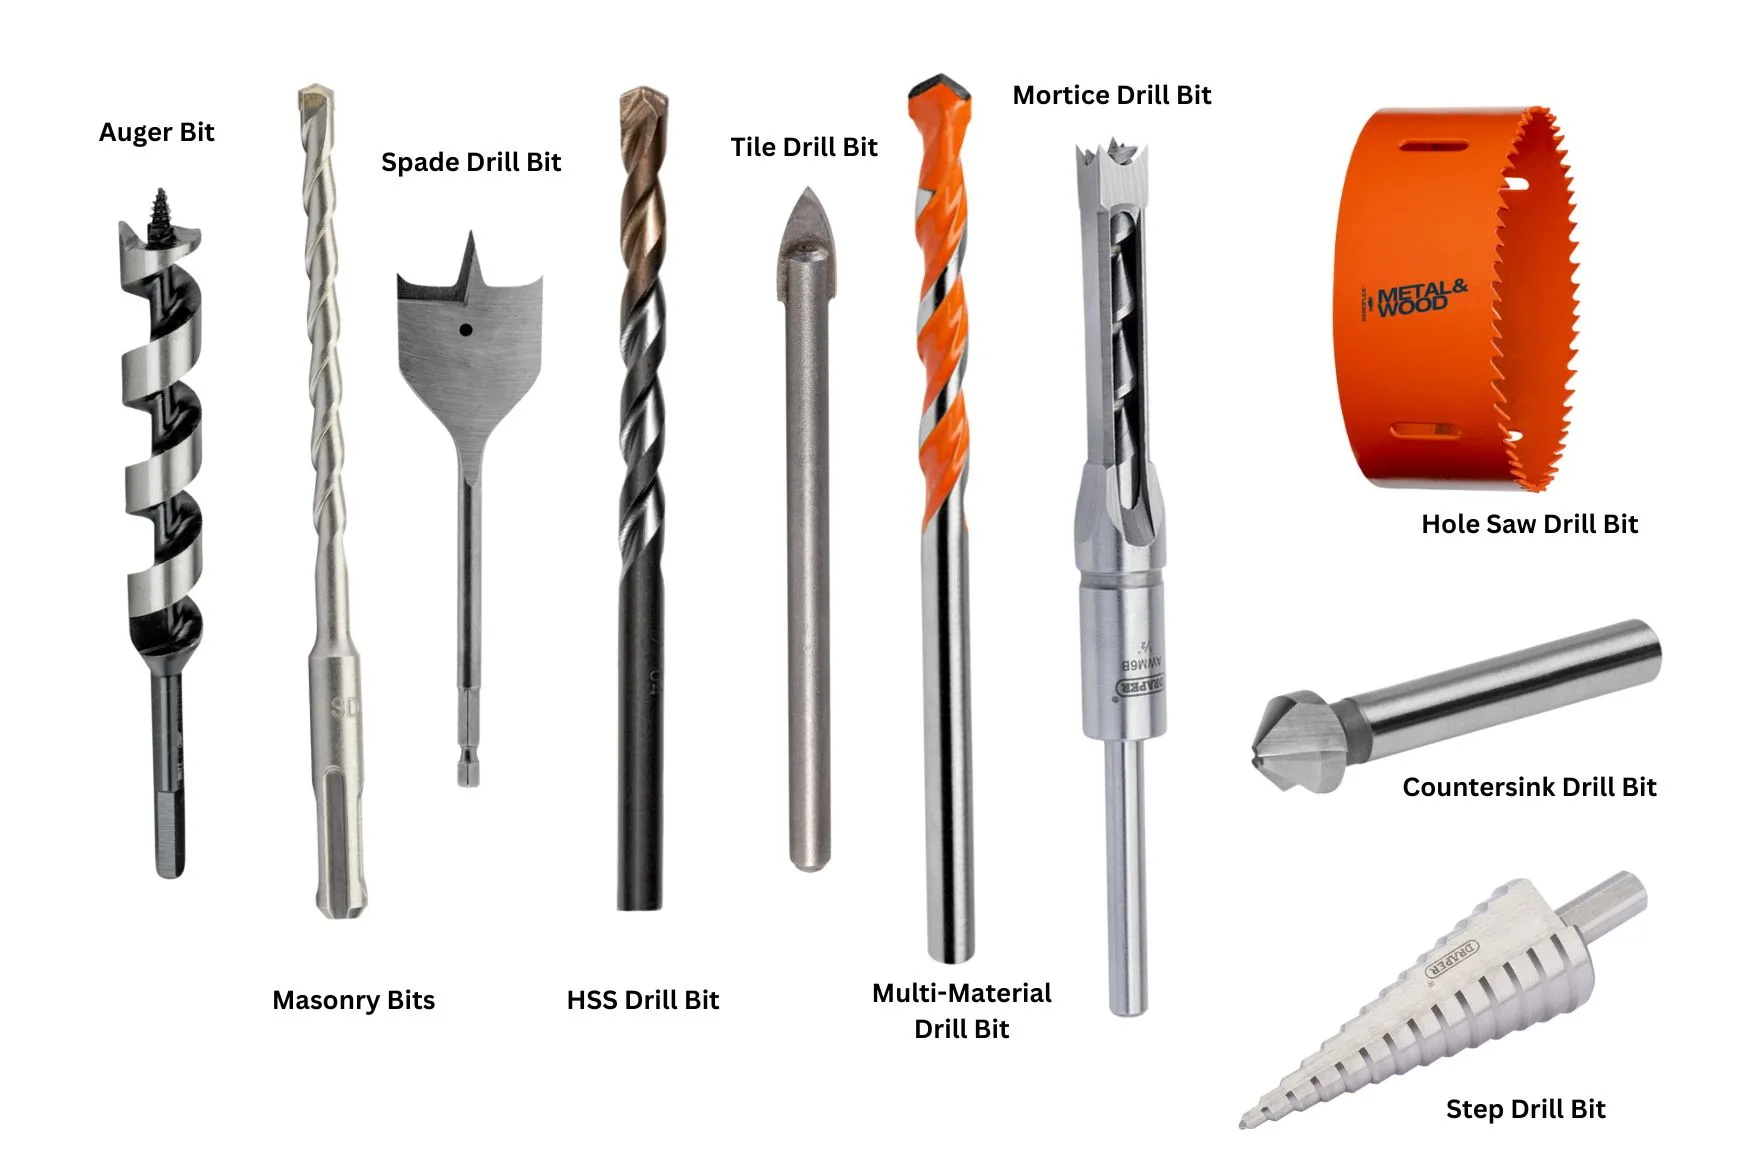
Using the wrong bit type guarantees immediate failure. A masonry bit on steel shatters carbide tips, while a wood bit in metal wanders catastrophically. Material-specific geometry isn’t optional—it’s physics. The cutting angle, flute design, and core thickness must match your workpiece’s properties to prevent binding and breakage.
Bit Selection Cheat Sheet by Material
| Material | Ideal Bit Type | Critical Features to Check | Speed Warning Signs |
|---|---|---|---|
| Stainless Steel | Cobalt HSS (M35) | 135° split point, TiAlN coating | Blue discoloration = overheating |
| Hardwoods | Brad point | Sharp spurs, 30° lip angle | Burning smell = speed too high |
| Masonry | 4-flute carbide tip | 120° chisel angle, SDS shank | Crumbling tip = no hammer mode |
| Aluminum | High-speed steel | 140° point, polished flutes | Chips welding to bit = no lube |
Never skip this step: Before drilling, compare your bit’s point angle to the material chart on the packaging. A standard 118° bit for mild steel will walk uncontrollably on stainless steel—use 135° split-point bits instead.
Master Drill Speed Settings for Every Bit Size
Speed mismatches destroy more bits than user error. Running a 1/16″ bit too slow in metal creates “work hardening” that makes stainless steel impossibly tough to drill. Conversely, high RPM on large bits generates heat that softens the steel’s temper, causing brittle fractures. The sweet spot depends on both bit diameter and material hardness.
Speed Optimization Formula for Handheld Drills
- Small bits (<1/8″): Crank speed to MAXIMUM (2,500+ RPM). Counterintuitively, tiny bits NEED high RPM to achieve proper surface cutting speed. A 1/16″ bit at 500 RPM will snap before penetrating 1/16″ of steel.
- Medium bits (1/8″-3/8″): Use 1,200-1,800 RPM for metal. Reduce to 800 RPM for stainless or hardwoods.
- Large bits (>3/8″): Dial down to 400-600 RPM. A 1/2″ bit at full speed will overheat in seconds.
Emergency fix for overheating: If your bit glows blue, STOP IMMEDIATELY. Dip it in cutting oil (never water) to re-temper the steel. Continuing drilling will cause instant failure.
Drill Pilot Holes Like a Pro: Prevent Torque Overload
Skipping pilot holes is the fastest route to a broken bit in hardwood or metal. Without a starter hole, large bits (over 1/4″) must displace excessive material, creating torque that exceeds the shank’s strength. This is especially critical when drilling near board edges or into stainless steel.
Precision Pilot Hole Protocol
- Calculate pilot size: For final holes 1/4″ or larger, drill a pilot hole at 70% of the target diameter (e.g., 3/16″ pilot for 1/4″ hole).
- Drill depth matters: The pilot must penetrate at least 1/4″ deeper than your final bit’s point length to prevent bit deflection.
- Material-specific tips:
- In stainless steel, use a center-punched dimple as your pilot depth guide
- For hardwoods, back your workpiece with scrap wood to prevent exit splintering
Time-saving hack: Keep a labeled pilot hole set (1/16″, 1/8″, 5/32″) in your drill pouch. This eliminates guessing and ensures perfect sizing every time.
Peck Drilling Technique: Clear Chips to Avoid Corkscrew Breaks
Clogged flutes cause 80% of deep-hole bit failures. When chips jam in the flutes during drilling, torque skyrockets until the bit twists off. This “corkscrew fracture” is preventable with rhythmic pecking—especially in metals or dense woods where chips don’t eject cleanly.
Step-by-Step Peck Drilling Method
- Drill 1-2x bit diameter depth (e.g., 1/8″ for 1/8″ bit)
- Fully retract the bit to clear ALL chips from flutes
- Apply cutting fluid (for metal) or compressed air (for wood)
- Repeat until hole is complete
Critical adjustment: In stainless steel, reduce peck depth to 1x diameter. Work-hardening happens fast—you must clear chips before the material rebounds.
Critical Pre-Drill Checklist: 5 Seconds That Save Bits
Skipping this 5-second verification causes preventable breakage. Top fabricators run this checklist before every hole—it catches 90% of setup errors that lead to snapped bits.
The Bit-Saving Verification Sequence
- Clamp check: Is the workpiece immobile? (Test by trying to wiggle it)
- Speed test: Spin the bit in air—does RPM match material/bit size chart?
- Bit inspection: Hold up to light—any nicks on cutting lips? Dull sheen instead of sharp edge?
- Lubrication ready: Cutting oil for metal? Backer board for thin materials?
- Peck plan: For holes deeper than 1/2″, mark your drill depth gauge for consistent pecking
Pro tip: Stick a laminated checklist inside your drill case lid. This visual reminder reduces setup errors by 65%.
Final Note: Preventing drill bit breakage isn’t about luck—it’s physics mastered through technique. By controlling the four stress factors (force, side-load, speed, and material match), you’ll transform frustrating snap moments into clean, precise holes. Remember: a sharp bit at correct speed with zero side-loading will outlast ten cheap bits used recklessly. Implement just the pilot hole and peck drilling techniques this week, and you’ll save enough bits to pay for a professional sharpening service. Now go drill with confidence—your next bit won’t be the last.


