
That moment when a screw head strips or a bolt shears off flush with the surface is one of the most frustrating experiences in DIY repairs and automotive work. When standard tools fail, a broken fastener can derail your entire project. The good news is you don’t need specialized machining skills to solve this problem—just the right technique and a screw extractor drill bit. This essential tool is designed specifically for removing damaged, stripped, or broken fasteners that seem impossible to grip. By following these proven methods, you’ll transform from frustrated amateur to confident problem-solver who can rescue even the most stubborn broken bolts.
When conventional extraction methods fail, a screw extractor drill bit becomes your secret weapon. Unlike regular drill bits, these specialized tools work by biting into damaged fasteners and reversing them out through precise counter-clockwise rotation. Understanding how to properly use this tool—without breaking the brittle extractor itself—will save you countless hours and prevent costly trips to professional machinists. This guide walks you through every critical step, from initial preparation to successful removal, ensuring you can tackle this common but daunting challenge with confidence.
How Screw Extractor Drill Bits Actually Work
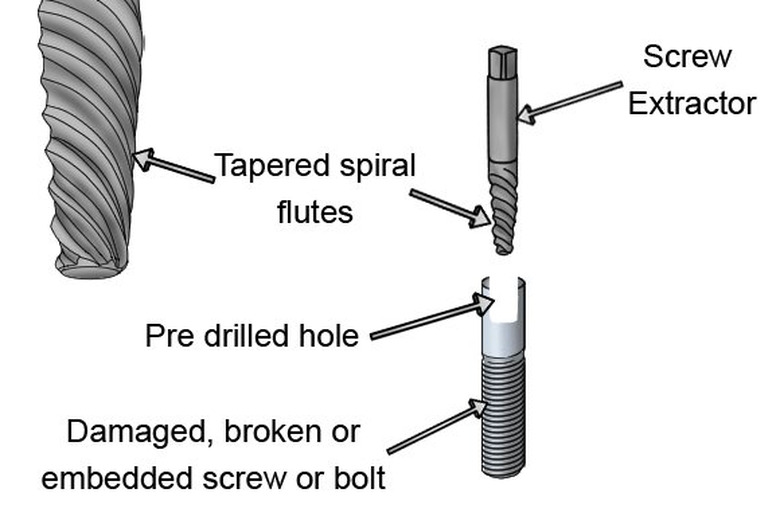
Screw extractor drill bits function through a clever combination of left-handed threading and hardened steel construction. Unlike standard drill bits that rotate clockwise to drill into materials, these specialized tools feature reverse-fluted, tapered designs that bite into broken fasteners when turned counter-clockwise. The extreme hardness of the extractor (typically made from heat-treated steel) allows it to cut into other metals, while its left-handed threads create increasing grip as you apply torque.
The Physics Behind Successful Extraction
When you insert a screw extractor into a properly drilled pilot hole and turn it counter-clockwise, the tapered design forces the extractor’s flutes deeper into the metal of the broken fastener. This creates a mechanical interference fit that grips the damaged screw or bolt with tremendous force. As you continue turning, the extractor essentially “wedges” itself into the fastener, transferring your rotational force directly to the broken piece. The key to success lies in creating the perfect pilot hole—too small and the extractor won’t seat properly; too large and it won’t grip effectively.
Why Extractors Break (And How to Prevent It)
Despite their effectiveness, screw extractors are notoriously brittle due to their hardened steel composition. The most common cause of broken extractors is applying excessive downward pressure while turning. Remember: extractors are designed to cut through metal with rotational force, not brute strength. If you feel significant resistance, stop immediately—forcing it will likely snap the extractor inside your already-stubborn fastener, creating a much more difficult problem to solve.
Essential Tools for Successful Screw Extraction

Before attempting to use your screw extractor drill bit, gather these critical components to ensure success on your first attempt. Skipping any of these items dramatically increases your chances of failure or creating a more complex problem.
Must-Have Extraction Toolkit
- Penetrating oil (Aerokroil, PB Blaster, or 50/50 acetone/transmission fluid mix)
- Center punch and ball-peen hammer for precise hole starting
- Cobalt or carbide drill bits capable of cutting hardened steel
- Variable-speed drill with reliable reverse function
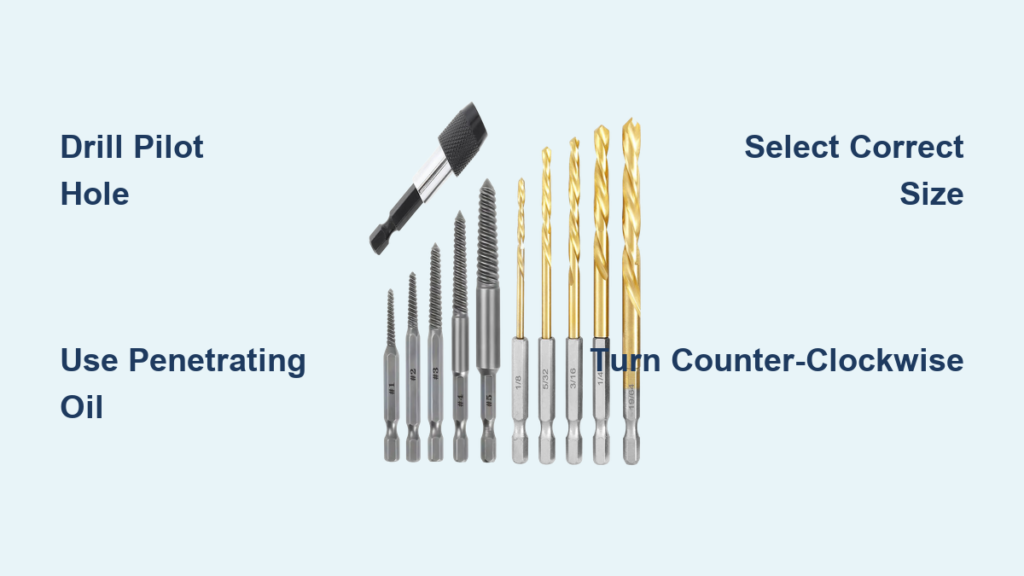
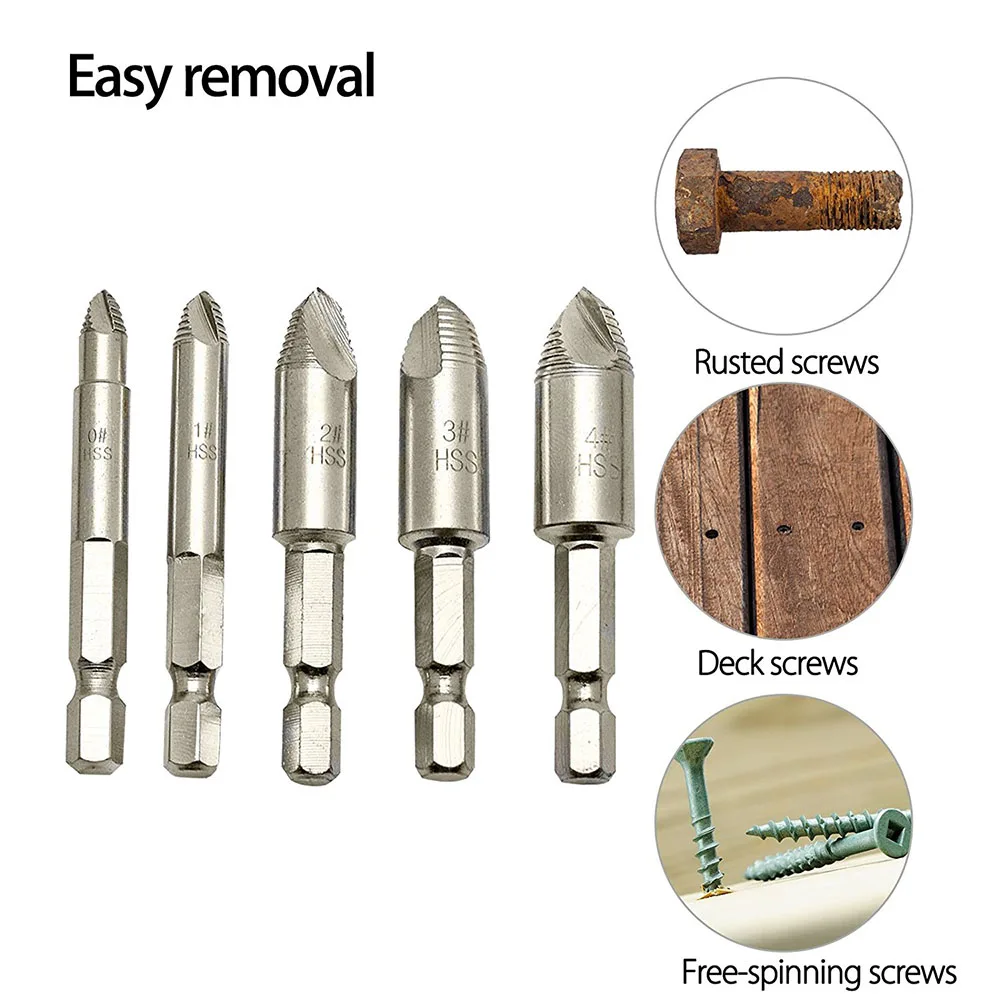
- Properly sized screw extractor set matching your fastener dimensions
- T-handle tap wrench for controlled manual extraction
- Safety glasses and impact-resistant gloves (non-negotiable protection)
Why Your Drill Choice Matters
While cordless drills offer convenience, a corded variable-speed drill provides more consistent torque for extraction work. Look for models with a clutch mechanism that prevents sudden torque spikes. If using a cordless model, ensure it’s fully charged—nothing derails extraction like a dying battery at the critical moment. For maximum precision, consider using a drill press or magnetic drilling guide to maintain perfect perpendicular alignment with the broken fastener.
Step-by-Step: Drilling the Perfect Pilot Hole
This initial step determines 90% of your extraction success. A poorly drilled pilot hole will cause the extractor to slip, potentially damaging both the tool and your workpiece.
How to Create the Ideal Starting Point
- Apply penetrating oil generously around the broken fastener and let it soak for at least 15 minutes (overnight for severely rusted parts)
- Use a center punch to create a deep, precise indentation in the exact center of the broken fastener
- Start with a center drill bit to create a small guide hole before switching to your main drill bit
- Drill slowly with light pressure using a bit approximately half the diameter of the fastener
- Maintain perfect perpendicular alignment—any angle will compromise extraction
Critical Tip: The pilot hole must be deep enough for the extractor to gain proper purchase—typically 2-3 times the diameter of the extractor. For a 1/4″ extractor, drill at least 1/2″ deep into the broken fastener.
Inserting and Engaging Your Screw Extractor
Now that your pilot hole is perfectly drilled, it’s time to deploy the extractor itself. This stage requires careful technique to avoid breaking the brittle tool.
Proper Extractor Installation Sequence
- Select the correct size extractor—it should fit snugly in your pilot hole with slight resistance
- Tap the extractor firmly into the hole using a hammer (not excessive force)
- Attach your T-handle wrench or set your drill to LOW reverse speed
- Apply steady counter-clockwise pressure while maintaining light downward force
- Increase torque gradually as the extractor bites into the fastener
Visual Cues for Successful Engagement
Watch for these indicators that your extractor is working properly:
– A distinct “bump” sensation as the flutes first engage the metal
– Increasing resistance as the extractor cuts deeper into the fastener
– Visible rotation of the broken fastener (if partially exposed)
– Decreasing resistance once the fastener breaks free
If you hear a grinding sound or feel the extractor slipping, stop immediately—this indicates improper sizing or an off-center hole.
Troubleshooting Stubborn Fasteners
Even with perfect technique, some broken fasteners refuse to budge. Knowing how to diagnose and address these situations prevents costly mistakes.
When Your Extractor Won’t Grip
Problem: The extractor spins freely in the pilot hole without turning the fastener
Solution: Remove the extractor and drill the hole slightly deeper, then try the next size up in your extractor set. Ensure you’re applying firm rotational force while maintaining light downward pressure.
When Penetration Oil Isn’t Enough
Problem: Severely rusted or corroded fasteners that won’t budge
Solution: Apply penetrating oil every 2 hours for 24-72 hours before attempting extraction. For extreme cases, carefully apply heat to the surrounding material (not the fastener itself) using a propane torch to break the rust bond.
Alternative Methods When Extraction Fails
If your screw extractor drill bit approach doesn’t work, don’t panic—several backup strategies can still save your project.
Left-Handed Drill Bit Technique
Special reverse-threaded drill bits can sometimes extract fasteners while drilling. Start with a small bit and gradually increase size, applying steady reverse pressure. The left-handed rotation may catch the broken fastener and spin it out during the drilling process.
Damaged Fastener Socket Method
For fasteners with partially exposed heads, specialized sockets like the Irwin Bolt-Grip can bite into rounded or stripped surfaces. These sockets feature aggressive internal teeth that grip damaged fasteners, allowing you to turn them out with standard wrenches.
Preventing Future Broken Fastener Nightmares
The best extraction is the one you never have to perform. Implement these preventive measures to avoid future headaches.
Proactive Fastener Maintenance
- Apply anti-seize compound to new fasteners before installation
- Never overtighten critical bolts—use a torque wrench for precision
- Replace corroded fasteners during routine maintenance rather than waiting for failure
- Use high-quality, hardened fasteners in critical applications
When to Call It Quits
If after multiple attempts the fastener remains stubbornly in place, consider drilling it out completely and installing a thread repair insert like a Helicoil. Continuing to force extraction often damages the parent material, creating a much more expensive repair scenario.
Final Tips for Screw Extraction Success
Mastering the art of screw extraction comes down to patience, preparation, and proper technique. Always start with the smallest possible solution—penetrating oil and manual extraction—before moving to more aggressive methods. Remember that the most successful extractions happen when you take your time preparing the pilot hole perfectly and select the exact right size extractor for the job. Keep your tools sharp, your movements controlled, and your expectations realistic—some fasteners simply won’t come out without drilling. By following these guidelines, you’ll transform from frustrated DIYer to confident problem-solver who can rescue even the most seemingly impossible broken fastener situations. The next time you face a stripped screw or sheared bolt, you’ll know exactly how to use your screw extractor drill bit to get the job done right.


