

That sinking feeling when your drill bit slips mid-project—ruining your workpiece, damaging your bit, or worse, causing dangerous kickback—is completely avoidable. A loose drill bit isn’t just frustrating; it’s the top cause of inaccurate holes, tool damage, and preventable accidents during DIY projects. Whether you’re hanging shelves or building furniture, knowing how to tighten drill bit securely is non-negotiable for precision and safety. This guide cuts through the confusion with foolproof methods for every chuck type, plus critical troubleshooting for stubborn bits that refuse to stay put.
Most DIYers underestimate how much a wobbling bit compromises their work. When the shank isn’t gripped firmly, torque transfers unevenly, creating oval-shaped holes and overheating your drill motor. By mastering the techniques in this guide, you’ll achieve rock-solid bit security in under 60 seconds—no matter if you’re using a cordless drill from the hardware store or a decades-old workshop model. Let’s get your bits locked in tight and keep your projects on track.
Essential Safety Prep Before Tightening Any Drill Bit
Skipping safety steps when tightening a drill bit risks severe injury from accidental trigger pulls or flying debris. Start by removing the battery from cordless drills or unplugging corded models—never skip this even for “quick” bit changes. Next, locate your drill’s forward/reverse switch and slide it to the center “lock” position. This critical step disables the motor while allowing you to manually rotate the chuck, preventing dangerous spin-ups during tightening.
While preparing, inspect the drill bit’s shank—the smooth metal section clamped by the chuck. Run your finger along its length; any nicks, burrs, or grease will sabotage your grip. Wipe it clean with a dry rag, and check that it’s perfectly round. A damaged shank is the #1 reason bits slip, even in a fully tightened chuck. If you spot deformities, replace the bit immediately—forcing a damaged shank risks catastrophic failure during use.
Hand-Tightening a Keyless Chuck: The Power-Tighten Method
Most modern drills use keyless chucks, but hand-tightening alone rarely delivers a secure hold. Here’s how to achieve industrial-grade security without tools.
Opening the Chuck Correctly
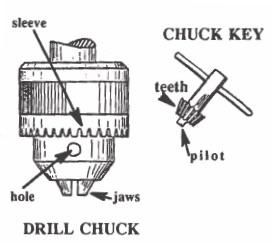
Hold the drill with the chuck facing away from your body. Grip the stationary sleeve (the metal collar directly behind the chuck jaws) firmly with your non-dominant hand. With your dominant hand, rotate the knurled chuck body clockwise to open the jaws. Turn until the opening exceeds your bit’s diameter by 1/8 inch—you should see all three jaw teeth clearly. Never force rotation; if stuck, clean debris from the chuck mechanism first.
Achieving Maximum Security with Power-Tightening
After inserting the bit shank fully (until it bottoms out), hand-tighten clockwise as hard as possible. Now comes the game-changer: With the drill still in lock position, brace it firmly against your workbench. Pull the trigger in three rapid 0.5-second bursts while maintaining pressure on the chuck body. The motor’s torque instantly seats the jaws 200% tighter than hand force alone. Test security by trying to twist the bit with pliers—you should feel zero movement.
Securing Bits in Geared Chucks with a Chuck Key
Older or heavy-duty drills require a chuck key for proper tightening. Missteps here cause uneven jaw closure and premature wear.
Three-Point Tightening for Perfect Alignment
Insert the chuck key into one of the three gear holes and turn counterclockwise to open jaws. After inserting the bit, place the key in the first hole and tighten clockwise until snug. Immediately rotate to the next hole—never complete full rotations in one position. Alternate through all three holes 2-3 times, applying even pressure each time. This sequential tightening forces the jaws to close concentrically around the shank, eliminating wobble. Stop when you hear a distinct “click” from the ratcheting mechanism—over-tightening strips internal teeth.
Critical Mistake to Avoid
Never use a chuck key on a keyless chuck. The mismatched gears will permanently damage the internal mechanism, requiring expensive replacement. If your keyless chuck has recessed holes, it’s designed for hand-tightening only—rely on the power-tighten method instead.
Locking SDS Bits in Hammer Drills Without Tools
Masonry drills use SDS chucks that lock bits instantly, but improper insertion causes dangerous ejection during hammer mode.
The One-Second Insertion Technique
For SDS-Plus or SDS-Max bits, pull the rubberized sleeve backward toward the drill body until it clicks into the retracted position. Slide the bit’s grooved shank straight in until you feel two distinct clicks—the first as the shank engages the ball bearings, the second as it seats fully. Release the sleeve; it should spring forward automatically. Never force the bit—if it doesn’t click, rotate it slightly while inserting. Test security by tugging firmly on the bit; there should be zero play.
Why SDS Bits Won’t Eject Under Hammering
Unlike standard chucks, SDS systems use spring-loaded ball bearings that grip the shank’s milled grooves. The hammering action actually increases clamping force as the bit retracts slightly during impact. If your bit ejects during use, the sleeve mechanism is worn out—replace the chuck immediately.
Fixing a Drill Bit That Won’t Stay Tight: 5 Critical Checks
When bits slip despite proper tightening, diagnose these hidden culprits before replacing your chuck.
Cleaning Debris from Chuck Jaws
The #1 cause of slippage is invisible debris. Remove the bit and shine a flashlight into the chuck. Use a brass brush (never steel—it damages jaws) to scrub the three V-shaped jaw channels. For stubborn dust, spray compressed air at 45-degree angles into each gap. Reinsert a clean bit and repeat the power-tighten method—90% of “faulty” chucks just need this simple cleaning.
Diagnosing Worn Jaws vs. Damaged Shafts
Inspect the chuck jaws for shiny, flattened edges—the telltale sign of wear. On the bit shank, check for “galling” (metal streaks) or out-of-round deformation. Place a new bit in the chuck; if it holds securely, your original bit is junk. If the new bit slips, your chuck is worn beyond repair. Pro tip: Measure shank diameter with calipers—any deviation from 3/16″ (or standard size) means replace the bit.
Emergency Field Fix for Loose Chucks
When you’re stranded on a job site with a slipping bit, wrap the shank with fine-grit sandpaper (120-220 grit) before insertion. The abrasive creates micro-grips that buy you 10-15 minutes of drilling time. This is only a temporary fix—replace the chuck ASAP as sandpaper particles accelerate wear.
Preventing Future Slippage: Maintenance You Can’t Skip
A single minute of monthly maintenance prevents 95% of bit-slipping issues. After each use, run the chuck empty at low speed for 10 seconds to eject dust. Every 20 hours of operation, apply two drops of lithium grease to the chuck threads (never oil—it attracts debris). Store bits in a dedicated case to protect shanks from dings.
Most importantly, never drill beyond 70% of a bit’s rated depth. Over-penetration forces the chuck to grip the fluted cutting section instead of the smooth shank, causing instant slippage. Mark your bits with painter’s tape at the safe depth limit—this simple habit doubles chuck lifespan.
A properly tightened drill bit transforms sloppy holes into precision work and prevents dangerous tool failures. By mastering chuck-specific techniques, implementing the power-tighten method, and performing 30-second debris checks, you’ll eliminate slippage permanently. Remember: when in doubt, clean first, tighten second, and always verify security with a firm tug test. Now grab your drill and tackle that project with confidence—your perfectly aligned holes await.


