
That sinking feeling when your drill bit slips mid-project—spinning uselessly while you ruin your workpiece—is completely avoidable. Properly connecting a drill bit isn’t just about getting the job done; it’s the critical safety step that prevents dangerous projectile hazards and ensures clean, precise holes every time. When a bit isn’t seated correctly, you risk damaging materials, overheating your drill motor, or even causing injury from sudden bit ejection. This guide cuts through the confusion with exact techniques for both keyless and keyed chucks, plus troubleshooting for stubborn bits. You’ll master the 30-second process that professionals use to guarantee rock-solid bit security, whether you’re hanging shelves or building furniture.
Essential Safety Protocol Before Touching Your Drill
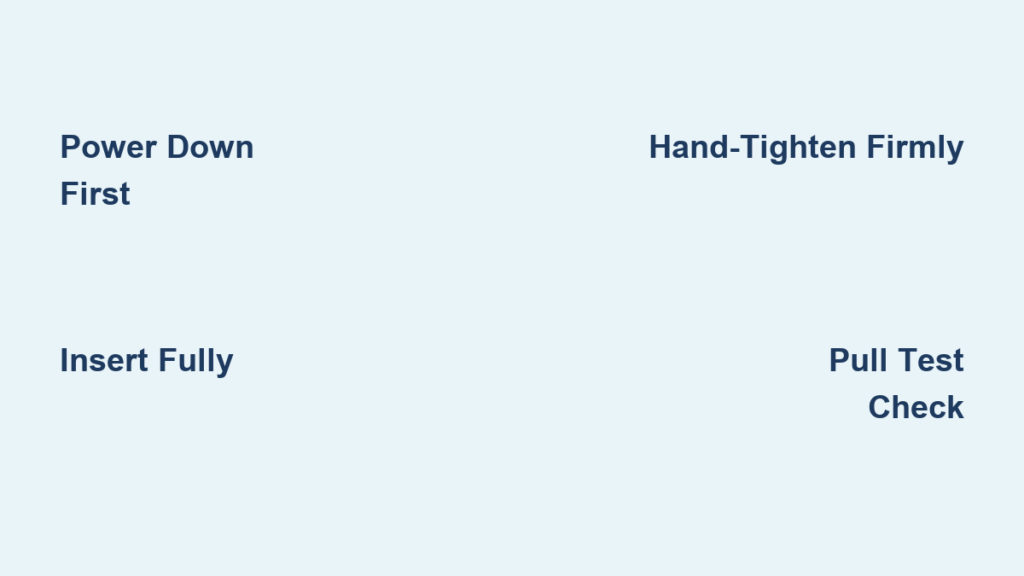
Powering down your drill isn’t optional—it’s your first line of defense against accidental activation. For corded drills, physically unplug the unit from the wall outlet; never rely solely on the trigger switch. Battery-powered models require complete battery removal, as residual charge can still engage the motor. This single step prevents 90% of home workshop injuries involving drill bits. While you’re at it, clear your workspace of metal shavings, wood dust, or loose objects that could interfere with chuck operation. Place your drill on a non-slip surface like a rubber mat to prevent rolling during bit changes. Skipping this safety sequence turns a simple task into a potential hazard—treat it as non-negotiable every single time.
Step-by-Step Guide to Connecting a Drill Bit
Follow these exact steps to achieve military-grade bit security. The entire process takes under a minute but prevents hours of rework and potential injury.
Prepare Your Tools and Workspace in 15 Seconds
Gather only what you need: your drill, the correct bit for your material (more on selection below), and a chuck key if required. Lay these on a clean, stable surface with ample lighting—poor visibility causes misalignment. For keyless chucks (90% of modern drills), no extra tools are needed. Pro tip: Wipe the drill bit shank with a dry cloth to remove oils or debris that compromise grip. Never use bits with damaged or scored shanks, as they’ll inevitably slip under pressure.
Open the Chuck Correctly for Your Drill Type
Identify your chuck system immediately—this determines your approach. For keyless chucks (the textured ring at the drill’s nose), grip the drill body firmly with your non-dominant hand. Rotate the chuck sleeve counter-clockwise with your dominant hand until the opening exceeds your bit’s shank diameter. You should see the three jaws spread evenly. Critical visual cue: Stop when you can easily slide the bit in without forcing it. For keyed chucks (older models with keyholes), insert the chuck key fully into any hole, then turn it counter-clockwise. Rotate through all three keyholes for even jaw movement—this prevents misalignment that causes wobble later.
Insert the Bit with Perfect Alignment
Hold the drill vertically with the chuck facing up. Align the smooth shank of your drill bit (not the fluted cutting end) straight with the chuck opening. Push firmly until the shank bottoms out against the chuck’s internal shoulder—you shouldn’t see any shank protruding past the jaws. This is where 80% of failures happen: Partially inserted bits will spin loose under torque. Verify depth by comparing the exposed fluted portion to a properly seated bit. If your bit has a hex shank (common on driver bits), ensure your chuck accepts hex inserts—standard 3-jaw chucks require round shanks unless you have an adapter.
Hand-Tighten for Maximum Security
For keyless chucks, grip the chuck sleeve with one hand and rotate the drill body clockwise with the other. Apply firm, even pressure—use your whole palm, not just fingertips—to close the jaws completely. Pro technique: Place the drill on a workbench, step on the base for stability, and use both hands on the chuck sleeve for maximum torque. For keyed chucks, insert the key fully into one hole and rotate clockwise. Engage all three keyholes sequentially to evenly distribute pressure across the jaws. Never skip this step—partial tightening guarantees slippage. After tightening, immediately remove the chuck key; leaving it inserted turns it into a dangerous projectile when the drill spins.
The Critical Pull Test Before Operation
This 5-second safety check prevents workshop disasters. Grip the drill firmly and pull the bit straight out with moderate force—no yanking. If the bit moves or slips, it’s dangerously loose. Red flag: Visible wobble when rotating the bit by hand means the chuck isn’t gripping evenly. Reopen the chuck, clean both shank and jaws with a dry cloth, and repeat the tightening process. Only when the bit resists firm pulling should you proceed. This test catches issues that visual inspection misses, especially with worn chucks.
Match Your Drill Bit to the Material Like a Pro
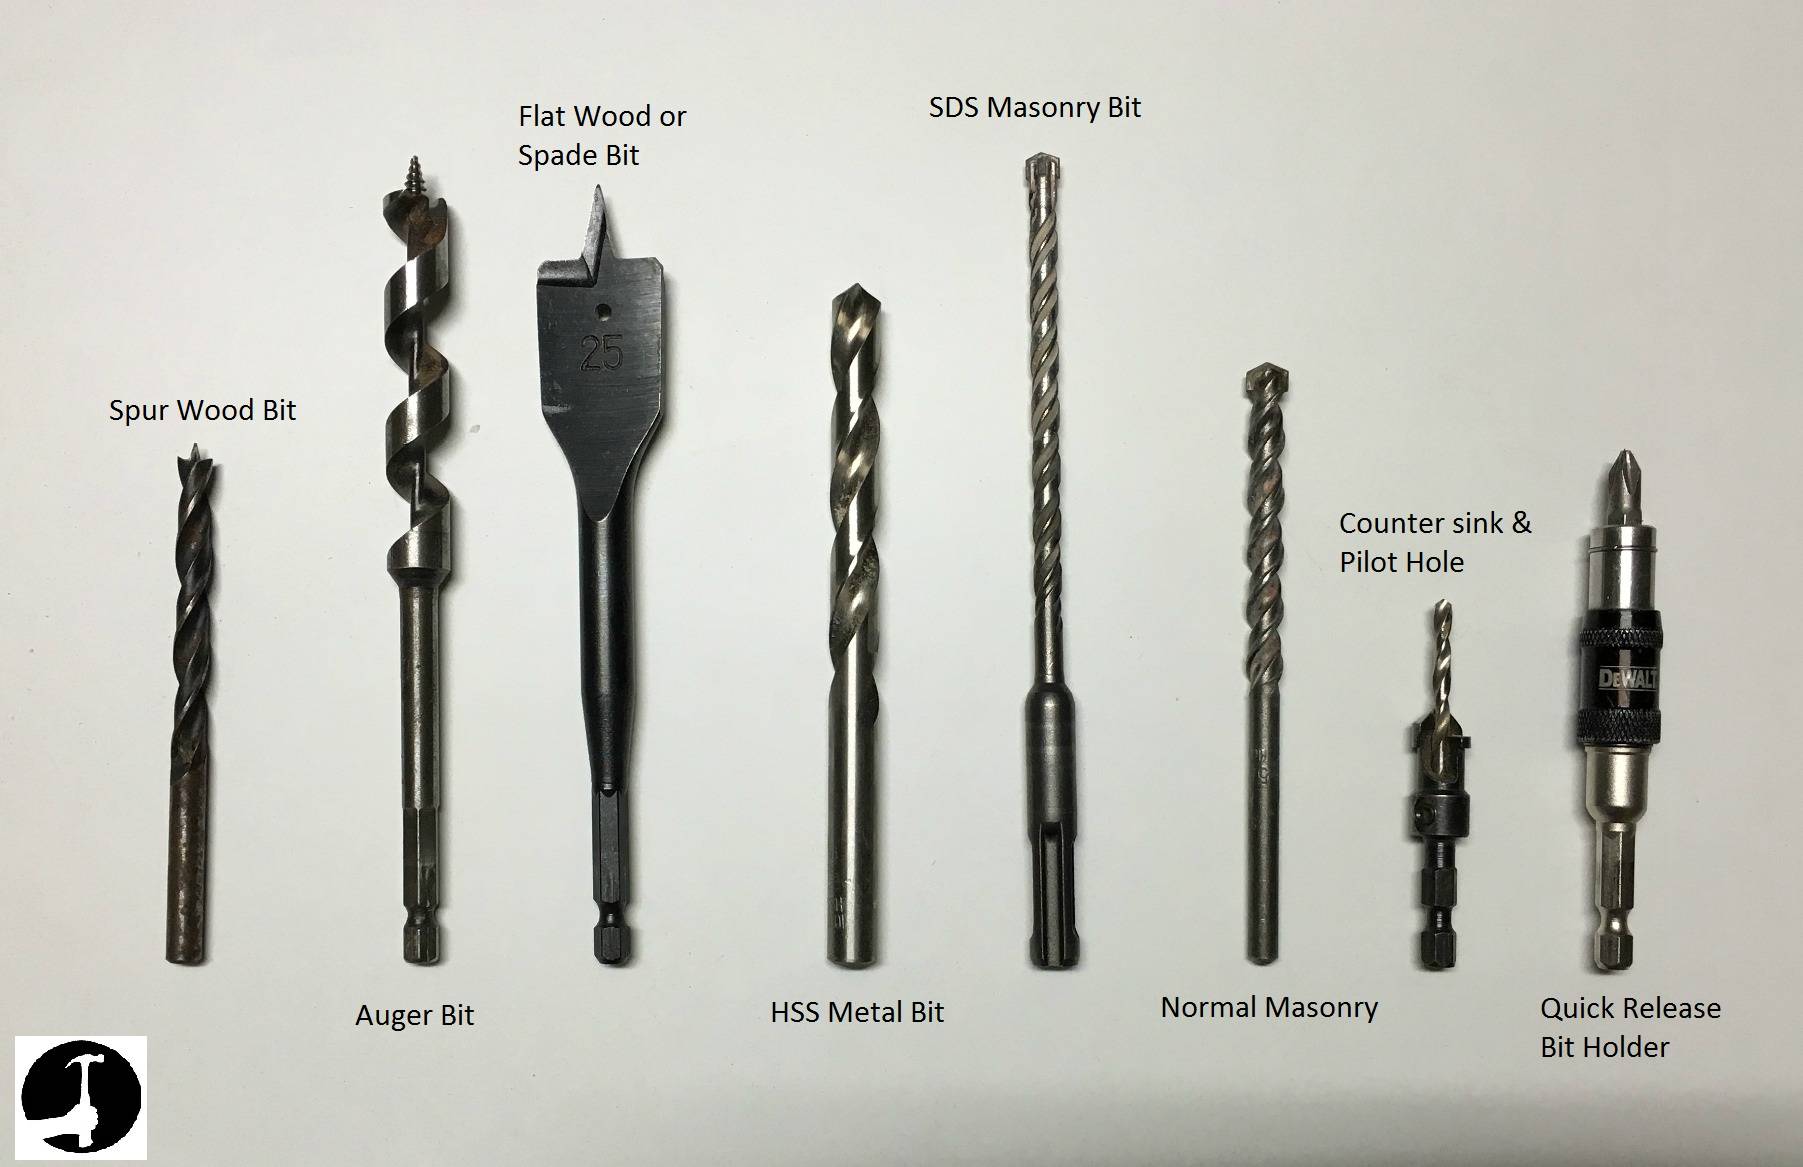
Using the wrong bit sabotages even perfect chucking. For wood, choose high-speed steel (HSS) twist bits with a sharp point—they cut cleanly without splintering. Masonry work demands carbide-tipped bits that withstand concrete’s abrasiveness; standard bits will dull instantly. Drilling metal requires HSS bits with a 135-degree split point to prevent walking and reduce heat. Screw driving needs exact driver bit matches: Phillips, Torx, or flathead shanks must fully seat in the chuck. Always verify shank compatibility—most consumer drills accept 3/8-inch or 1/2-inch round shanks, while hex-shank bits require specialized chucks. A mismatched bit is guaranteed to slip regardless of tightening effort.
Fix Stubborn Chuck Problems in Under 5 Minutes
When standard procedures fail, these targeted solutions resolve 95% of chuck issues without tools.
Stuck Chuck Won’t Open or Close
Debris jamming is the usual culprit. Blow compressed air into the chuck jaws at a 45-degree angle to dislodge sawdust or metal shavings. For rust-seized chucks, apply one drop of penetrating oil (not WD-40) to the sleeve threads, wait 10 minutes, then gently tap the chuck with a rubber mallet while rotating. Never use pliers—they crush the sleeve. If the chuck remains frozen after this, professional replacement is safer than risking damage.
Bit Slips During Operation Despite Tightening
Immediately stop drilling—continued use damages the chuck. Remove the bit and inspect the shank for smooth, polished spots indicating previous slippage; replace damaged bits. Clean both the shank and chuck jaws with isopropyl alcohol to remove grease film. If wobble persists, check jaw alignment: rotate the chuck sleeve slowly and watch for uneven jaw movement. Uneven closing means worn internal threads requiring chuck replacement.
Chuck Key Won’t Engage or Strips Teeth
Bent keys cause most engagement failures. Discard any key that doesn’t slide smoothly into all three holes. For stripped teeth, examine the chuck’s keyhole teeth—if they’re rounded instead of sharp, the chuck is worn out. Temporary fix: Use channel-lock pliers wrapped in a cloth to grip the chuck sleeve for tightening, but replace the chuck within 48 hours. Never force a key—that destroys teeth permanently.
Prevent Chuck Failure With 30-Second Maintenance
Extend chuck life dramatically with these field-tested habits. After heavy use, blow debris from jaws with compressed air—never use sharp objects that scratch gripping surfaces. For keyed chucks, apply one drop of machine oil annually to keyhole teeth; over-lubrication attracts dirt. Store your drill with the chuck slightly open (jaws spread 1/8 inch) to relieve spring tension. Before each use, perform the pull test even with “fresh” bits—vibrations during storage can loosen chucks. These micro-maintenance steps prevent 70% of chuck failures.
When to Replace Your Drill Chuck Immediately
Certain symptoms demand chuck replacement, not repair. Replace if you notice persistent wobble even with new bits fully tightened, visible cracks in the chuck body, or grinding noises during operation. Critical warning: If jaws close unevenly—one jaw protruding while others retract—the chuck is internally damaged and unsafe. Most modern drills have user-replaceable chucks; consult your manual for the specific removal sequence (usually involves unscrewing a central screw while holding the chuck in reverse gear). For older models, professional service is cost-effective only if the drill is high-end.
Mastering how to connect a drill bit transforms frustrating DIY moments into smooth, professional results. Remember the non-negotiables: always power down first, insert the shank fully, hand-tighten aggressively, and perform the pull test. This 60-second ritual guarantees safety and precision whether you’re drilling pilot holes or masonry anchors. Keep your chuck clean, match bits to materials, and replace worn components before they fail mid-project. With these proven techniques, you’ll eliminate bit slippage permanently—turning every drilling task into a confident, controlled operation. Your next project starts with a perfectly secured bit, so make this skill your workshop foundation.


