
That frustrating moment when your drill bit slips mid-drilling or wobbles uncontrollably? It almost always traces back to improper installation. Whether you’re mounting shelves or building a deck, how to install drill bit correctly is the non-negotiable foundation for clean holes, tool longevity, and personal safety. A poorly secured bit doesn’t just ruin your project—it can become a dangerous projectile. In this guide, you’ll master chuck types, avoid critical mistakes, and troubleshoot common issues. By the end, you’ll install bits with the confidence of a professional, ensuring every rotation is precise and secure.
Key Drill Components and Chuck Types Revealed
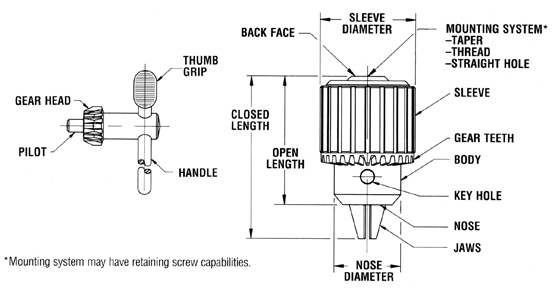
Before touching a bit, identify your drill’s anatomy. The chuck—the cylindrical head at the front—contains three jaws that grip the bit. Rotate the chuck sleeve (the ribbed outer ring) by hand to open or close these jaws. For older models, you’ll need a chuck key, a T-shaped tool that slots into side holes for extra torque. The shank is the smooth, non-cutting end of your bit that inserts into the chuck. Crucially, never confuse shank types: standard round shanks fit most chucks, while hex shanks (common on impact drivers) require compatible chucks to prevent slippage.
Drills primarily use two chuck systems. Keyless chucks dominate modern cordless drills—simply twist the sleeve by hand for quick changes. Keyed chucks, found on heavy-duty or older models, demand a chuck key for maximum grip strength. Misidentifying your chuck type is the #1 cause of installation errors. If your drill has three small holes circling the chuck body, it’s keyed; if it’s smooth with textured ridges, it’s keyless. Using a key on a keyless chuck (or vice versa) risks stripping internal mechanisms. Always consult your manual—some specialty drills like rotary hammers use SDS systems incompatible with standard bits.
Installing Bits in Keyless Chucks: Precision in 4 Steps
Secure Your Drill and Open the Jaws
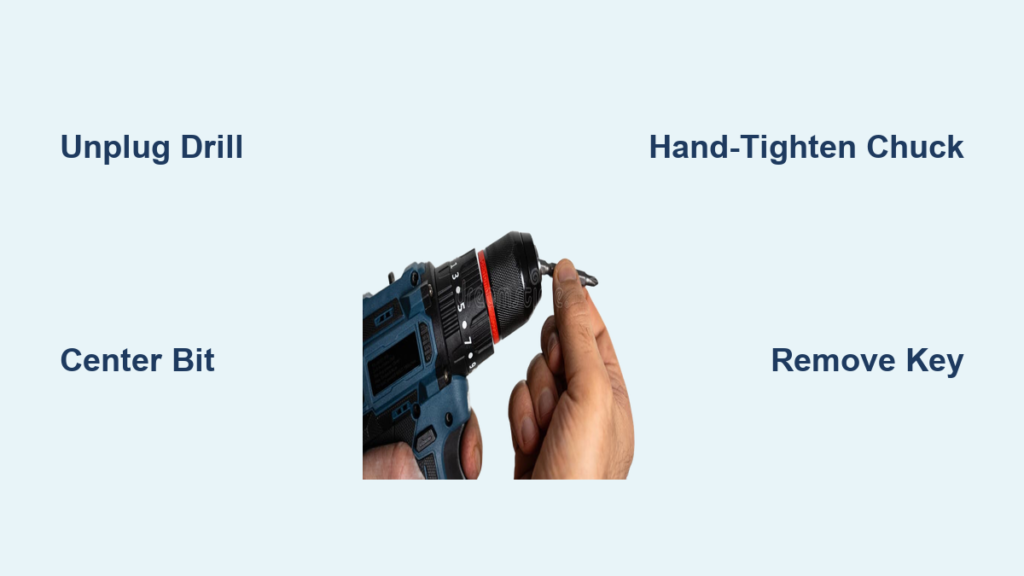
Unplug corded drills or remove the battery—this isn’t optional. Hold the drill body firmly against your workbench with your non-dominant hand. Grip the chuck sleeve with your dominant hand and rotate it counter-clockwise (as viewed from the front) until the jaw opening exceeds your bit’s shank diameter. If the sleeve resists, lightly squeeze the trigger in reverse mode for 1 second to loosen stubborn jaws—never force it.
Insert and Center the Bit Correctly
Slide the bit’s shank straight into the chuck until it bottoms out. Ensure at least ¾ of the shank is fully seated—a common error is inserting bits too shallowly, causing slippage. Visually confirm the bit is centered: tilt the drill sideways and check for even gaps between the shank and all three jaws. If it’s crooked, remove and reinsert. For hex shanks, align the flat sides with the jaws’ gripping surfaces.
Achieve Maximum Tightening Without Tools
While maintaining firm pressure on the drill body, rotate the chuck sleeve clockwise with a strong palm grip—use the heel of your hand for leverage. Hand-tighten until no further rotation is possible. For critical applications (e.g., drilling metal), apply the motor-assist method: hold the sleeve steady, set the drill to forward mode, and briefly squeeze the trigger for 0.5 seconds. You’ll feel the chuck lock into place with a distinct “thunk.” Never use pliers—this damages the sleeve’s texture and compromises future tightening.
Installing Bits in Keyed Chucks: Avoiding Costly Mistakes
Proper Key Insertion and Jaw Opening
With the drill unplugged or battery removed, insert the chuck key into any one of the three side holes. Turn counter-clockwise to open the jaws. If the key slips, align its teeth fully with the chuck’s internal gears—partial engagement strips teeth. Open jaws just wide enough for the shank; excessive widening stresses the mechanism.
Critical Three-Point Tightening Sequence
After inserting the bit shank fully, never tighten using the same hole twice. Start by inserting the key into a different hole than you used for opening and turn clockwise firmly. Move to the third hole and tighten slightly. Finally, return to the first hole and apply equal pressure. This triangular sequence centers the bit, eliminating wobble. If jaws feel gritty, blow debris from holes with compressed air—never oil the chuck key mechanism.
The Non-Negotiable Key Removal Rule
This cannot be overstated: Always remove the chuck key before powering on. Leaving it in transforms the key into a high-velocity missile capable of penetrating drywall or causing injury. Develop a ritual: after tightening, place the key in your pocket immediately. A stripped chuck key hole (from using the wrong-sized key) is a permanent failure point—only use the key supplied with your drill.
Fixing Wobbling, Slipping, and Jammed Chucks

Diagnosing and Stopping Bit Wobble
A wobbling bit ruins hole accuracy and stresses your drill. First, check for runout: run the drill at high speed with no load. If the tip traces a circle larger than 1/16″, loosen the chuck, clean shank and jaws with a dry cloth, and reseat the bit. If wobble persists with multiple bits, inspect chuck jaws for wear—smooth, rounded teeth indicate replacement is needed. For small bits (<1/8″), use a collet adapter; standard chucks can’t grip tiny shanks securely.
Solving Bit Slippage Under Pressure
When bits slide during drilling, debris is the usual culprit. Blow compressed air into the chuck to remove metal shavings or sawdust. If slippage continues, try this pro fix: apply 2 drops of denatured alcohol to the shank to dissolve oils, then dry thoroughly before reinserting. For keyed chucks, ensure you’re using the three-point tightening sequence—uneven pressure causes slippage. If jaws are visibly worn (gaps visible when closed), stop using the drill; a slipping bit can shatter on hard materials.
Unjamming Stuck Chucks Safely
A seized chuck sleeve often results from thread debris. Never hammer the chuck—this damages bearings. Instead, apply penetrating oil sparingly to the sleeve-thread junction, wait 10 minutes, then grip the sleeve with a rubber jar opener for better traction. For keyed chucks, insert the key at a slight angle to engage undamaged teeth. If unresolved, the chuck likely needs professional replacement—forcing it risks gear damage.
Safety Rules That Prevent Catastrophic Failures
Power Disconnection and Key Removal
Always disconnect power before changing bits—this includes removing batteries, not just releasing the trigger. A single accidental trigger squeeze while inserting a bit can crush fingers. For keyed chucks, implement the “key in pocket” rule: after removal, physically move the key away from the work area. Statistics show 70% of chuck-key injuries occur because users leave keys resting on the drill during setup.
Mandatory Eye Protection and Bit Testing
Safety glasses aren’t optional—they’re your only defense against shrapnel from snapped bits. Before drilling, perform a no-load spin test: run the drill at 50% speed for 5 seconds. Watch for vibration or wobble. If present, stop immediately—reseat the bit. Also, secure your workpiece with clamps; holding materials by hand leads to loss of control when bits bind.
Pro Techniques for Bulletproof Bit Installation
Optimizing Hand Grip and Chuck Maintenance
For keyless chucks, maximize leverage with the “palm roll” technique: cup the chuck sleeve in your palm and rotate your entire forearm clockwise. This generates 30% more torque than finger twisting alone. Monthly, apply one drop of light machine oil to the chuck threads (not inside jaws)—this prevents rust-induced seizing. Never lubricate jaw surfaces; oil reduces grip strength by 40%.
Selecting Bits for Problem Materials
Drilling metal? Use cobalt bits with a center-punch starter dimple to prevent walking. For masonry, insert SDS bits only into SDS chucks—forcing standard bits causes catastrophic slippage. When switching between materials, clean shank residue immediately: wood sap on metal bits causes overheating. Pro tip: store bits in a dedicated case with silica gel to prevent moisture-related chuck corrosion.
When to Stop and Seek Professional Help
If a bit still slips after thorough cleaning and correct tightening, cease operation immediately. This indicates worn chuck jaws or internal damage—continuing risks bit ejection. Similarly, if the chuck sleeve spins freely without gripping (a stripped mechanism), do not attempt DIY repairs. Take the drill to a service center; replacing a chuck costs $25-$50, while a flying bit can cause thousands in property damage or medical bills. Remember: proper installation takes 30 seconds but prevents 90% of drill-related accidents. Master these steps, and every project starts with rock-solid precision.


