
You’ve measured twice, marked your wood perfectly, and now you need to create an elongated hole for adjustable shelf pins or a sliding joint. But when you search “how to drill a slotted hole in wood,” you get conflicting advice that leaves you with ragged edges or misaligned slots. The truth? Drilling alone won’t cut it—literally. A true slotted hole requires controlled material removal along a straight path, and doing it right prevents frustrating tear-out, wobbly fittings, and ruined projects. Whether you’re building cabinets, installing hardware, or crafting jigs, this guide delivers field-tested techniques that transform sloppy slots into professional results. You’ll learn exactly which tool to grab for your situation, how to avoid the #1 mistake that ruins 80% of first attempts, and why “shallow passes” aren’t just advice—they’re your ticket to clean, straight slots every time.
Stop wasting time with drill bits that wander or chisels that gouge your workpiece. We’ve distilled decades of workshop experience into three actionable methods that match your tools and project needs. By the end, you’ll know precisely how to cut slots that accept fasteners smoothly, maintain structural integrity, and look like they came from a CNC machine—not your garage. Let’s fix those frustrating slotting problems once and for all.
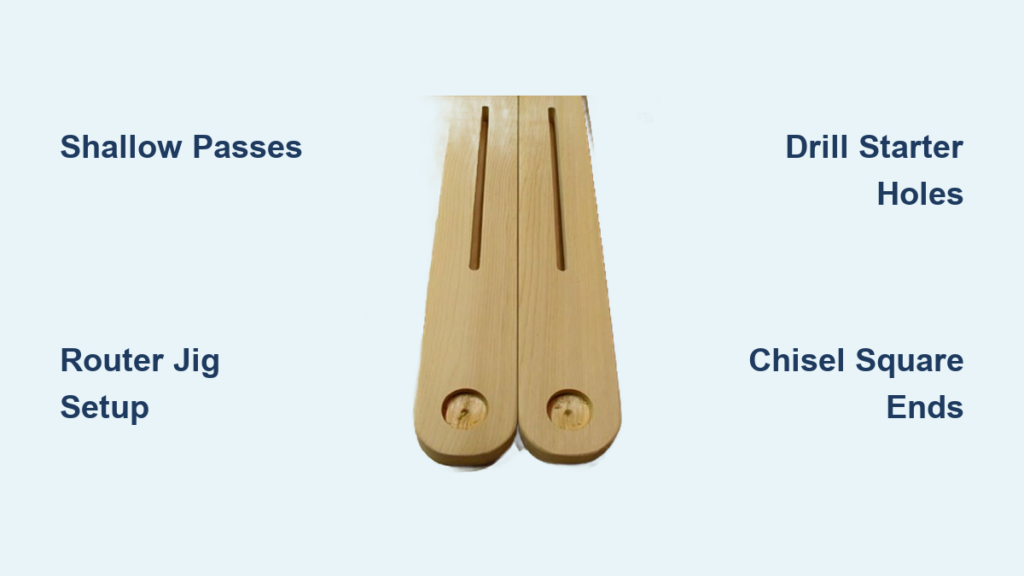
Router Method: Cut Perfectly Straight Slots in Under 10 Minutes

Forget struggling with hand tools—your plunge router is the undisputed champion for clean, repeatable slots. This method delivers factory-smooth edges ideal for visible joinery like cabinet shelf standards or sliding table extensions. The secret lies in setup, not skill: a simple jig eliminates guesswork and guarantees straightness.
Why Shallow Passes Prevent Burning and Tear-Out
Attempting full-depth cuts in one pass overloads your router bit, causing burning, chatter, and dangerous kickback. Instead, remove material incrementally:
– Set depth to 1/8″ for hardwoods (oak, maple) or 1/4″ for softwoods (pine, poplar)
– Make 3-5 passes, increasing depth each time until you reach the final dimension
– Critical visual cue: If you see smoke or hear a strained motor sound, you’re cutting too deep—back off immediately
This technique reduces heat buildup, minimizes tear-out on grain-sensitive woods, and extends bit life. Always move the router against the bit’s rotation (right to left for right-handed users) for superior control and cleaner cuts. Never force the tool—let the bit’s RPM do the work.
Build a $5 Router Jig for Repeatable Accuracy
Professional results demand a guide system. Skip expensive commercial jigs with this foolproof DIY solution:
1. Clamp a straight scrap board (3/4″ × 2″ × 24″) parallel to your slot line, positioned so the router base rides against it
2. Attach stop blocks at both ends using quick-clamp vises to define exact slot length
3. Test on scrap wood first—adjust jig position until slot width matches your fastener
Pro Tip: Apply painter’s tape along the jig edge where the router base contacts it. This reduces friction for smoother movement and prevents wood-on-wood scoring. For slots longer than 12″, add a middle support block to prevent jig flex.
Jigsaw Shortcut: Drill a Slotted Hole Fast Without Router Precision
When router setup feels excessive for hidden joints or rough carpentry, your jigsaw becomes a slotting superhero. This method works best for non-visible applications like framing brackets or temporary fixtures where +/- 1/16″ tolerance is acceptable. The key is controlling that notoriously wobbly blade.
How to Drill Starter Holes for Clean Jigsaw Slots

Jigsaw blades deflect mid-cut without entry/exit points, causing curved slots. Prevent this with strategic drilling:
1. Drill 3/8″ holes at both ends of your slot using a brad-point bit
2. Insert jigsaw blade into first hole and cut toward the second hole
3. Use a zero-clearance base plate (or tape over the shoe opening) to prevent blade deflection
Critical Mistake to Avoid: Don’t start cutting from the edge of the board—this causes splintering. Always begin within a drilled hole. For hardwoods, apply masking tape over the cut line to minimize tear-out.
Guide Your Jigsaw for Straight Cuts: The Fence Trick
Your jigsaw’s built-in guide is useless for precision slots. Instead:
– Clamp a straight metal ruler or aluminum angle along your slot line as a fence
– Rest the jigsaw shoe against this fence while cutting
– Move slowly (1-2 inches per second)—rushing causes blade wandering
Pro Tip: Install a 24-tpi fine-cutting blade (like Bosch T119BO) for smoother results in plywood or MDF. For solid wood, use a 10-tpi aggressive blade (like Diablo DP5104) to prevent binding in thick stock.
Drill and Chisel Method: Manual Slot Cutting Without Power Tools
When routers and jigs aren’t an option, this old-school technique saves the day for single slots in small projects. It’s slower but requires minimal tools and delivers surprisingly clean results in softwoods and plywood. The magic happens through strategic hole placement and chisel control.
Drill Overlapping Holes: The Key to Minimal Chisel Work
Random drilling creates a mess. Instead, follow this pattern:
1. Drill 3/8″ holes at both slot ends using a brad-point bit
2. Drill a center hole midway between them
3. Add two more holes at quarter-points (1/4 and 3/4 along the slot)
4. Overlap holes by 50%—each new hole should remove half the wood between existing holes
Visual Cue: When done correctly, the remaining “bridges” between holes should be no wider than your chisel. This reduces chiseling by 70% compared to drilling end holes only.
Squaring the Slot Ends with a Chisel
Router bits leave rounded ends, but chisels create crisp square corners perfect for bolt heads:
1. Score cut lines deeply with a utility knife before chiseling
2. Hold chisel bevel-down at 20° angle for controlled wood removal
3. Tap gently with a mallet—never swing the mallet like an axe
4. Clean up sides with light paring cuts (pushing chisel away from you)
Pro Warning: Never chisel toward yourself. Always work from the waste side toward the finished edge. For hardwoods, chamfer slot corners slightly with a file to prevent splitting during fastener insertion.
Avoid These 3 Slotted Hole Mistakes That Ruin Your Wood Project
Even with perfect technique, these hidden pitfalls can wreck your slot. Learn to spot and stop them before they cost you time and materials.
Why Loose Clamps Cause Wobbly Slots (and How to Fix)

Movement during cutting creates tapered or curved slots that reject fasteners. Solution: Use two clamp types—pipe clamps for primary hold-down plus non-marring corner clamps at cut points. Test stability by trying to wiggle the workpiece with your finger—zero movement is mandatory. For end-grain slots, back up the cut area with scrap wood to prevent blowout.
The Feed Direction Secret: Router Climb Cutting vs. Conventional
Moving with the bit rotation (“climb cutting”) gives cleaner edges in figured wood but risks losing control. Use conventional feed (right-to-left) for:
– Slots wider than 1/2″
– Any hardwood project
– Beginners or critical visible joints
Only attempt climb cutting when:
– Depth per pass is under 1/16″
– You’re experienced with router control
– Working with stable plywood
Pro Tip: For climb cutting, place your left hand on the router’s front (not the handle) to resist sudden pulls. Always unplug the router before adjusting depth.
Rounded Ends That Won’t Accept Fasteners (Quick Fix)
Router-cut slots naturally have rounded ends that prevent bolt heads from seating. Fix without re-cutting:
1. Place a sharp 3/8″ chisel vertically at the slot end
2. Tap once with a mallet to create a square corner
3. Clean up with a mill bastard file using straight strokes
This takes 20 seconds and eliminates frustrating “almost fits” with hardware. For production work, modify your jig with end stops that position the router exactly at slot terminations.
Mastering slotted holes transforms frustrating adjustments into satisfying precision. Remember: routers deliver pro results with jigged setups, jigsaws work for hidden joints when starter holes guide the blade, and drill-and-chisel saves the day with strategic hole patterns. Always make shallow passes, clamp like your project depends on it (it does), and square slot ends for hardware compatibility. For your next project, start with the router method on scrap wood—practice the jig setup until cutting perfect slots becomes second nature. When you nail that first flawless slot, you’ll never fear adjustable joinery again. Ready to level up? Try cutting identical slots in matching cabinet sides using a single jig—this production technique cuts installation time by 60% and guarantees perfect alignment every time.


