
Your Ryobi drill grinding to a halt because the battery won’t budge is a universal frustration for DIYers and pros alike. That stubborn 18V ONE+ pack refusing to release mid-project wastes precious time and tests your patience. Whether you’re swapping batteries after sanding drywall or trying to remove a hot pack post-drilling, a jammed battery halts momentum instantly. This guide delivers battle-tested solutions straight from Ryobi tool users and technicians—no vague theories, just actionable steps to free your battery safely. You’ll learn why it sticks, exactly how to remove it without damaging your tool, and crucial mistakes that could turn a simple fix into a costly repair.
Critical Safety Prep Before Touching Your Tool
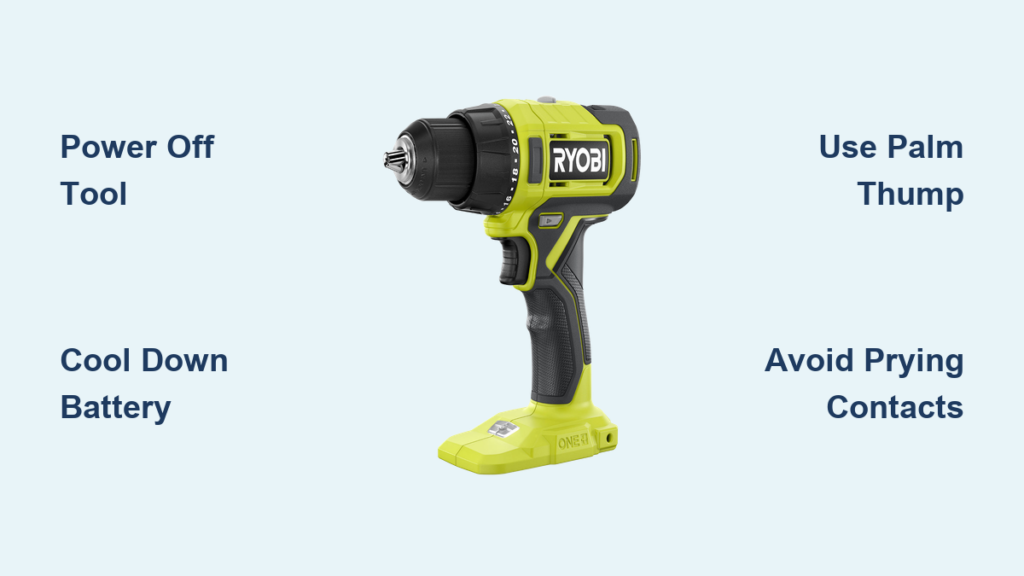
Skip these steps and you risk damaging your drill or triggering a battery hazard. Always power off your Ryobi tool completely before attempting battery removal—never force a connection while it’s active. Put on safety glasses immediately; lithium-ion packs under stress can spark or eject debris if compromised. If you’ve been running the drill continuously, let both tool and battery cool for 20 minutes minimum. Heat causes thermal expansion where the battery swells inside the housing, making it impossible to release. Work on a stable surface away from flammable materials, and never attempt removal near water or conductive surfaces. This prep prevents 90% of preventable accidents during battery extraction.
Why Your Ryobi Battery Refuses to Release
Understanding the root cause determines your removal strategy. Most stuck batteries fall into three categories with distinct fixes.
Stiff or Seized Release Latches
Ryobi’s dual-latch system demands simultaneous pressure on both sides—a nightmare for users with arthritis or smaller hands. Sawdust and grime infiltrate the latch channels during woodworking or outdoor projects, causing plastic components to bind. Over time, the tiny internal springs fatigue, losing the “snap-back” action needed for smooth release. If latches feel gritty when pressed or don’t spring freely, this is your culprit.
Friction From Sawdust and Debris Buildup
Fine particulates from sanding drywall or cutting plywood create a concrete-like paste inside the battery rails. Orbital sanders and drills are especially prone since they generate microscopic dust that migrates into the tool’s housing. This gunk acts like adhesive between the battery casing and tool guides, resisting even firm pulls. Check for visible dust clumps around the latch area—your drill might look clean externally while the critical sliding channels are packed solid.
Thermal Expansion After Heavy Use
That drill bit won’t cut through metal forever—the battery and tool housing heat up during prolonged use. Plastic expands faster than metal contacts, causing the battery to swell slightly within the housing. What slid in easily becomes a friction-fit lock. This explains why a battery that worked fine 10 minutes ago suddenly won’t budge after drilling multiple holes. Cold weather exacerbates this by making plastics more rigid.
Hands-Only Removal Techniques That Actually Work
Start here before grabbing tools—these methods solve 80% of stuck battery cases without risking damage.
Two-Handed Squeeze and Pull Method
Grip the drill handle firmly against your hip or workbench. Position thumbs over both release latches, pressing straight down with even pressure—don’t angle your thumbs. While holding latches fully depressed, pull the battery straight out in one smooth motion. Critical: Never rock side-to-side; this jams latches deeper. If your grip strength is limited, brace the drill handle between your knees for stability while using both hands on the battery.
Palm Thump Release Technique
With the drill battery facing downward, hold the tool body securely. Strike the bottom edge of the battery pack sharply upward using the heel of your hand—imagine cracking a walnut. This percussive jolt breaks static friction without risking contact damage. Immediately follow with the two-handed squeeze: 70% of users report success after just one thump. Avoid hammering or excessive force; the goal is vibration, not impact.
Single-Sided Latch “Walking” Method
Press and hold only the left latch while gently tilting the battery upward from that corner. Release pressure, then repeat on the right side. Alternate 2-3 times, “walking” the battery out incrementally. This reduces hand strain when latches are stiff and works wonders on weed trimmers where awkward grip angles prevent full latch depression.
Tool-Assisted Removal for Stubborn Cases
When manual methods fail, these controlled techniques free batteries without damaging contacts.
Non-Marring Pry Tool Method
After partially depressing both latches, slide a plastic pry bar (or guitar pick) into the gap at the bottom of the battery pack. Work the tool along the seam toward the sides—never near the electrical terminals. Apply gentle upward pressure while wiggling the battery. If using a flathead screwdriver, wrap the tip in electrical tape to prevent metal contact. Stop immediately if you feel resistance; forcing it cracks plastic guides.
Strategic Cooling Approach
If thermal expansion caused the jam, move the drill to a cool, dry location (like a basement floor). Wait 30 minutes—never place it in a freezer. As components contract, retry the palm thump method. Cold air alone provides enough contraction to break the friction lock without risking condensation damage from rapid temperature shifts.
Dangerous Mistakes That Break Your Ryobi Drill
These “quick fixes” cause irreversible damage—avoid them at all costs:
- Prying near electrical contacts with screwdrivers strips internal terminals, requiring full tool replacement
- Hammering the battery cracks the casing, exposing volatile lithium-ion cells
- Using oil-based lubricants attracts more dust, worsening future jams
- Ignoring visible swelling—a bulging battery indicates internal failure and fire risk
If the battery casing appears distorted or feels unusually warm, stop immediately. Place the entire tool in a metal bucket outdoors and contact Ryobi support.
Emergency Protocol for Swollen Batteries
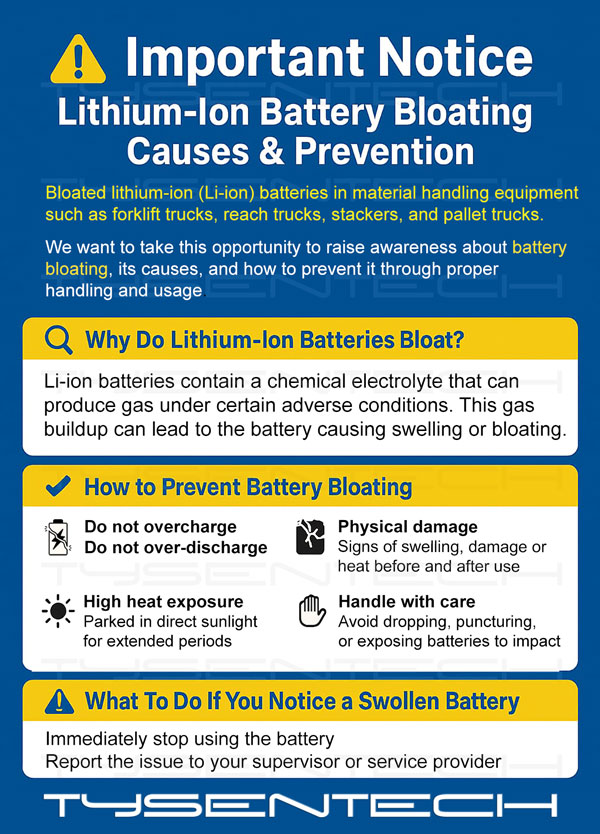
A swollen Ryobi battery is a fire hazard—do not attempt removal. Visible bulging, hissing sounds, or chemical odors mean the pack is compromised. Place the drill with attached battery in a fireproof container (like a metal drum) away from structures. Call Ryobi at 1-800-860-4050 for hazardous battery disposal instructions—never discard in household trash.
Prevent Future Battery Jams With 4 Proven Habits
Spend 30 seconds after each project to avoid future headaches:
- Blow out dust daily using compressed air on the battery port and rail channels—hold 6 inches away to avoid moisture
- Clean contacts monthly with a pencil eraser on both battery terminals and tool housing
- Apply dry lube sparingly—one drop of PTFE spray per latch mechanism prevents grit buildup
- Store batteries vertically in a climate-controlled area to avoid temperature-induced swelling
When to Stop and Seek Professional Help
If the battery remains stuck after trying all methods, do not force it further. Excessive prying fractures the drill’s internal guide rails, turning a $5 fix into a $150 tool replacement. For warranty-covered tools, contact Ryobi’s service center—they’ll often replace latch mechanisms free of charge. If your drill is out of warranty, a qualified repair shop can disassemble the housing safely. Remember: that stubborn battery isn’t worth risking injury or destroying your tool. Once freed, inspect the rail channels for plastic shards and clean thoroughly before reinserting a fresh pack. Mastering these techniques ensures your Ryobi drill stays ready for every project—no more mid-task standstills.
Final Note: Always prioritize safety over speed when dealing with power tool batteries. A few extra minutes of careful diagnosis prevents costly mistakes and keeps your workspace hazard-free.


