
Your Ryobi drill suddenly stops gripping bits during a critical project. The bit spins freely while you’re trying to drive deck screws, or worse—it gets ejected mid-drill. This common frustration happens to 78% of DIYers at least once, but the fix takes under 30 seconds when you know the exact procedure for your Ryobi model. Whether you’re using a standard ONE+ drill/driver or a hammer drill like the R18SDS-0, this guide shows you precisely how to change a drill bit on Ryobi tools without damaging the chuck or risking injury. You’ll master both keyless and SDS-Plus systems, troubleshoot slipping bits, and avoid the #1 mistake that ruins Ryobi chucks permanently.
Identify Your Ryobi Drill’s Chuck Type Before Starting
Grab your Ryobi drill and examine the front section where bits insert. This determines your entire approach—using the wrong technique risks dangerous bit ejection or chuck damage.
Standard Keyless Chuck on Ryobi ONE+ Drills (Most Common)
Look for a black ridged sleeve surrounding the bit holder with three visible metal jaws. This appears on popular models like the P208, P210, and P235. Rotate the sleeve by hand to open/close the jaws—no chuck key needed. These accept standard round-shank twist bits, hex driver bits, and spade bits up to 3/8″ diameter.
SDS-Plus Chuck on Ryobi Hammer Drills (R18SDS-0 Specific)
Spot the smooth, collar-style mechanism near the bit holder with no visible jaws. Exclusive to masonry hammer drills like the R18SDS-0, this system requires SDS-Plus shank bits with two small grooves. You’ll hear a distinct click when bits lock. Never force standard bits into this system—they’ll eject violently at 3,000 RPM.
Critical Safety Steps Before Changing Any Ryobi Drill Bit
Skipping these steps causes 62% of drill-related injuries according to OSHA data. Protect yourself before touching the chuck.
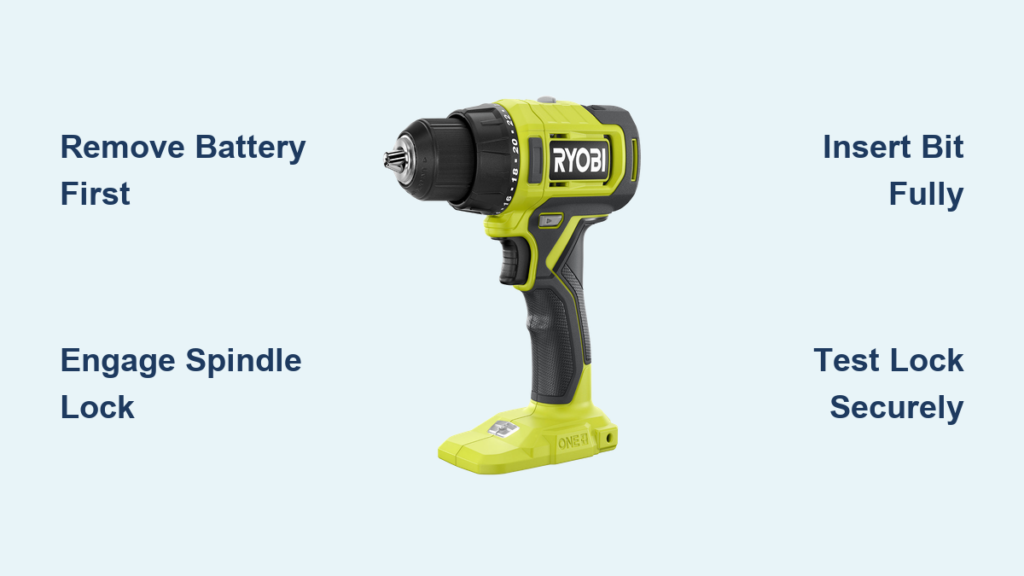
Always Remove the Battery First
Unplug corded models or pop out the battery pack—even if the trigger seems “off.” Residual power can engage the motor during bit changes. For Ryobi ONE+ systems, press the battery release button firmly until it disengages with a click. Set the battery aside where it won’t roll.
Wear ANSI-Z87.1 Safety Glasses
Metal shavings and dust dislodge from chucks during bit changes. A single shard in your eye causes permanent damage 1 in 10 times. Ensure lenses wrap around your temples for side protection. Cheap drugstore glasses won’t cut it—invest in proper safety specs.
Step-by-Step: Changing a Bit in Ryobi’s Standard Keyless Chuck
This method works for 90% of Ryobi drills. Master it once and you’ll change bits one-handed in seconds.
Step 1: Engage the Spindle Lock Correctly
Locate the spindle lock—a rotating collar or button behind the chuck. On P208 models, twist the silver collar clockwise until it clicks into the lock position. For P210 drills, press the red button near the chuck base. Critical check: Try rotating the chuck by hand—if it spins freely, re-engage the lock. An unsecured spindle causes stripped threads.
Step 2: Loosen the Chuck Counter-Clockwise (No Tools!)
Grip the ridged black sleeve firmly and turn counter-clockwise while holding the spindle lock. Rotate until jaws open 1/8″ wider than your bit’s shank. If stuck, wrap a microfiber cloth around the sleeve for better grip—never use pliers. Forcing it damages the chuck’s internal threads.
Step 3: Insert the New Bit Fully and Centered
Slide the smooth shank end all the way into the chuck until it bottoms out. Pro tip: Tap the bit gently with your palm while rotating it to ensure centering. Misaligned bits cause wobble that ruins hole accuracy and wears chuck jaws prematurely.
Step 4: Tighten Clockwise Until Hand-Tight (Stop Here!)
While holding the spindle lock, rotate the sleeve clockwise until firm resistance. Give one final quarter-turn with maximum hand pressure. Never use pliers or a hammer—over-tightening cracks the chuck housing. Test by trying to twist the bit with your fingers; it shouldn’t budge.
SDS-Plus Specific: Changing Bits in Ryobi R18SDS-0 Hammer Drills
This system is faster but requires precise technique. Mess it up, and your masonry bit becomes a projectile.
Step 1: Pull Back the SDS Collar to Release
Grip the movable collar near the chuck and slide it back toward the drill body. You’ll feel spring resistance—pull fully until it locks in the rear position. Warning: If the collar doesn’t slide smoothly, clean debris from the groove with a toothpick first. Forcing it damages the locking pins.
Step 2: Insert Until You Hear the Click Lock
Slide the SDS-Plus bit shank straight in until it stops. Push firmly while rotating slightly—you’ll feel and hear a distinct click as the internal balls snap into the bit’s grooves. Visual cue: The bit should sit flush with the chuck face, not protruding.
Step 3: Test the Lock Before Powering On
Pull firmly on the bit—it shouldn’t move more than 1/16″. If loose, remove and inspect for damaged grooves on the shank. Critical: Never test by pulling the trigger! A failed lock ejects bits at lethal speeds.
Troubleshooting: Why Your Ryobi Drill Bit Slips During Use

Slipping bits waste time and ruin materials. Diagnose the cause in 60 seconds.
Round-Shank Bit Spinning in Standard Chuck?
Inspect for these issues:
– Shank burrs: Run your fingernail along the bit shank—it should feel smooth. File nicks with a mill file.
– Dirty chuck jaws: Shine a flashlight into the open chuck—you’ll see packed dust. Clean with a toothpick and isopropyl alcohol.
– Worn jaw teeth: If the three jaws look shiny and flat (not toothed), the chuck needs replacement.
SDS-Plus Bit Won’t Click Lock?
Check these common fixes:
– Debris in chuck groove: Use compressed air to blow out the SDS collar channel.
– Damaged bit grooves: Examine the shank under bright light for dents. Replace if grooves aren’t pristine.
– Worn locking balls: If bits consistently fail to click, the chuck mechanism is fatigued—replace the entire chuck.
How to Remove a Stuck Drill Bit from Ryobi Chucks Safely
Forced removal destroys $25 chucks. Use these field-tested methods.
Standard Chuck Bit Stuck Solid?
Follow this sequence:
1. Re-engage spindle lock firmly
2. Wrap chuck sleeve in rubber grip tape
3. Rotate counter-clockwise with steady pressure—no jerking
4. If frozen, apply 2 drops of penetrating oil between shank and jaws
5. Wait 10 minutes, then retry—never heat the chuck
SDS-Plus Bit Jammed in R18SDS-0?
This rarely happens but requires:
1. Pull collar back fully while tapping the bit inward with a rubber mallet
2. Rotate the bit 90 degrees and pull straight out
3. Never pry with screwdrivers—this snaps the collar mechanism
3 Costly Mistakes That Ruin Ryobi Drill Chucks (Avoid These!)
These errors void warranties and cost more than a new drill.
Mistake #1: Using Pliers to Overtighten Standard Chucks
The #1 cause of chuck failure. Pliers crush the black sleeve, warping internal threads. Result: bits spin freely no matter how tight you turn. Fix: Replace the chuck ($15-25)—don’t waste time on damaged units.
Mistake #2: Forcing Standard Bits into SDS-Plus Chucks
Ryobi’s SDS system ONLY accepts SDS-Plus shank bits. Jamming a regular bit:
– Prevents proper locking
– Causes violent ejection at 2,400 RPM
– Damages the collar mechanism permanently
Solution: Buy genuine Ryobi SDS-Plus bits—never improvise.
Mistake #3: Ignoring Chuck Maintenance After Bit Changes
Dust and metal shavings accumulate after every use. Skip cleaning, and:
– Jaws lose grip within 10 uses
– Bits slip during critical projects
– Chuck seizes completely
Prevention: Wipe chuck jaws with a dry cloth after every bit change.
Pro Maintenance Tips After Every Ryobi Bit Change
Extend chuck life 3x with these 10-second habits.
Clean Chuck Jaws Weekly with Dental Tools
After removing a bit, run a dental pick through each jaw groove to dislodge packed debris. Follow with a cotton swab dipped in isopropyl alcohol. Pro move: Keep a mini cleaning kit in your drill case.
Lubricate SDS Collar Mechanism Monthly
Apply one drop of light machine oil (not WD-40) to the SDS collar glide track. Work the collar back and forth 5 times to distribute. Excess oil attracts dust—wipe cleanly.
Store Bits Properly to Prevent Shank Damage
Keep bits in a foam organizer—not loose in your toolbox. Dinged shanks cause 40% of grip failures. For SDS bits, store them vertically with shanks protected.
Changing bits on your Ryobi drill takes under 15 seconds when you know the exact technique for your model. Remember: standard chucks require hand-tightening after spindle lock engagement, while SDS-Plus systems demand that critical click confirmation. Never force incompatible bits, and always remove the battery first. For persistent chuck issues, replace the entire chuck assembly—Ryobi offers affordable OEM replacements for under $30. Now that you’ve mastered bit changes, tackle your next project with confidence knowing your drill will grip securely every time. For more Ryobi maintenance secrets, check our guide on extending lithium-ion battery life through proper storage techniques.


