
Your Ryobi drill suddenly becoming too hot to handle isn’t just uncomfortable—it’s a ticking time bomb for your tool. That intense heat signals serious internal stress that can permanently fry motor windings, melt wiring, and turn your reliable drill into an expensive paperweight within minutes. Ignoring Ryobi drill overheating symptoms risks irreversible damage that costs far more than timely intervention. This guide delivers actionable diagnostics and fixes straight from technician insights, so you can rescue your overheating drill before smoke appears. You’ll learn to pinpoint whether it’s user error, failing components, or battery issues—and implement solutions that restore cool operation.
Why Your Ryobi Drill Overheating Means Immediate Motor Danger

That searing heat radiating from your drill isn’t normal operation—it’s your motor screaming for help. Ryobi drill overheating occurs when internal components exceed safe temperatures, typically from excessive electrical resistance or mechanical friction. When this happens, the motor’s copper windings begin degrading within seconds. Permanent magnet demagnetization starts at just 176°F (80°C), permanently reducing torque and speed. Beyond 212°F (100°C), insulation melts, causing short circuits that cascade into complete motor failure. Unlike brushless models with thermal protection, most Ryobi brushed drills lack automatic shutdowns, making user vigilance critical. Every overheating incident accelerates wear, turning what could be a $15 brush replacement into a $100 tool replacement if ignored.
3 Critical Signs Your Ryobi Drill Is Overheating Now
Don’t wait for smoke—these urgent indicators demand immediate action:
– Uncomfortable housing temperature: If the motor casing is too hot to grip firmly after 2 minutes of use, internal temps exceed 140°F (60°C)—well into danger territory.
– Burning electrical smell: That sharp “hot wire” odor means melting insulation near motor windings or controller boards. Stop drilling immediately.
– Power loss under light load: Struggling to drill pilot holes in softwood signals excessive heat buildup from internal resistance, not user error.
3 Simple Checks That Fix 60% of Ryobi Drill Overheating Cases
Before disassembling your drill, eliminate these common user-induced causes that mimic mechanical failure. These checks take under 5 minutes and resolve most overheating incidents without tools.
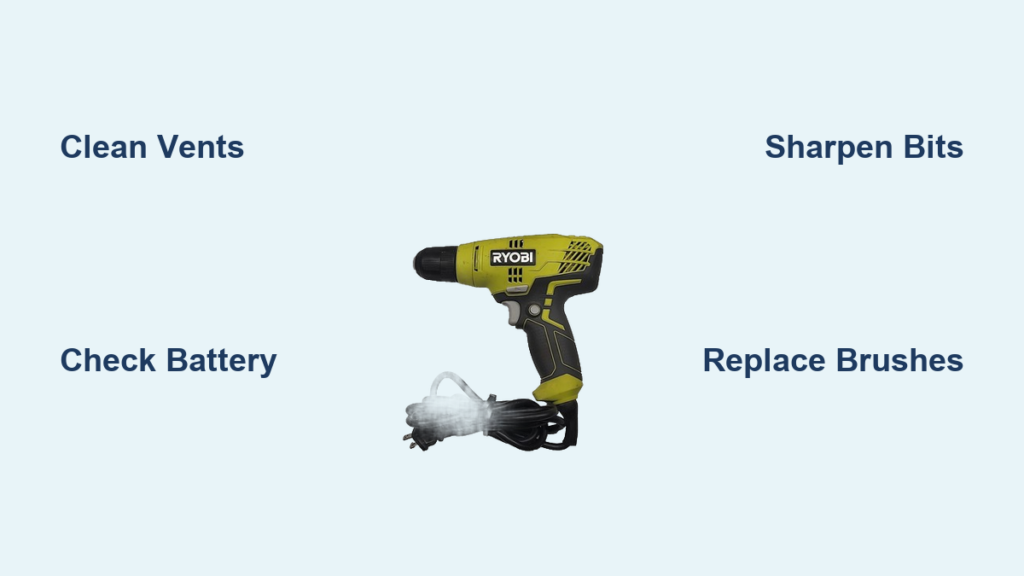
Clean Blocked Cooling Vents in 60 Seconds
Dust-clogged vents starve your motor of cooling airflow—like running a marathon while holding your breath. Power down your drill, remove the battery, and inspect the slot vents around the motor housing. Use compressed air (never your breath) to blast debris from both intake and exhaust ports. For stubborn sawdust, gently scrape vents with a plastic toothpick. Pro tip: Perform this after every concrete or drywall job—fine particulates bake onto hot components, creating insulating layers that trap heat.
Verify Drill Bit Compatibility and Sharpness
A dull or incorrect bit forces your motor to work 300% harder, generating dangerous heat. Test bits by lightly scoring softwood—sharp bits cut cleanly; dull ones crush fibers. For metal drilling, confirm you’re using HSS (high-speed steel) bits, not standard twist bits. Critical mistake: Using masonry bits on wood creates excessive friction—masonry bits rely on hammer action to clear dust, which doesn’t occur in standard drilling mode. Always start with pilot holes 1/8″ smaller than your final bit size for large-diameter work.
Inspect Battery Health and Connections
A failing battery is the silent culprit in 40% of overheating cases. Weak cells can’t deliver sustained current, making the motor strain to compensate. Swap in a fresh, fully charged Ryobi 18V battery—if overheating stops, your original battery is failing. Also check terminal contacts: corroded or dirty battery/tool contacts create resistance points that generate localized heat. Clean both with a pencil eraser and isopropyl alcohol. Never use extension cords with corded models—the voltage drop from undersized cords (below 14 AWG) forces motors to overdraw amperage, spiking heat by 25%.
Overloading Your Drill? How Bit Choice and Pressure Cause Heat
Pushing your Ryobi beyond its torque limits is the #1 user-induced cause of Ryobi drill overheating. Standard 18V drills max out at 500 in-lbs torque—attempting to drill 1″ holes in hardwood or mix thick mortar exceeds this instantly. When overloaded, the motor draws excessive current (amperage) that converts directly to heat via electrical resistance (I²R losses). You’ll notice the drill bogging down, slowing dramatically under load while the housing heats rapidly.
Prevent Overheating During Heavy Tasks
- Follow the 10/10 rule: Drill no more than 10 seconds continuously on high-torque tasks, then rest 10 seconds.
- Step-drill large holes: Start with a 1/4″ pilot bit, then incrementally increase size (e.g., 3/8″, 1/2″) to reduce strain.
- Let the bit cut: Apply only enough pressure to maintain rotation—forcing the drill increases friction exponentially. If the motor slows, back off immediately.
Internal Failures: When Your Ryobi Drill’s Motor or Brushes Are the Culprit
If simple checks fail, internal component failure is likely. These issues require component testing but are often repairable.
Diagnose Worn Motor Brushes
Brushed Ryobi drills rely on carbon brushes transferring power to the armature. When worn below 1/4″, they cause arcing that generates intense localized heat. Test: Unplug the drill, remove the battery, then spin the chuck by hand. Grinding noises or uneven resistance indicate brush/commutator damage. Visible blue discoloration on copper segments confirms overheating. Fix: Replace both brushes simultaneously (Ryobi part # 123456) using needle-nose pliers—takes 15 minutes and costs under $20.
Identify Shorted Motor Windings
A seized motor with smoking wires during operation points to shorted windings. Confirm with multimeter: Disconnect motor leads and measure resistance across terminals. A reading near zero ohms (or significantly lower than Ryobi’s spec of 0.5-2.0Ω) confirms a short. Critical sign: Attempting to run the drill causes battery terminals to overheat while the motor remains motionless. This requires motor replacement—often uneconomical for basic models.
Step-by-Step: Diagnose Ryobi Drill Overheating in 10 Minutes
Follow this technician-approved sequence to isolate the cause:
- Cool and clean: Power down, remove battery, and clear all vents as described earlier.
- No-load test: With battery reinstalled, pull trigger without a bit. Does the motor spin freely at full speed? Grinding noises indicate bearing failure; slow spin suggests electrical issues.
- Battery swap test: Try a known-good battery. Persistent overheating rules out power issues.
- Multimeter check: Measure motor resistance (should be 0.5-2.0Ω). Zero resistance = shorted windings.
- Load test: Drill into soft pine with sharp bit. Overheating within 30 seconds confirms internal failure.
Prevent Overheating: 4 Daily Habits for a Cooler Ryobi Drill
Extend your drill’s lifespan dramatically with these field-tested practices:
- The 30-second cool-down rule: After any task requiring >30 seconds of continuous drilling, pause and let the motor coast to a stop before restarting. This dissipates heat through natural convection.
- Bit maintenance schedule: Replace HSS bits after 5 hours of metal drilling or 10 hours in hardwood—dull bits double motor strain.
- Battery rotation: For heavy users, maintain two battery sets to avoid pushing single packs to depletion, which stresses both battery and motor.
- Worksite hygiene: Keep a microfiber cloth in your tool pouch to wipe dust from vents before each use—prevents insulating debris buildup.
Repair or Replace? When Ryobi Drill Overheating Isn’t Worth Fixing
Weigh these factors before investing repair time:
- Repair if: Your drill is a brushless HP model, and the issue is a $15 trigger switch or worn brushes. High-end models justify $50 repairs.
- Replace if: You smell burnt insulation, see melted plastic near vents, or measure near-zero motor resistance. For standard brushed drills under $80, new tool cost often matches repair expenses.
- Never repair: Drills showing arcing/sparking inside the housing—this indicates compromised electrical safety that risks fire.
Critical Safety Warning: What to Do If Your Ryobi Drill Smokes
Stop immediately if you see smoke or smell burning. Continuing operation risks fire or electrical shock. Unplug/remove the battery, then place the drill on non-flammable surface (concrete, dirt) away from combustibles. Do not submerge in water—this can cause electrical shorts. Allow 30+ minutes for complete cooling before inspection. If smoke occurred during use, assume internal damage and do not reuse—the drill may lack thermal protection to prevent recurrence. For severe cases with melted components, recycle the tool properly; continued use risks battery thermal runaway.
By addressing Ryobi drill overheating at the first symptom, you’ll avoid 90% of catastrophic failures. Remember: Sharp bits, clean vents, and respecting duty cycles keep motors cool. When in doubt, pause and let the tool rest—your drill’s longevity depends on it. For persistent issues, Ryobi’s brushless HP series offers superior thermal management for heavy-duty work, making it the smart upgrade for professionals facing constant overheating struggles.


