
Your Milwaukee drill suddenly slips bits while drilling concrete, or the chuck wobbles violently during a critical project. That frustrating “head” (properly called the chuck) failure halts work and risks damaging materials. When your M18 Fuel or M12 drill won’t grip bits securely, replacing the chuck yourself saves costly service trips and gets you back on site fast. This guide cuts through confusing online advice to deliver the exact steps for safely swapping chucks on any Milwaukee cordless drill—whether you own a 3/8″ keyless model or heavy-duty 1/2″ keyed version. You’ll learn why reverse-thread screws trip up 90% of DIYers and how to avoid spindle damage that ruins your entire tool.
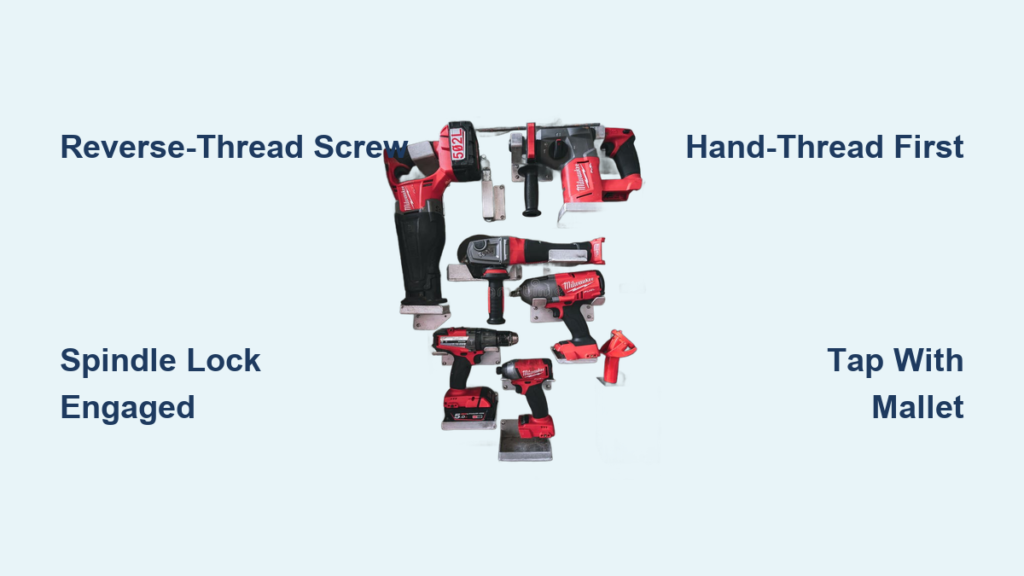
Must-Have Tools for Milwaukee Chuck Replacement (No Specialized Gear Needed)
Gather these items before starting—most are already in your toolbox. Skipping safety gear risks eye injuries from metal fragments during removal. For Milwaukee models like the 2804-20 or 2724-20, you’ll need:
- 14mm or 1/2-inch socket wrench (fits spindle flats on 95% of M18/M12 drills)
- Phillips #2 screwdriver (long-shaft recommended for reverse-thread screw access)
- New chuck matching your drill’s spindle type (1/2″ keyed for hammer drills, 3/8″ keyless for compact models)
- Safety glasses and work gloves (non-negotiable for eye/hand protection)
- Blue threadlocker (Loctite 243—prevents screw loosening from vibration)
Critical Safety Steps Milwaukee Owners Ignore
Unplug corded drills or remove the battery immediately—this prevents accidental trigger activation during chuck removal. Milwaukee’s spindle lock feature won’t stop the motor if the trigger is engaged. Always wear safety glasses: hammer taps during stubborn chuck removal send metal shards flying toward your face. Use the correct socket size; a 14mm fits most Fuel models while 1/2-inch works on older M18s. An ill-fitting wrench rounds spindle flats, requiring expensive repairs. Never clamp the chuck body in a vise—grip only the metal spindle flats to avoid cracking the chuck housing.
Removing a Seized Milwaukee Drill Chuck in 4 Non-Damaging Steps
Why Your Milwaukee Chuck Won’t Release (And How to Fix It)
Stuck chucks usually happen because you’re turning the internal screw the wrong way. That small screw deep inside the chuck has reverse threads—turning it clockwise loosens it (opposite of normal screws). If you’ve been turning counter-clockwise, you’ve overtightened it, welding the chuck to the spindle. Confirm reverse threads by checking for a left-hand thread symbol (↶) inside the chuck. Apply penetrating oil down the screw hole, wait 15 minutes, then proceed.
Step 1: Unlocking the Reverse-Thread Chuck Screw Safely
- Engage spindle lock by pressing the button near the chuck (common on Fuel models) or twisting the collar clockwise until it clicks.
- Open chuck jaws fully and insert a long Phillips screwdriver into the recessed screw at the bottom.
- Tap the screwdriver handle firmly with a hammer—this breaks thread adhesion without stripping the screw head.
- Turn clockwise while applying downward pressure. If resistance is extreme, clamp the drill in a soft-jaw vise and use a hand impact driver set to “loosen” for shock force. Never use a power drill—this strips screws.
Step 2: Freeing the Tapered Spindle Connection Without Damage
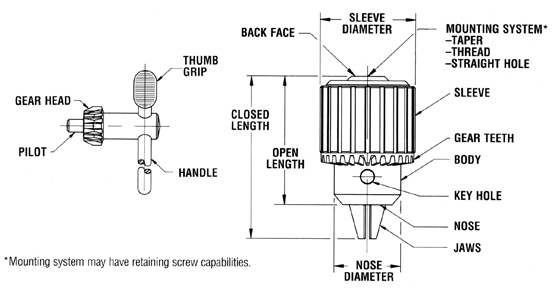
Milwaukee uses a Jacobs Taper system where the chuck locks onto a conical spindle. Forcing it causes wobble. Here’s the safe removal sequence:
1. Insert a chuck key into any jaw slot (or 5mm hex key for keyless models).
2. Place a 14mm socket on the spindle’s hex flats near the motor housing.
3. Hold the socket wrench steady while turning the chuck key counter-clockwise. You’re unscrewing the chuck from the spindle—not the key from the chuck.
4. If stuck, strike the wrench handle once with a rubber mallet. Repeat penetrating oil applications if needed. Stop if you hear grinding—this indicates cross-threading.
Installing Your New Milwaukee Chuck for Zero Wobble
Hand-Thread First: The Critical Step Everyone Skips
Cross-threading destroys spindle threads and causes dangerous runout. Before tightening:
1. Wipe the spindle taper and new chuck’s interior with a lint-free cloth—any metal shavings cause vibration.
2. Align the chuck’s keyway with the spindle’s flat tab (visible on most M18 models).
3. Screw the chuck on by hand clockwise until fully seated. If it binds after 2-3 turns, back off and restart—you’ve cross-threaded it.
Achieving Perfect Chuck Seating in 90 Seconds
- Re-engage the spindle lock and tighten the chuck by turning the key counter-clockwise.
- Tap the chuck face squarely with a rubber mallet 3-4 times—this seats the taper without hammering the spindle.
- For final torque, clamp the chuck key in a vice and trigger the drill briefly in reverse. Milwaukee engineers confirm this method applies optimal force without gearbox strain.
Securing the Reverse-Thread Screw (Where 80% Fail)

Reinstalling the screw wrong causes chuck detachment during use. Do this:
1. Apply blue threadlocker to the screw threads (red is too strong for field repairs).
2. Insert the screw and turn it counter-clockwise to tighten—remember, it’s reverse-threaded.
3. Test security by trying to turn the screw clockwise with a screwdriver—it shouldn’t budge. Over-tightening cracks the chuck base.
Troubleshooting Milwaukee-Specific Chuck Failures
“My New Chuck Still Wobbles!” Fixing Runout Issues
Wobble means improper taper seating. Remove the chuck and:
– Check for burrs on the spindle with your fingernail—if rough, polish with 400-grit sandpaper.
– Ensure no threadlocker seeped into the taper during assembly (wipe excess immediately).
– Re-seat using the mallet method: 3 firm taps while rotating the chuck 120 degrees between strikes.
Why Your Drill Bit Slips After Chuck Replacement
This indicates incorrect jaw alignment in keyless chucks. Close the chuck completely on a 3/8″ hex key before first use—this resets the internal mechanism. If slipping continues, return the chuck; Milwaukee’s QC rejects misaligned units.
Stuck Chuck Screw? Emergency Removal Protocol
When the screw head is stripped:
1. Drill a 1/8″ hole into the screw center using a left-hand drill bit.
2. Insert a screw extractor and turn counter-clockwise—the reverse bit often backs it out during drilling.
3. Never use heat—Milwaukee’s aluminum housings warp at 300°F.
Pro Maintenance Tips from Milwaukee Field Technicians
Mark alignment points with a silver paint pen before disassembly. Draw lines connecting the chuck to the gear housing—this ensures identical repositioning for balanced rotation. After installation, run the drill at 500 RPM for 30 seconds with no load; this seats the chuck under operational stress. For jobsites with concrete dust, apply a thin coat of marine grease to the spindle threads every 6 months—this prevents corrosion-induced seizure without attracting debris.
Final Safety Verification Before Drilling
Test your repair before risking injury:
1. Insert a 1/4″ hex bit and tighten the chuck fully.
2. Hold the drill sideways and pull the trigger at 300 RPM—watch for lateral movement exceeding 0.5mm.
3. Apply downward pressure on scrap wood; if the bit spins in the chuck, the internal jaws are damaged.
4. Never operate a wobbling drill—vibration cracks gear housings within 10 minutes.
A properly installed Milwaukee chuck lasts 5+ years under heavy use. If you skipped threadlocker or cross-threaded during installation, replace it immediately—loose chucks become dangerous projectiles at high speeds. For models with integrated hammers (like the 2704-20), always verify chuck tightness before switching to hammer mode. Now that your drill grips securely, keep your workspace efficient: store chuck keys in the battery slot to prevent loss. For Fuel model owners, remember that spindle lock engagement varies—consult your manual if the button doesn’t click audibly. This repair isn’t just about fixing a tool; it’s about ensuring every hole you drill meets professional standards without costly rework.


