
You’ve spent hours planning your Hot Wheels modification, only to ruin everything with a single slip of the drill bit. Drilling holes for screws in Hot Wheels cars is one of the most common yet most challenging steps in die-cast customization. Many hobbyists accidentally crack the plastic body, strip the tiny holes, or create misaligned openings that prevent proper screw installation. This frustrating experience happens because Hot Wheels parts are incredibly small—typically 1:64 scale—with delicate plastic bodies and thin metal chassis that demand precision drilling techniques most beginners don’t know.
The difference between a professional-looking custom build and a ruined collectible often comes down to how you drill holes for screws for Hot Wheels. Unlike regular drilling projects, these miniature modifications require specialized tools, specific techniques, and patience you won’t find in standard DIY guides. When done correctly, your screw holes will be clean, precisely sized, and perfectly aligned, allowing for secure attachments whether you’re installing motors, swapping chassis, or adding custom details. This guide reveals the exact methods professional modelers use to drill flawless screw holes in Hot Wheels without damaging these valuable collectibles.
Why Most Hot Wheels Screw Holes Fail (And How to Fix It)
Your Hot Wheels modifications fail at the drilling stage because standard techniques don’t work on these miniature parts. The #1 reason drill bits wander across Hot Wheels surfaces is the lack of a proper starting point. Without a center punch mark, even experienced hobbyists struggle to keep tiny drill bits from skidding across the smooth metal or plastic surfaces of these small vehicles. This wandering creates oversized, misaligned holes that prevent screws from seating properly and compromise your entire modification project.
How to Create the Perfect Starting Point for Hot Wheels Drilling
Take a fine-tip scribe or needle and make a tiny indentation at your exact drilling location. For metal chassis components, use a small center punch with light hammer taps to create a defined dimple. This dimple guides the drill bit precisely where you want it, preventing that frustrating skidding motion. On plastic bodies, be extremely gentle—too much force will crack the material. For the smallest Hot Wheels parts, use a pin vise with a tiny drill bit to create a minuscule starter hole before moving to your final size.
Essential Safety Setup Before Drilling Hot Wheels Chassis

Drilling Hot Wheels creates dangerous metal and plastic shavings that can permanently damage your eyes. Safety glasses aren’t just recommended—they’re absolutely mandatory when working with these miniature parts. Standard reading glasses won’t cut it; you need ANSI Z87.1-rated safety glasses that provide full coverage from all angles. At this small scale, even microscopic shavings become projectiles that can fly surprising distances when ejected from the drill bit.
How to Secure a Hot Wheels Car Without Damaging the Paint
Never hold your Hot Wheels in your hand while drilling—this is how fingers get injured and holes get misaligned. Use a small hobby vise with soft jaw protectors or padded clamps designed for delicate work. Position your Hot Wheels so the drilling surface is perfectly horizontal, then secure it with just enough pressure to prevent movement without crushing the thin plastic body. If working on a painted show car, wrap the clamp jaws with masking tape to prevent scuffing. For maximum stability during drilling, place your secured Hot Wheels on a non-slip mat to prevent the entire setup from vibrating.
Selecting the Exact Drill Bits for Hot Wheels Screw Holes
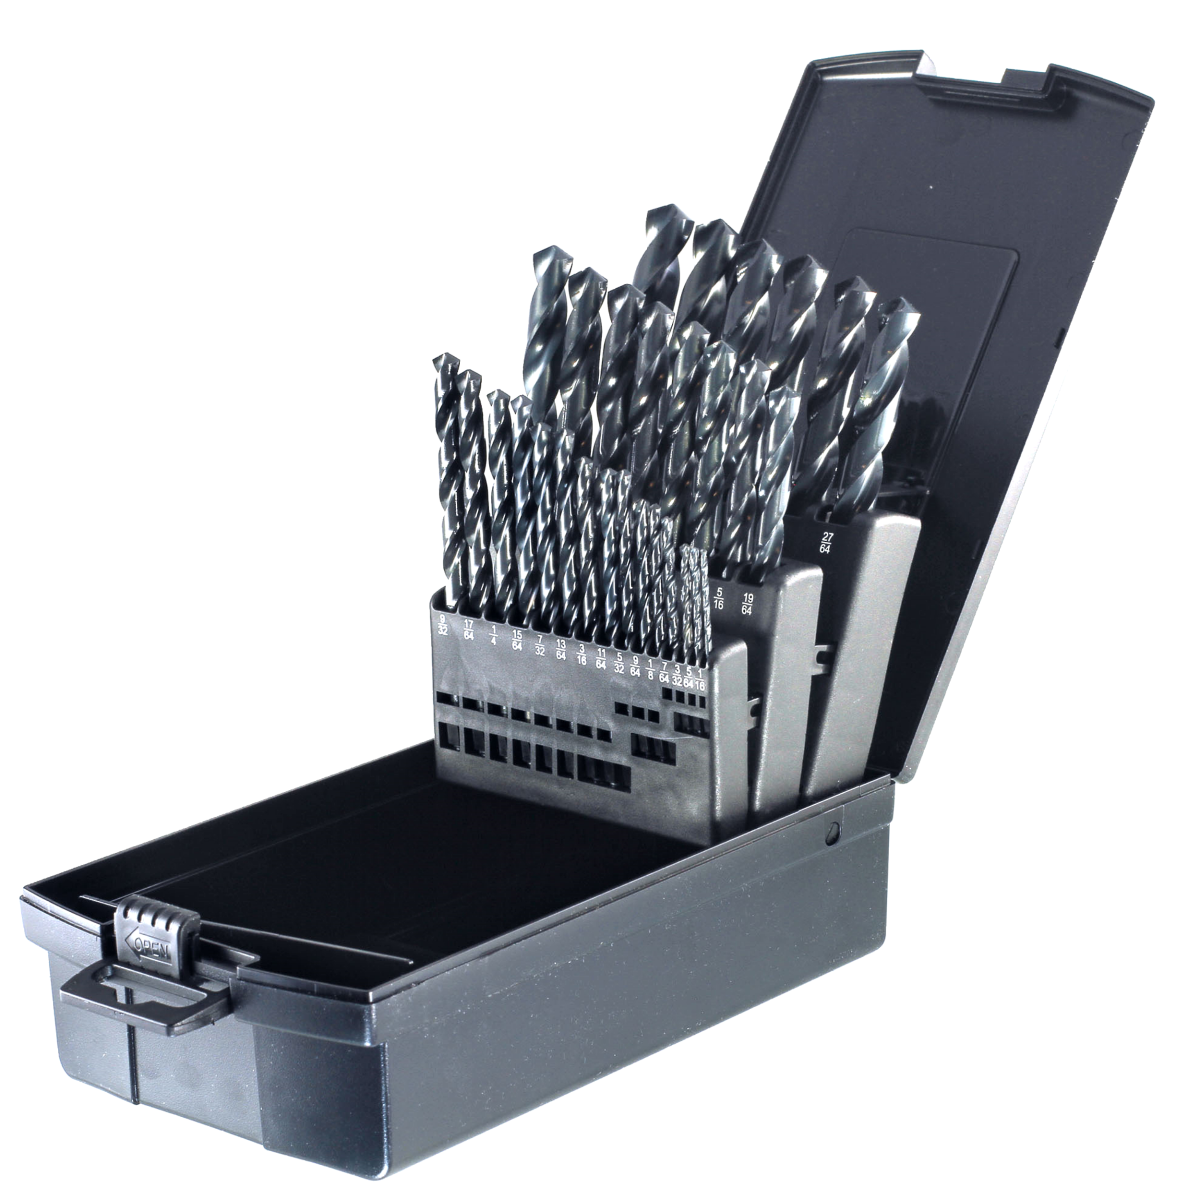
Using the wrong drill bit size is the most common mistake in Hot Wheels modifications. For #2-56 screws—the standard size for professional model work—you need two specific drill bits working in sequence. The 1/16″ (1.6mm) bit creates the pilot hole that guides your larger bit, while the 11/64″ (4.37mm) bit creates the final clearance hole that allows the screw to pass through without binding. Using only one bit size guarantees problems—too small and your screw won’t fit; too large and you lose holding power.
Why 1/16″ Is the Perfect Pilot Hole Size for #2-56 Screws
This specific size creates just enough space for the screw’s core while maintaining enough material for the threads to grip. Drill this pilot hole all the way through your Hot Wheels chassis or body component before moving to the clearance size. For plastic bodies, drill at extremely slow speeds (under 500 RPM) to prevent melting. On metal chassis parts, increase to 800-1200 RPM with light machine oil as lubricant—this reduces heat buildup that can warp thin metal components.
The Two-Step Drilling Method That Prevents Hot Wheels Damage
Skipping the pilot hole step is why most Hot Wheels drilling attempts fail. The two-step method—starting with a small pilot hole before enlarging to final size—is non-negotiable for professional results. This technique prevents drill bit wandering, reduces the force needed (minimizing crack risks), and ensures perfectly round holes every time. For Hot Wheels modifications, this process takes just 30-45 seconds per hole but makes the difference between success and a ruined model.
Step-by-Step: Drilling the Pilot Hole Without Cracking Plastic
1. Secure your Hot Wheels in your vise with the drilling surface horizontal
2. Position your 1/16″ drill bit directly over your center punch mark
3. Start drilling at the lowest speed setting on your drill
4. Apply only light downward pressure—let the bit cut at its own pace
5. Drill completely through the material, lifting the bit every 2-3 seconds to clear debris
6. For plastic bodies, stop immediately if you see melting or smoke—this means your speed is too high
Widening to Clearance Size: The Critical Second Drill Step
After completing your pilot hole, switch to your 11/64″ bit and align it perfectly with the existing hole. Drill slowly through the pilot hole, maintaining perpendicular alignment. On metal chassis, you’ll feel the bit grab as it enters the pilot hole—this is your cue to reduce pressure slightly. For plastic bodies, go even slower than with the pilot hole; the larger bit generates more heat that can melt surrounding material. Complete this step by drilling just through the material—over-drilling creates an oversized hole that won’t properly secure your screw.
Soldering Iron Method: Drilling Hot Wheels Without Metal Shavings
If you lack precision drill tools or work in environments where metal shavings threaten your health, the soldering iron method provides a clean alternative for removing Hot Wheels rivets. This technique uses heat to soften surrounding plastic, allowing you to remove rivet heads without creating any metal debris. It’s particularly valuable when modifying valuable collector’s items where metal shavings could damage paint or interior details.
Proper Temperature Settings for Melting Hot Wheels Rivets
Set your soldering iron to 500-600°F (260-315°C)—hot enough to melt plastic but not so hot that it burns. Position the tip directly on the rivet head and apply light, consistent pressure for 30-45 seconds. You’ll feel the resistance decrease as the plastic softens. At this point, twist gently with needle-nose pliers while maintaining pressure—the rivet should lift out cleanly, leaving a perfect hole. Critical tip: Work in a well-ventilated area as melting plastic produces fumes, and always have heat-resistant gloves nearby in case you need to handle hot components.
How to Choose the Right #2-56 Screws for Hot Wheels Modifications

Not all #2-56 screws work equally well for Hot Wheels modifications. The standard 1/8″ length provides optimal holding power without protruding through the opposite side of your model. Button head screws offer the best combination of low profile and secure grip—their rounded tops sit flush with most Hot Wheels surfaces without creating protrusions that interfere with display or operation. Hex socket drives (Allen keys) are superior to slotted or Phillips heads because they won’t strip when working with these tiny fasteners.
Button Head vs. Flat Head: Best Screws for Low-Profile Hot Wheels Mods
For chassis modifications where clearance matters, button heads provide 30% more head strength than flat heads of the same size while maintaining a low profile. Their rounded tops distribute pressure more evenly across the thin metal of Hot Wheels chassis, preventing the “pull-through” that commonly ruins flat-head installations. When installing screws, always start threading by hand to prevent cross-threading, then use a properly sized hex key for final tightening—stop when you feel firm resistance to avoid stripping the delicate threads in plastic components.
Troubleshooting Common Hot Wheels Drilling Problems
How to Fix a Wandering Drill Bit on Small Hot Wheels Parts
If your drill bit keeps skidding across the surface, your center punch mark isn’t deep enough. Create a new, slightly deeper dimple using a pin vise with a tiny drill bit (1/32″ or smaller) to establish a secure starting point. Alternatively, apply a small piece of masking tape over your drilling location—this gives the bit something to “bite” into initially. For stubborn cases, start with an even smaller pilot bit (1/32″) before moving to your 1/16″ size.
Why Your Hot Wheels Plastic Cracks During Drilling (And How to Stop It)
Plastic cracking happens when you apply too much pressure or drill too fast. Switch to a sharp drill bit (dull bits require more force), reduce your drill speed to minimum, and support the backside of your Hot Wheels with a wood block to prevent blowout. Drill in short bursts with frequent lifting to clear debris and allow the plastic to cool. If cracks still occur, switch to the soldering iron method which creates clean holes without mechanical stress.
Post-Drilling Steps for Professional Hot Wheels Modifications
Deburring Techniques for Smooth Hot Wheels Screw Holes
After drilling, inspect each hole for burrs—tiny metal or plastic edges that prevent proper screw seating. For metal chassis, gently rotate a slightly larger drill bit (1/8″) in the hole by hand to smooth the edges. On plastic bodies, use the back of a small file or even the shank of a drill bit to carefully remove any rough edges. Never skip this step: burrs cause screws to bind, creating false “tight” spots that lead to stripped threads during installation.
How to Clean Metal Shavings from Hot Wheels Interior Components
Use a shop vac with a narrow nozzle attachment to remove visible shavings, then follow with compressed air to dislodge hidden particles. For thorough cleaning, submerge metal components in isopropyl alcohol and use a soft brush to remove stubborn debris. For assembled models, use a piece of scotch tape wrapped around a toothpick—sticky side out—to lift shavings from hard-to-reach areas. Always test your cleaning method on a scrap piece first to ensure it won’t damage paint or decals.
Final Tip: Before drilling your prized Hot Wheels model, practice this entire process on a junked vehicle or scrap plastic/metal pieces. Mastering the two-step drilling method on practice materials builds the muscle memory needed for perfect results on your valuable collectibles. With these techniques, you’ll create professional-quality screw holes that transform your Hot Wheels modifications from amateur attempts to showcase-worthy builds.


