

That frustrating crunch when your drill bit slips and ruins a screw head. The panic as a screw sinks too deep into expensive wood. These common mistakes turn simple projects into headaches—all because most people never learn how to use a drill for screws correctly. Forget random YouTube tutorials; professional carpenters know driving screws flawlessly requires precise technique, not just brute force. Whether you’re building a deck or hanging shelves, this guide reveals the exact steps to avoid stripped screws, split wood, and wasted hours. You’ll discover why 90% of screw-driving failures stem from three avoidable errors—and how to fix them in under 60 seconds.
Drill Driver vs. Impact Driver: Choosing Your Screw-Driving Weapon
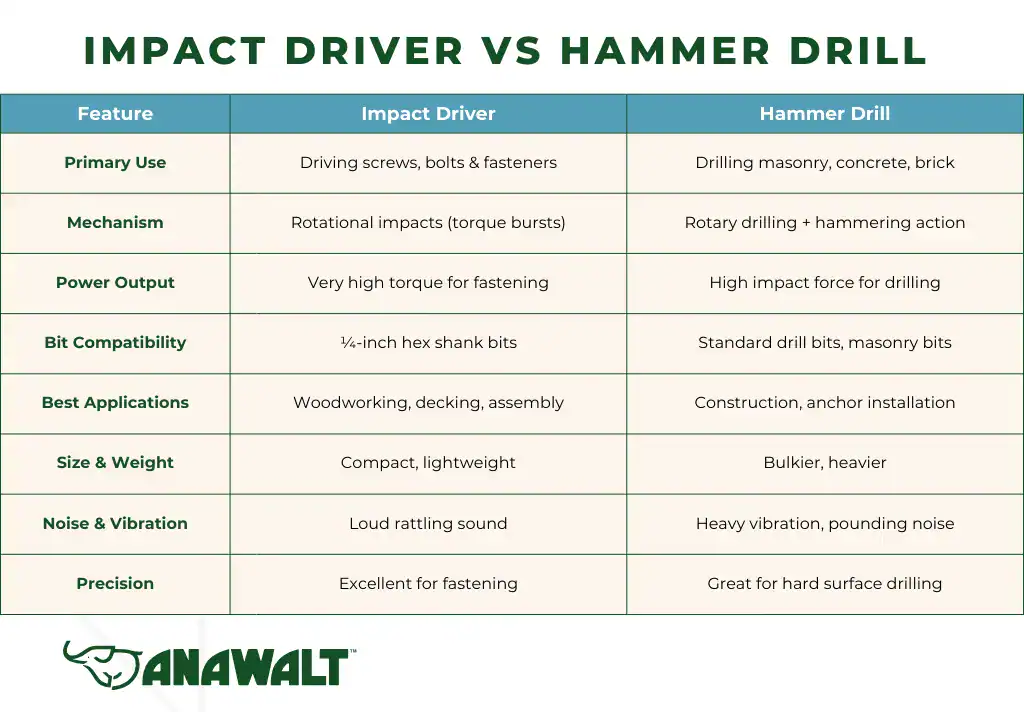
Grabbing the wrong tool guarantees frustration. Your first critical decision determines success or stripped screw heads.
Why a Standard Hammer Drill Will Ruin Your Screws
Never use a hammer drill for screw driving. Its aggressive hammering action designed for concrete creates catastrophic results in wood—it cracks materials, strips heads instantly, and offers zero torque control. The vibration alone will make your bit jump from the screw recess before the first rotation completes. Save hammer drills strictly for masonry; they have no place near screws.
Impact Driver: The Secret for Decking and Tough Jobs
When driving 3-inch deck screws or lag bolts, an impact driver becomes essential. Its rotational hammer mechanism delivers sudden torque bursts that prevent “cam-out” (bit slippage) while reducing wrist strain by 70%. But beware: set the clutch too high, and you’ll rip screw heads clean off. Always start at the lowest torque setting for new materials, and wear hearing protection—the 120+ decibel noise requires ear defenders for safety.
The Non-Negotiable Clutch Setting for Wood Projects
Your drill driver’s clutch ring is the single most overlooked feature. Set it too high (above 8), and screws sink too deep or strip heads. Too low (below 3), and screws won’t seat fully. For standard #8 wood screws in pine, begin at clutch setting 4. Test on scrap wood: if the clutch clicks before full seating, increase one notch. If the screw strips, decrease one notch. This 30-second calibration prevents 95% of driving failures.
Magnetic Bit Holders: The One Upgrade That Changes Everything
Skip this, and you’ll fight wobbly screws every time. A magnetic bit holder solves the #1 beginner mistake: losing screw alignment during startup.
Why Phillips Bits Fail (And What to Use Instead)
Phillips screws intentionally cam out to prevent over-tightening—a “feature” that destroys DIY projects. Switch to Pozidriv (PZ2) or Torx (T20) bits immediately. Their precise geometry grips screw heads 40% tighter, eliminating slippage. For critical structural work, Torx is non-negotiable; its star pattern transfers torque without cam-out. Always match the bit size exactly—#2 Phillips for #8 screws, T25 for deck screws. A 0.5mm mismatch guarantees stripped heads.
The One-Handed Screw-Starting Technique
Load the screw onto your magnetic bit holder until it snaps into place. Position the tip on your mark, then rest your index finger lightly on the screw head. Squeeze the trigger gently while maintaining downward pressure—your finger guides the screw for the first 3 rotations until threads bite. Release your finger and increase speed only after the screw is self-feeding. This eliminates wobble that causes stripped heads.
Why Skipping Pilot Holes Causes Split Wood (And How to Size Them Correctly)
That “pop” when wood splits around a screw? It’s always preventable. Pilot holes aren’t optional—they’re physics.
The Exact Drill Bit Size Formula
Use a bit 70% the diameter of the screw’s solid shank (not the threads). For a standard #8 screw (0.164″ shank), a 1/8″ (0.125″) bit creates the perfect hole. In hardwoods like oak, go 10% smaller; in softwoods like pine, match the shank size exactly. Never guess—measure your screw with calipers and consult a pilot hole chart. Too small? Motor strains and wood splits. Too large? Screws won’t grip.
Countersinking for Invisible Results
For flush finishes, add a countersink step. After drilling the pilot hole, use a countersink bit to create a 45-degree cone recess matching your screw head angle. The drill’s depth stop collar should be set so the countersink only cuts 1/8″ deep—any deeper weakens the wood. Pro tip: combo bits (pilot + countersink in one) save 50% setup time for repetitive tasks like cabinet installation.
Step-by-Step: Driving Screws Without Stripping Heads
Follow this sequence for perfect results every time—no matter the material.
Align Your Body Like a Pro (Not Just the Drill)
Stand with feet shoulder-width apart, bracing your non-dominant hand against your hip bone for stability. Your dominant hand operates the trigger while the other hand cups the drill’s rear handle. Look down the drill barrel—the bit, screw, and your eye must form a dead-straight line. Any angle over 5 degrees causes instant cam-out. For overhead work, brace the drill against your shoulder for unshakeable alignment.
The 3-Second Trigger Control Method
- Place & press: Rest the bit in the screw head, applying firm downward pressure (5-10 lbs of force).
- Start slow: Squeeze the trigger to 25% power for exactly 3 seconds—just enough for threads to bite.
- Accelerate smoothly: Increase to 75% power only after the screw is self-feeding.
- Stop at the click: Release the trigger the instant you feel the clutch slip (a distinct “click-click” rhythm).
Rushing step 2 causes 80% of stripped heads. Let the drill do the work—your job is pressure control, not speed.
Emergency Fixes for Stripped Screws and Cam-Out
When disaster strikes, these field-tested solutions save ruined projects.
Extracting a Stripped Screw in 45 Seconds
- Jam a wide rubber band between the screw head and bit for extra grip.
- Set drill to reverse at 15% power with maximum clutch setting.
- Apply firm downward pressure while slowly backing out.
If that fails, drill a small pilot hole (1/16″) through the screw head’s center, then insert a screw extractor bit. Never use pliers—they damage surrounding material.
Why Your Drill Strains (And the 10-Second Fix)
If the motor whines but the screw won’t move, stop immediately. You’ve hit one of three issues:
– Pilot hole too small: Back out the screw and enlarge the hole with the next drill bit size up.
– Hidden nail or pipe: Switch to a stud finder and relocate your screw.
– Dull bit: Replace it—worn bits require 300% more torque. Keep spares in your tool belt.
Pro Techniques for Flawless Results
Lubricate Hardwood Screws Like a Carpenter
Rub bar soap or paraffin wax on screw threads before driving. This reduces friction by 60% in dense woods like maple, preventing motor strain and heat buildup that strips heads. For pressure-treated lumber, wrap threads in plumber’s tape—it acts as a lubricant while resisting corrosion.
Depth Stop Collar Setup for Consistent Seating
Attach the depth stop collar to your drill chuck. Set it so the bit protrudes exactly the screw length plus 1/8″. This guarantees uniform depth across 100+ screws for cabinetry or decking. Test on scrap wood first—adjust in 1/16″ increments until heads sit 1/32″ below the surface.
Safety Rules That Prevent ER Visits
The 3 Must-Wear Protections (No Exceptions)
- Safety glasses: Metal screw fragments travel at 200+ mph when heads snap.
- Hearing protection: Impact drivers exceed 115 dB—enough to cause permanent hearing loss in 15 minutes.
- Dust mask: Wood dust contains carcinogens; wear N95 for indoor projects.
Never Hold Work With One Hand
Clamp materials securely to a workbench. Using your free hand to stabilize wood shifts alignment during driving, causing bit slippage that sends screws flying toward your face. For large sheets, use toggle clamps—never your body.
Mastering how to use a drill for screws transforms frustrating DIY moments into professional results. Start every project by calibrating your clutch on scrap wood, always drill pilot holes, and use magnetic bit holders with Torx bits. When you feel that smooth clutch click signaling perfect depth—no stripping, no splits—you’ll understand why carpenters treat their drills like precision instruments. Practice these steps on pine scraps for 20 minutes, and you’ll drive screws with the confidence that turns weekend warriors into trusted handymen. For structural projects like deck framing, always consult a professional—your safety is never worth a shortcut.


