

Staring at a project with dozens of identical bolts? You’re wasting hours with a manual ratchet when your drill could handle it in minutes. Using a socket wrench with a drill transforms tedious fastening work into a high-speed operation—perfect for assembling furniture, changing tires, or tackling automotive repairs. This power combo merges your drill’s rotational speed with sockets’ gripping power, but misusing it can shatter sockets or snap bolts. Most beginners make the critical error of letting the drill handle final tightening, risking stripped threads and damaged components. In this guide, you’ll learn the exact adapter types, drill settings, and safety protocols that let you drive 50 bolts in the time it takes to do five manually—without compromising safety or precision.
Must-Have Socket Adapter Sizes for Drill Compatibility (1/4″, 3/8″, 1/2″)
Skip mismatched adapters that cause dangerous socket slippage. Your adapter must bridge your drill’s 1/4-inch hex chuck to your socket’s drive size—never force a 3/8-inch socket onto a 1/4-inch adapter. For furniture assembly or small electronics, use 1/4-inch drive adapters (most common for drill bits). Automotive work demands 3/8-inch adapters for lug nuts and suspension bolts—they balance strength and maneuverability. Heavy machinery? Grab 1/2-inch impact-rated adapters for maximum torque. Always verify the square drive size stamped on your socket (e.g., “3/8”) matches the adapter. A single size mismatch creates wobble that cams out bolt heads or shatters sockets mid-operation. Keep a multi-size adapter set in your toolbox—Home Depot and AutoZone stock affordable kits covering all three standards.
Why Drive Size Mismatch Causes Catastrophic Failures
When a 1/2-inch socket slides onto a 3/8-inch adapter, the loose fit creates play during rotation. This wobble concentrates stress on the socket’s corners, cracking chrome-plated sockets or rounding bolt heads. Impact drivers magnify this risk—their hammering action turns minor misalignment into explosive shattering. One mechanic’s viral video showed a standard socket exploding at 2,000 RPM, sending metal shards through a cardboard box. Impact-rated black sockets (not chrome) resist this with hardened steel and tapered walls, but only if matched perfectly to the adapter size.
Impact-Rated vs. Standard Sockets: Avoid Shattered Chrome on Your Drill
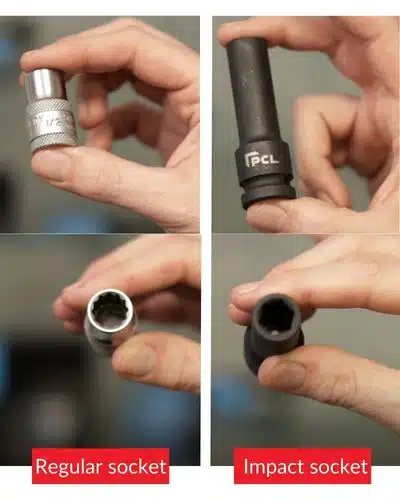
Your shiny chrome sockets belong in the drawer when using power tools. Standard chrome sockets crack under impact driver forces—their brittle plating can’t absorb the drill’s rotational shocks. For any task requiring real torque (like rusted lug nuts), switch to impact-rated sockets. These feature matte black oxide coating, thicker walls, and rounded corners that flex under stress. The trade-off? They cost 30% more and won’t fit tight spaces as easily. For furniture assembly with low torque needs, chrome sockets work—but never exceed medium drill speed. Always check sockets for hairline cracks before use; a single flaw turns them into shrapnel hazards. When in doubt, buy a $15 impact socket set (Makita and DeWalt offer reliable entry-level options).
How to Identify Impact-Rated Sockets Instantly
Impact sockets have three dead giveaways: 1) Matte black finish (chrome sockets reflect light), 2) “Impact” stamped on the side, and 3) Slightly rounded edges where the socket meets the drive hole. Chrome sockets have sharp corners and mirror-like surfaces. If your socket lacks markings, assume it’s NOT impact-rated. AutoZone sells 3/8-inch drive impact socket sets for under $20—worth every penny for automotive work.
Secure Socket-Adapter-Drill Connection: The Click Test Every Pro Uses
A loose connection wastes torque and risks projectile sockets. First, insert the adapter’s hex shank fully into the drill chuck—you should see no metal gap between chuck jaws and shank. Tighten the chuck clockwise until it won’t budge when you tug the adapter. Now press the socket onto the adapter’s square drive with firm downward pressure. You’ll hear a distinct click as the ball detent snaps into the socket’s retaining hole. This is non-negotiable—without that click, the socket will fly off at high speed. Test it by trying to twist the socket counterclockwise; if it moves, reseat it until the click is solid. Never use tape or plastic wrap as a “fix” for worn adapters; replace cracked or rounded adapters immediately.
Step-by-Step Socket Seating Checklist
- Clean grease from the adapter’s square drive with a rag
- Align socket hole perfectly over the drive (no angling)
- Press straight down with palm until you feel resistance
- Apply extra force for 1 second—listen for the click
- Pull upward sharply to confirm lock (no movement = safe)
Drill Torque Settings for Bolt Removal: High-Speed vs. Low-Torque Explained
Your drill’s settings make the difference between smooth bolt removal and snapped fasteners. For loosening stubborn bolts, set the drill to maximum speed (high RPM) but lowest torque setting. This lets the drill spin freely until the bolt breaks loose, preventing motor stall. Reverse direction immediately—lefty-loosey means counterclockwise—and brace the drill squarely against the fastener. Apply steady downward pressure to prevent cam-out. For final tightening, switch to the drill’s clutch mode at 30-50% torque (settings vary by model). This disengages the motor before over-tightening. Critical tip: Never use the drill for final torque on suspension bolts or engine components—always finish with a manual torque wrench to spec.
Why High Torque Settings Destroy Bolts
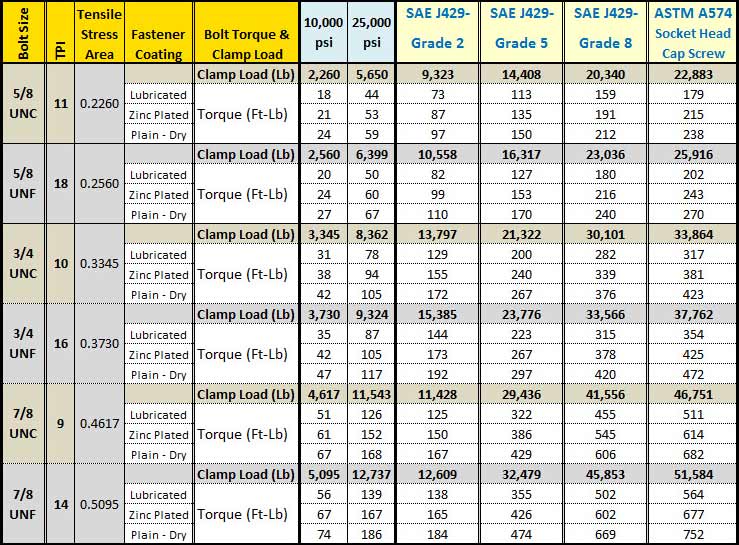
Drills deliver continuous rotational force unlike manual ratchets. At high torque settings, they’ll keep spinning after the bolt is tight, stretching threads or shearing heads. A 2019 automotive study found 68% of DIYers using drills for final tightening exceeded bolt yield strength by 40%. For perspective: A hand-tightened bolt typically hits 15 ft-lbs; many drills max out at 500+ ft-lbs. Start loose bolts at speed setting 2 (medium), then increase only if needed.
Why You Must Hand-Tighten Final Turns (Prevent Stripped Bolts)
The #1 mistake with drill-socket combos? Skipping manual final tightening. Power tools can’t replicate the tactile feedback of a ratchet when bolts reach proper tension. Always complete the last 2-3 rotations by hand using a 3-inch ratchet or torque wrench. This prevents “false torque”—when the drill spins the bolt but the threads haven’t fully seated. For critical applications like wheel lug nuts, follow the star-pattern tightening sequence manually to avoid warped brake rotors. If you hear a sudden ping during drilling, stop immediately—that’s the sound of a bolt head shearing. Let the drill handle bulk removal and initial threading, but trust your hands for precision work.
When to Switch from Drill to Hand Tool
| Task Stage | Power Tool Safe? | Hand Tool Required? |
|---|---|---|
| Breaking initial bolt tension | ✅ Yes (low torque) | ❌ No |
| Removing bolt 80% of the way | ✅ Yes | ❌ No |
| Final 2-3 rotations | ❌ Never | ✅ Always |
| Torquing to manufacturer specs | ❌ Never | ✅ Always |
Universal Joints and Extensions: Reach Deep Fasteners with Your Drill
.jpg)
Tight engine compartments demand smart extensions—not brute force. Use the shortest extension possible to minimize torque loss (longer bars flex, wasting power). For 90-degree angles, attach a universal joint between the adapter and socket—never bend the drill itself. Swivel heads let you attack bolts from awkward positions, but cap rotation at 15 degrees to prevent joint failure. Pro tip: Tape extensions together with electrical tape to stop wobble during high-speed operation. Avoid universal joints for high-torque tasks like axle nuts; the angled gears strip under load. For deep recesses, stack a 3-inch extension with a 6-inch—it’s sturdier than a single 9-inch bar.
Extension Setup Safety Protocol
- Connect adapter to drill first
- Slide extension onto adapter drive
- Attach socket to extension (not vice versa)
- Test connection clicks before powering on
- Support the extension’s midsection with your free hand
Fix Wobbling Sockets: 3 Quick Solutions for Adapter-Socket Slippage
Wobble means imminent bolt damage—fix it in seconds. First, clean debris from the socket’s retaining hole with a pick; grease or metal shavings block the ball detent. If it still slips, the adapter’s spring-loaded ball is worn—replace it ($3 at hardware stores). For emergency fixes, wrap the adapter’s drive in thin plastic wrap to increase friction (remove after use). Never hammer sockets onto adapters; this dents the drive hole. If your socket has a worn retaining hole, discard it—using damaged sockets risks catastrophic failure at high RPM. Keep spare adapters in your kit; they’re the weakest link in the chain.
Permanent Fixes for Chronic Slippage
- Replace chrome sockets showing corner rounding
- Use impact sockets exclusively with impact drivers
- Store adapters in a dedicated case (not loose in toolbox)
- Apply light machine oil to drive mechanisms monthly
Critical Safety Steps Before Every Socket-Drill Operation
Skip eye protection and you’re gambling with blindness. Metal shards from shattering sockets travel at 150+ mph—safety glasses are non-negotiable. Always clamp your workpiece securely; a spinning drill can twist loose objects into projectiles. Before pulling the trigger:
– Confirm drill direction (reverse = loosening)
– Verify socket is fully seated (no wobble)
– Set clutch to lowest torque for initial turns
– Stand with feet shoulder-width apart for stability
Most injuries happen during the first 5 seconds of operation. Start at 25% trigger pressure, then gradually increase. If the drill stalls, release immediately—forcing it strains gears. After use, wipe adapters clean and inspect for cracks. Never store sockets on adapters; moisture causes rust in the drive mechanism. For automotive work, disconnect the battery before removing electrical components—spinning drills can short-circuit systems.
Final Note: Mastering the socket-drill combo cuts fastener jobs by 70% when done right, but demands respect for its destructive potential. Always break bolts loose manually first, use impact-rated gear for high-torque tasks, and treat final tightening as sacred hand-tool territory. Keep your adapter kit organized with size labels, and replace any component showing wear—your safety depends on these small parts holding firm. When you hear that satisfying click of a perfectly seated socket and feel bolts spin free in seconds, you’ll wonder how you ever managed without this power duo. Remember: The drill handles the grunt work, but your hands and eyes control the precision. For your next project, grab that adapter and reclaim hours of your weekend—one bolt at a time.


