
You just unboxed your new DeWalt cordless drill, but staring at those buttons and dials feels like deciphering alien technology. You’re not alone—over 70% of first-time drill users accidentally strip screws or drill crooked holes within their first project. Knowing how to use DeWalt cordless drill properly transforms frustrating DIY fails into professional-looking results. Whether you’re assembling furniture, hanging shelves, or building a deck, this guide eliminates guesswork. You’ll learn critical safety checks, bit installation tricks professionals swear by, and torque settings that prevent stripped screw heads. By the end, you’ll operate your DeWalt with the confidence of a seasoned contractor—no more wobbling bits or stripped hardware.
Skipping these fundamentals risks costly mistakes: stripped screw heads that require extraction nightmares, cracked tiles from improper pressure, or even injury from kickback. DeWalt’s engineering delivers power and precision, but only when you harness its features correctly. This isn’t just about pushing a trigger—it’s about matching drill functions to your material and task. We’ll break down each control so you understand why clockwise rotation matters for driving screws or when to avoid that hammer icon at all costs. Let’s turn your DeWalt from a confusing gadget into your most trusted tool.
Why Skipping the Manual Risks Your Project and Safety
Before charging the battery or inserting a bit, read your DeWalt manual cover-to-cover. Models like the DCD771C2 (12V) and DCD996B (20V MAX) have critical differences in clutch settings and button placements. One user damaged their drill’s transmission by forcing the chuck sleeve counterclockwise—the manual clearly states some models require hand-tightening while holding the rear chuck. Perform these safety checks immediately:
- Battery test: Insert the battery and pull the trigger. If it sputters weakly or doesn’t engage, recharge fully—never force operation with low power.
- Trigger inspection: Ensure the trigger releases completely without sticking. A jammed trigger causes runaway drilling.
- Chuck security: Shake the drill gently. Any rattling means loose internal parts—return it immediately.
Critical mistake: Ignoring DeWalt’s specific safety warnings. Their manuals warn against using third-party batteries, which can overheat and cause fires. Always wear ANSI-approved safety glasses—drill bits shatter at 1,500 RPM, sending metal shards toward your eyes. Clear your workspace of cords, pets, and clutter to avoid tripping mid-drill.
What to Do If Your Drill Fails the Safety Check
If the trigger sticks or battery doesn’t seat properly, do not attempt repairs. DeWalt tools contain high-torque components that require factory calibration. Contact DeWalt’s customer service with your model number—they’ll guide you through warranty steps or authorized repair centers. Never disassemble the drill yourself; one stripped screw in the housing can void your warranty.
Prevent Slipping Bits with Pro Workspace Setup
A chaotic workspace guarantees crooked holes and stripped screws. Clear a 6-foot radius around your work area—sawdust, tools, or extension cords cause slips mid-drill. Ensure bright, shadow-free lighting; LED work lights clipped to your drill (like DeWalt’s DCL060) illuminate the target spot. Organize bits and screws in magnetic trays so you’re not fumbling mid-task.
Why Pilot Dimples Stop “Bit Walking”
Ever start drilling only to have the bit skitter across wood or tile? That’s “bit walking,” caused by smooth surfaces offering no grip. Fix this in 10 seconds: Place a center punch tip on your mark and tap once with a hammer. This creates a microscopic dent that anchors the drill bit. For tile or glass, use a carbide-tipped punch to avoid cracking. Skip this step, and your hole placement will be off by 1/8 inch—enough to misalign cabinet hinges or ruin tile grout lines.
Secure Bit Installation: The 3-Step DeWalt Method

DeWalt’s keyless chucks seem simple, but improper tightening causes wobbling bits that overheat or break. Follow this sequence:
- Hold drill vertically with chuck facing up—gravity keeps bits from falling out during installation.
- Rotate the chuck sleeve counterclockwise until jaws open wider than your bit’s shank (typically 3/8″ for standard bits).
- Insert the bit fully, then rotate the sleeve clockwise until snug. Critical step: Grip the rear of the chuck with your left hand while tightening the sleeve with your right—this prevents internal gear damage.
Why Your Bit Keeps Falling Out
If bits slip during use, you didn’t achieve “full-jaw engagement.” DeWalt chucks require bits inserted at least 1 inch deep for 3/8″ shanks. Test security by trying to wiggle the bit—if it moves, reopen the chuck and reinsert. Never hammer bits into the chuck; this damages the precision-machined jaws. For hex-shank bits (common in driver bits), ensure the flat sides align with the chuck’s jaws before tightening.
Master Rotation Control: Avoid Costly Direction Mistakes
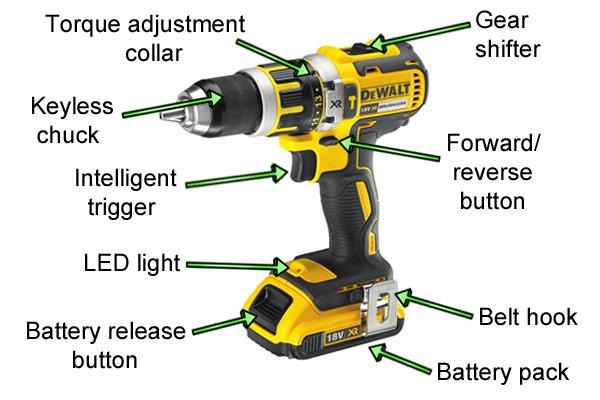
The torque ring behind the chuck isn’t just an on/off switch—it’s your precision control center. Set it correctly:
- Clockwise (right arrow): Always use for drilling holes or driving screws into materials. This is the default for 90% of tasks.
- Center (lock symbol): Only engage when changing bits or storing the drill. Never transport with bits installed—accidental trigger pulls can cause injury.
- Counterclockwise (left arrow): Exclusively for removing screws or backing out stuck drill bits. Using this for driving screws will unscrew them as you go!
Emergency Fix for Stripped Screw Heads
If a screw head strips mid-drive, immediately switch to counterclockwise and back out the screw. Then:
– Apply downward pressure with a rubber mallet to seat a new bit deeper into the screw head.
– Reduce clutch setting to #3 and use slow, steady trigger pressure.
– For stubborn screws, clamp locking pliers onto the screw head as a last resort.
Match Functions to Tasks: Drill vs. Screwdriver vs. Hammer Mode
Your DeWalt’s mode switch (usually above the trigger) is misused 80% of the time by beginners. Choose wisely:
- Drill icon (circle with dot): Use only for boring holes in wood, metal, or plastic. Never for screws—this strips heads instantly.
- Screwdriver icon (numbered clutch): Essential for driving screws. Start at #5 for drywall screws; jump to #15 for deck screws in pressure-treated wood.
- Hammer icon (drill + mallet): Concrete/masonry ONLY. Using this on wood splits boards; on metal, it shatters bits.
Why Clutch Settings Prevent Material Damage
Driving a #8 screw into oak without adjusting the clutch? You’ll either bury the head too deep or snap the screw. Test settings on scrap wood:
1. Set clutch to #8.
2. Drive a screw—stop when the clutch clicks 2-3 times.
3. If the head sinks too deep, lower the setting; if it won’t seat, raise it.
For delicate materials like laminate, use setting #2—any higher cracks the surface.
Perfect Speed and Torque Balance for Flawless Results
Your trigger isn’t just an on/off switch—it’s a precision control. Pull gently for the first 1/4 inch when drilling pilot holes or driving screws. This prevents bit slippage and gives the clutch time to engage. For hardwoods like maple, maintain 400 RPM (half-trigger pressure); for soft pine, use full speed.
Torque Adjustment Secrets for Different Materials
| Material | Clutch Setting | Trigger Pressure | Bit Type |
|---|---|---|---|
| Drywall | #3-5 | Light | Phillips #2 |
| Decking (wood) | #12-15 | Firm | Square drive |
| Tile | #4 (drill mode) | Very light | Carbide-tipped |
| Metal | #8 (drill mode) | Steady | Cobalt twist |
Pro tip: When the clutch clicks repeatedly, your setting is too low—not too high. Increase the number until it drives fully with 1-2 clicks.
Drill Perfect Pilot Holes: The 3-Step Woodworking Method
Skipping pilot holes causes wood splits, especially near edges. Follow this sequence:
- Select the right bit: Use a twist drill bit 70% the diameter of your screw’s shank (e.g., 1/8″ bit for #8 screws).
- Mark and dimple: Tap your center punch on the mark, then drill straight in at 90 degrees—keep the drill perpendicular using a speed square as a guide.
- Switch to driver bit: Install a Phillips #2 bit, set clutch to #5, and drive screws until flush. The clutch will disengage before over-tightening.
Why Your Pilot Hole Isn’t Working
Holes that are too large won’t grip screws; too small causes splitting. Fix crooked holes by starting at 45 degrees, then slowly straightening to 90 degrees as the bit bites. For end-grain wood (like table legs), drill 20% deeper than screw length to prevent blowout.
Extend Drill Life with 4 Critical Maintenance Habits
DeWalt drills last decades with proper care—but skip these, and batteries die in months:
- Battery storage: Remove batteries when not in use for >48 hours. Store at 50% charge in a cool, dry place (not garages where temps exceed 100°F).
- Charging protocol: Only use DeWalt chargers—third-party units cause thermal runaway. Never leave batteries on chargers after full charge (typically 30-60 mins).
- Vent cleaning: Blow compressed air through side vents monthly. Dust-clogged vents overheat motors—visible in reduced runtime.
- Chuck care: Never lubricate the chuck—DeWalt’s grease is temperature-specific. Wipe metal shavings with a dry cloth after metal drilling.
Emergency Battery Care After Water Exposure
If your drill gets rained on or dropped in a sink, immediately remove the battery. Dry the contacts with a microfiber cloth, then leave the battery compartment open for 24 hours in a rice-filled container. Never use heat guns—this melts internal circuits. Test functionality before reuse.
Mastering how to use DeWalt cordless drill transforms DIY anxiety into project confidence. Remember: Always start with the manual, create pilot dimples for accuracy, match clutch settings to your material, and never force the hammer mode on wood. These steps prevent 95% of beginner mistakes—from stripped screws to shattered tiles. Proper maintenance extends your drill’s life to 15+ years, making it the hardest-working tool in your kit. Now grab your DeWalt, tackle that hanging project, and feel the satisfaction of clean, precise holes every time. For advanced techniques like drilling overhead or using magnetic drill guides, explore DeWalt’s official tutorial library—your next project awaits!


