
You’ve finally decided to mount that heavy TV bracket, install security cameras, or hang industrial shelving in your concrete basement. But when you position your drill against the unyielding surface, that familiar panic hits—will your bit shatter? Will the hole be crooked? Can you actually do this without professional help? Drilling into concrete successfully hinges on three non-negotiable elements: the right tools, precise technique, and rigorous safety protocols. Forget intimidating myths—this guide cuts through the confusion with battle-tested methods that transform concrete drilling from a nightmare into a routine task. Whether you’re tackling one small hole or prepping for a major renovation, you’ll learn exactly how to drill into concrete cleanly, safely, and with professional results every time.
Concrete’s deceptive hardness isn’t the real challenge—it’s the silica dust, hidden rebar, and tool limitations that sabotage DIYers. Most failed attempts stem from using inappropriate equipment or skipping critical preparation steps. This isn’t like drilling into wood; concrete demands respect for its composition and your safety. By the end of this guide, you’ll know how to drill into concrete without damaging your tools, compromising your health, or wasting hours on misaligned holes. Let’s turn that daunting concrete wall into your next successful project.
Why Standard Drills Fail on Concrete Walls and Floors
Attempting concrete drilling with a regular drill guarantees frustration and equipment damage. Standard drills lack the percussive action needed to fracture concrete’s aggregate structure, causing bits to overheat, wander, or snap. Concrete contains silica particles harder than steel—without carbide-tipped bits and hammering force, you’re essentially grinding your drill bit against stone. The rotational-only motion of basic drills creates excessive heat buildup, melting plastic anchors and weakening the surrounding concrete. Worse, DIYers often apply excessive downward pressure in desperation, forcing bits to bind and potentially causing dangerous kickback. Recognizing these fundamental physics limitations is your first step toward avoiding costly mistakes and achieving clean, straight holes.
Essential Safety Gear for Concrete Drilling (Non-Negotiable!)
Silica dust from concrete drilling causes irreversible lung damage—silicosis has no cure. Skip this gear at your peril:
- Respirator with P100 filters: Standard dust masks block only 10% of silica particles; OSHA requires N95 minimum but P100 offers 99.97% protection
- Anti-fog safety goggles: Concrete chips travel at 120+ mph; regular glasses shatter on impact
- Vibration-dampening gloves: Prevent “white finger” syndrome from prolonged hammer drill use
- Hearing protection: Rotary hammers operate at 100+ decibels (equivalent to a chainsaw)
Never work near electrical wiring without a circuit tester—concrete often hides conduit. Clear your workspace of tripping hazards; concrete drilling requires stable footing to control powerful tools. If drilling overhead, wear a hard hat to protect against falling debris. This isn’t just caution—it’s legal compliance on job sites and the only way to protect your long-term health.
Must-Have Tools for Drilling into Concrete Walls and Floors
Your tool choice makes or breaks the job. Forget “all-purpose” kits—concrete demands specialized equipment:
- Hammer drill for light duty: For 1/4″ to 3/8″ holes in walls under 4″ thick (e.g., mounting shelves). Must have adjustable clutch and hammer-only mode
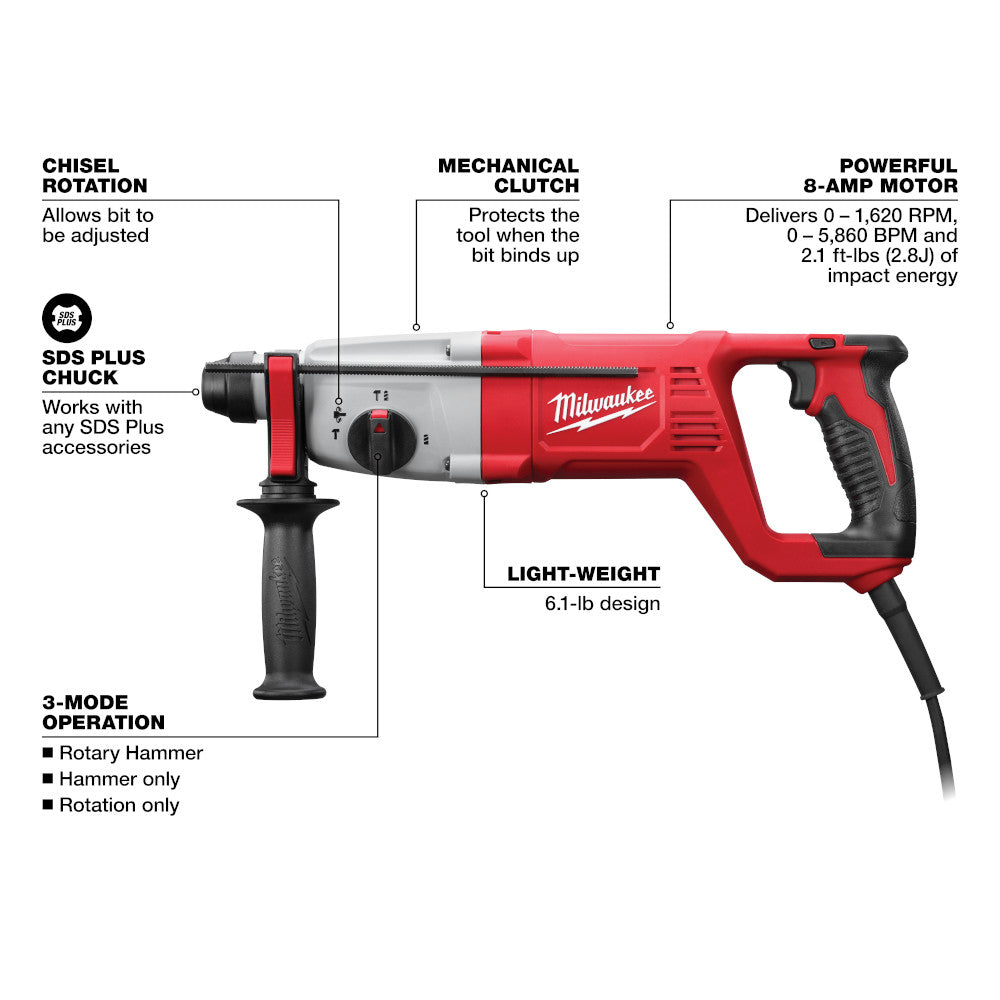
- Rotary hammer for serious work: For foundation walls, floors, or holes 1/2″+. SDS-Plus shank system delivers 3x more impact energy than standard hammer drills
- Carbide-tipped masonry bits: Match bit diameter EXACTLY to anchor specs (1/8″ oversizing causes anchor failure)
- Depth gauge tape: Masking tape wrapped around bit at exact hole depth—critical for consistent anchor seating
- Concrete hole brush kit: Wire brushes on flexible rods remove 95% more dust than air alone
Avoid these deadly mistakes: Using titanium-coated bits (designed for metal, not concrete), substituting rotary hammers with hammer drills for large holes, or using worn bits (chipped carbide tips create dangerous kickback). Your bit’s shank type must match your drill—SDS-Plus won’t fit standard chucks.
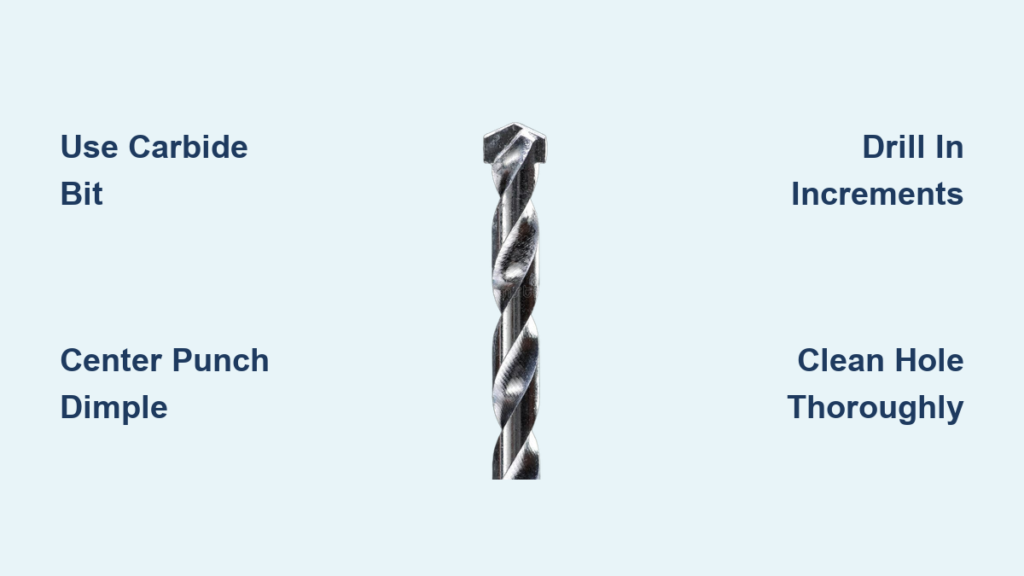
How to Locate and Mark Drill Points on Concrete Without Slippage

Concrete’s smooth surface causes catastrophic bit wandering if not prepped properly. First, locate studs or utilities with a stud finder that detects metal—rebar lurks just below many surfaces. Then:
- Apply blue painter’s tape over your target area and mark through it with a carbide scribe
- Use a center punch to create a 1/16″ deep guide dimple—tap firmly with a ball-peen hammer
- Verify plumb with a laser level for vertical installations (critical for handrails)
- Double-check measurements against your fixture—drilled holes can’t be moved!
This 60-second process prevents costly errors. Without the dimple, even light pressure sends bits skating across concrete, ruining bits and creating jagged entry points that weaken anchors. For tile-covered concrete, drill a pilot hole through tile first with a glass bit before switching to masonry bits.
Starting Your Concrete Hole: Avoiding Bit Walk and Skating
The first 1/4″ determines your hole’s entire trajectory. Hold your drill perpendicular to the surface—use a torpedo level against the drill body for verification. Start at 300 RPM with minimal pressure (just enough to keep bit seated). As the dimple deepens:
- Increase speed to 600 RPM while maintaining light pressure
- Listen for the “crunch” sound indicating clean concrete fracturing
- If bit skates, stop immediately—re-punch the dimple and restart
Never force the drill; let the carbide tip do the work. If you smell burning or see blue discoloration on the bit, you’re applying too much pressure. Pause every 1/2″ to clear dust buildup—concrete dust acts as an abrasive paste that overheats bits. For vertical holes, drill upward at 45 degrees first to create a stable entry point before straightening.
Drilling to Exact Depth While Managing Concrete Dust
Silica dust clogs holes and compromises anchor strength. Implement this dust control system:
- Attach a shop vac hose directly to the drill’s dust collar (most rotary hammers have ports)
- Wrap tape 1/2″ below your target depth as a visual stop—concrete dust accumulates at the hole’s base
- Drill in 1″ increments, retracting fully to clear debris
- When reaching tape depth, drill 1/4″ deeper to accommodate dust settling
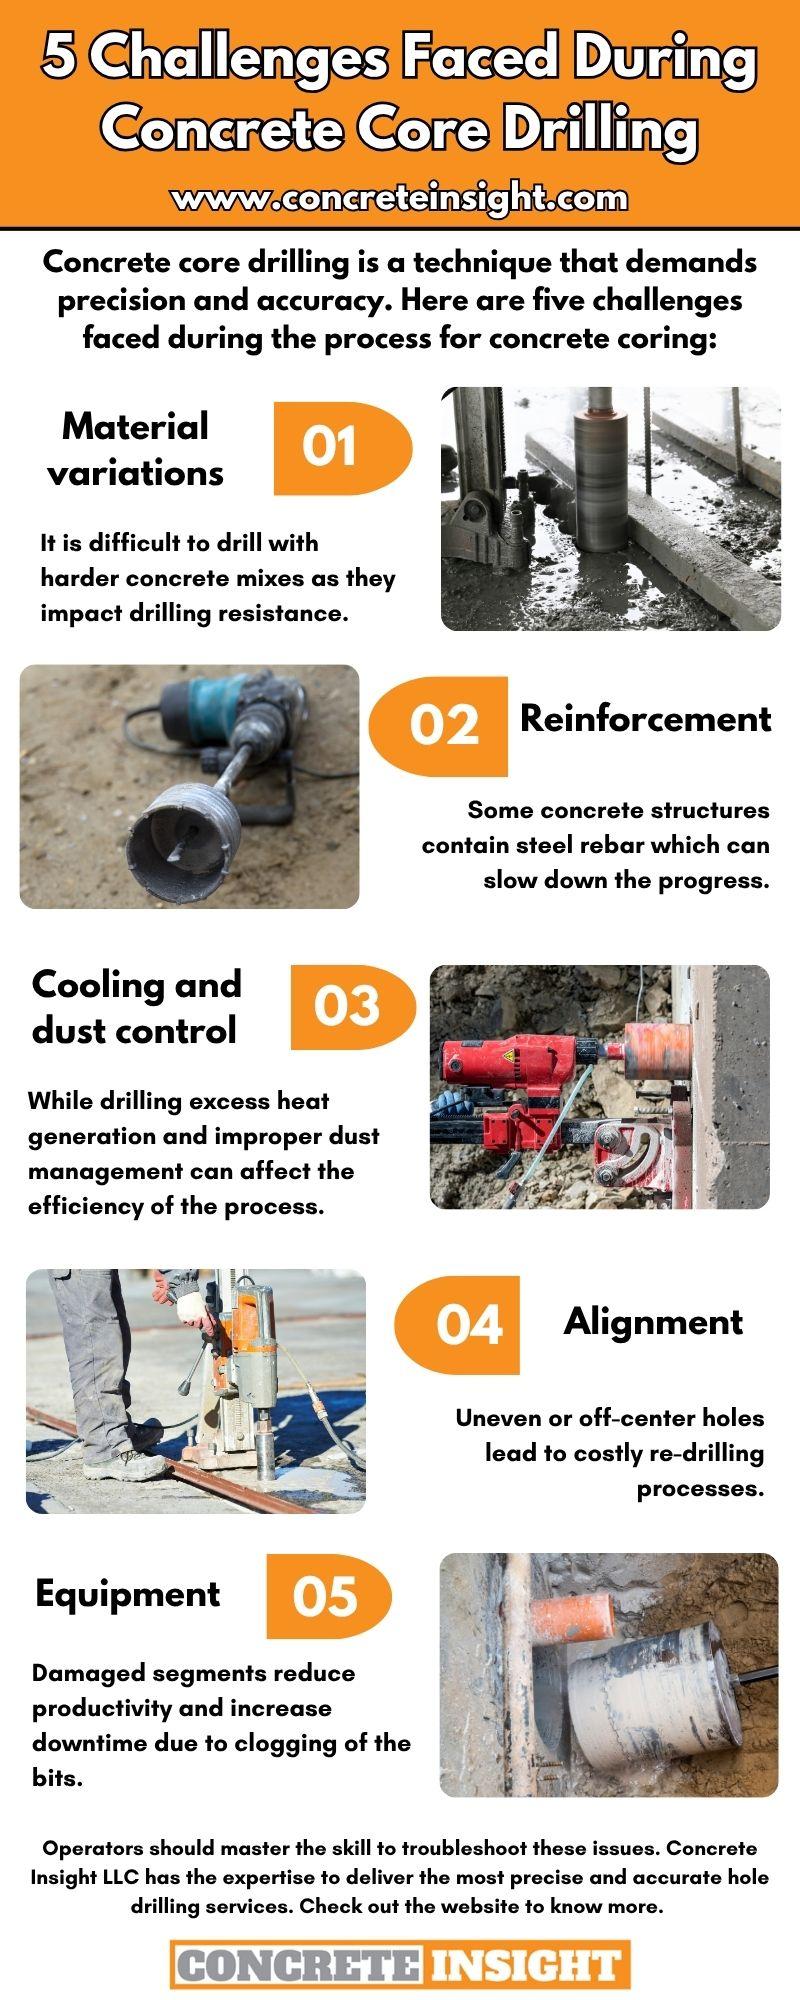
For overhead drilling, create a dust dam with putty around the hole. Never blow dust with compressed air—that aerosolizes silica. If you hit rebar (sudden resistance, metallic sound), STOP. Drill a new hole at least 2″ away—never force through steel. Rebar-cutting bits exist but require specialized tools most DIYers lack.
Critical Hole Cleaning for Secure Anchor Installation
80% of anchor failures stem from inadequate hole cleaning. Vacuum alone leaves 30% residual dust. Use this two-step method:
- Insert a wire hole brush and rotate 10 times while plunging deep
- Blast with compressed air while vacuuming the exit point
Verify cleanliness by inserting a toothpick—it should slide smoothly to full depth. Dust creates a “false bottom” that prevents anchors from seating fully. For chemical anchors, wipe with acetone-soaked cloth after brushing. This step takes 20 seconds but increases holding strength by 400%. Skipping it risks catastrophic anchor pullout under load.
Proper Anchor Installation in Concrete: Step-by-Step
Anchor choice depends on your load requirements:
- Plastic anchors: For light loads (under 50 lbs) in solid concrete
- Wedge anchors: For medium loads (50-200 lbs)—hammer directly until sleeve expands
- Sleeve anchors: For variable-depth applications—tighten bolt to expand sleeve
Insert anchors only after hole verification. For wedge anchors: Tap gently until flush, then tighten bolt with wrench (1/4 turn past hand-tight). Overtightening cracks concrete. Test anchor strength by applying gradual pressure—never sudden force. If anchor spins, the hole is oversized; fill with epoxy and redrill.
Hammer Drill vs. Rotary Hammer: Which Do You Need?
Don’t waste money on the wrong tool. Match your equipment to the job:
| Tool Type | Best For | Hole Size Range | Concrete Thickness |
|---|---|---|---|
| Hammer Drill | Drywall anchors, light fixtures | 1/8″ – 3/8″ | Under 4″ |
| Rotary Hammer (SDS) | Structural anchors, plumbing mounts | 1/4″ – 1-1/2″ | Unlimited |
Hammer drills work via clutch-driven percussion (like a jackhammer in your hand), causing extreme fatigue during extended use. Rotary hammers use piston-driven impact—1,900 BPM versus 4,800 BPM for hammer drills—but deliver 5x more energy per blow with less user strain. Rent a rotary hammer for foundation work; buy a hammer drill for occasional light projects.
Top 5 Concrete Drilling Mistakes That Cause Project Failure
These errors ruin hours of work and compromise safety:
- Skipping the center punch dimple: Causes bit skating and crooked holes (65% of DIY failures)
- Using dull or wrong bits: Standard masonry bits melt in concrete—carbide tips are mandatory
- Ignoring depth control: Shallow holes reduce anchor strength by 70%
- Forcing the drill: Creates heat buildup that weakens concrete structure
- Inadequate hole cleaning: Dust cushion prevents proper anchor expansion
Each mistake compounds the next—bit skating creates uneven holes that are harder to clean, leading to anchor failure. Prevention takes seconds; correction requires epoxy filling and redrilling.
Pro Tips for Faster, Cleaner Concrete Drilling Results
Master these professional techniques:
- Pre-chill bits: Store in freezer—cold bits resist heat buildup in dense concrete
- Water cooling: For deep holes (>3″), use spray bottle to reduce dust (never flood)
- Pilot hole method: Start with 1/8″ bit to verify path before final drilling
- Anchor test fit: Dry-fit anchors before installation—tight squeeze indicates dust issues
- Vibration reduction: Place rubber mat under drill base for floor work
For recurring projects, invest in a magnetic drilling guide that ensures perfect perpendicularity. When drilling near edges, stay 4x the hole diameter away to prevent spalling. Remember: concrete drilling is 10% tool power and 90% technique—let the hammer action do the work while you maintain alignment.
Drilling into concrete successfully hinges on respecting the material’s challenges while mastering controlled technique. By implementing these precise methods—from that critical center-punch dimple to the non-negotiable hole cleaning—you’ll achieve anchor-holding strength that rivals professional installations. Always prioritize silica dust protection; your lungs can’t regenerate like concrete can be patched. For your next project, start with a sharp carbide bit, verify your depth markings twice, and let the tool’s percussion do the work while you maintain steady alignment. Within minutes, you’ll have clean, secure holes ready for even the heaviest fixtures. Now that you know how to drill into concrete safely and effectively, that blank concrete wall has transformed from an obstacle into your next opportunity.


