
Scattering seeds by hand wastes up to 70% of your precious seeds while creating uneven germination and spotty crop stands. If you’ve ever battled patchy vegetable rows or wasted hours replanting bare spots, you know why learning how to make a seed drill is a game-changer for backyard gardeners and small-scale farmers. This precision tool places seeds at exact depths and spacing while covering them automatically—boosting germination rates by 40% compared to manual methods. In this guide, you’ll discover practical, field-tested techniques to build your own functional seed drill using affordable materials, whether you’re planting a 10×10 garden bed or a half-acre field. We’ll cover everything from simple hand-pushed models to tractor-drawn systems, with calibration tricks that ensure every seed lands perfectly.
Dimpled Shaft vs. Cup Metering: Pick Your Seed Delivery System
Your seed drill’s accuracy depends entirely on the metering mechanism. Choose wrong, and you’ll get doubles or skips that ruin crop uniformity. For DIY projects, dimpled shafts and cup systems deliver the best control without commercial complexity.
Build a Dimpled Shaft for Corn or Bean Seeds
This rotating rod with precisely spaced indentations works best for medium-to-large seeds like beans, peas, or sunflowers. Cut a 1/2-inch steel rod to match your drill width, then epoxy 1/4-inch plastic cups every 2 inches along its length. Mount it horizontally at the hopper’s base so seeds roll into each cup as it rotates. Critical detail: The cups must be deep enough to hold one seed but shallow enough to release it cleanly—test with your actual seeds before final assembly. A single rotation should drop seeds spaced 4-6 inches apart for most garden crops.
Create Adjustable Cup Metering for Mixed Seed Sizes
For smaller seeds like carrots or lettuce, use a rotating disc with variable-sized holes. Cut a 4-inch plywood circle, drill 1/8-inch holes in concentric rings (use different drill bits for varying seed sizes), then mount it vertically inside your hopper. Attach a wiper blade to scrape excess seeds off the disc surface. Pro tip: Cover unused holes with tape to match your seed size—this prevents clumping and ensures single-seed drops. Rotate the disc via chain drive at 1 RPM for optimal spacing in raised beds.
Build a Hand-Pushed Seed Drill Frame in Under 2 Hours

Skip expensive commercial models with this garden-scale build that covers 3-foot beds. You’ll complete it with basic tools and scrap materials, costing under $50.
Assemble the Frame and Drive Wheels
Cut two 36-inch 2x4s for the base rails and connect them with crosspieces every 12 inches. Mount 8-inch bicycle wheels on a steel axle at the rear—this ground drive powers your metering system. Visual cue: The axle should sit 4 inches above the frame to allow furrow opener clearance. Attach a 30-inch handle to the front with a sturdy U-bolt, ensuring it angles back slightly for comfortable pushing. Reinforce all joints with corner brackets; wobbling ruins depth consistency.
Install the Seed Hopper and Metering Shaft
Split a 4-inch PVC pipe lengthwise to create your hopper, securing it vertically above the metering shaft. Connect the drive wheel to your dimpled shaft using a 1:1 sprocket ratio (one wheel rotation = one seed drop cycle). Common mistake: Skipping the seed gate. Add an adjustable PVC slide gate below the hopper to control seed flow—you’ll need this for calibration later. Position the metering shaft so seeds drop directly into your furrow opener tube.
Install Furrow Openers for Consistent Planting Depth
Without precise depth control, seeds either rot in cold soil or dry out in shallow planting. Your opener must create uniform trenches matching your crop’s needs.
Mount Shoe Openers for Tilled Garden Beds
Bolt a 1-inch wide steel runner (salvaged from an old cultivator) to a hinged arm under the seed tube. Attach a depth gauge wheel 2 inches ahead of the opener—this wheel rides on soil surface while the opener cuts 1-2 inches deep. Troubleshooting tip: If soil piles up, increase the opener’s downward angle by 5 degrees. For loose soil, add a 2-pound weight to the arm to maintain depth.
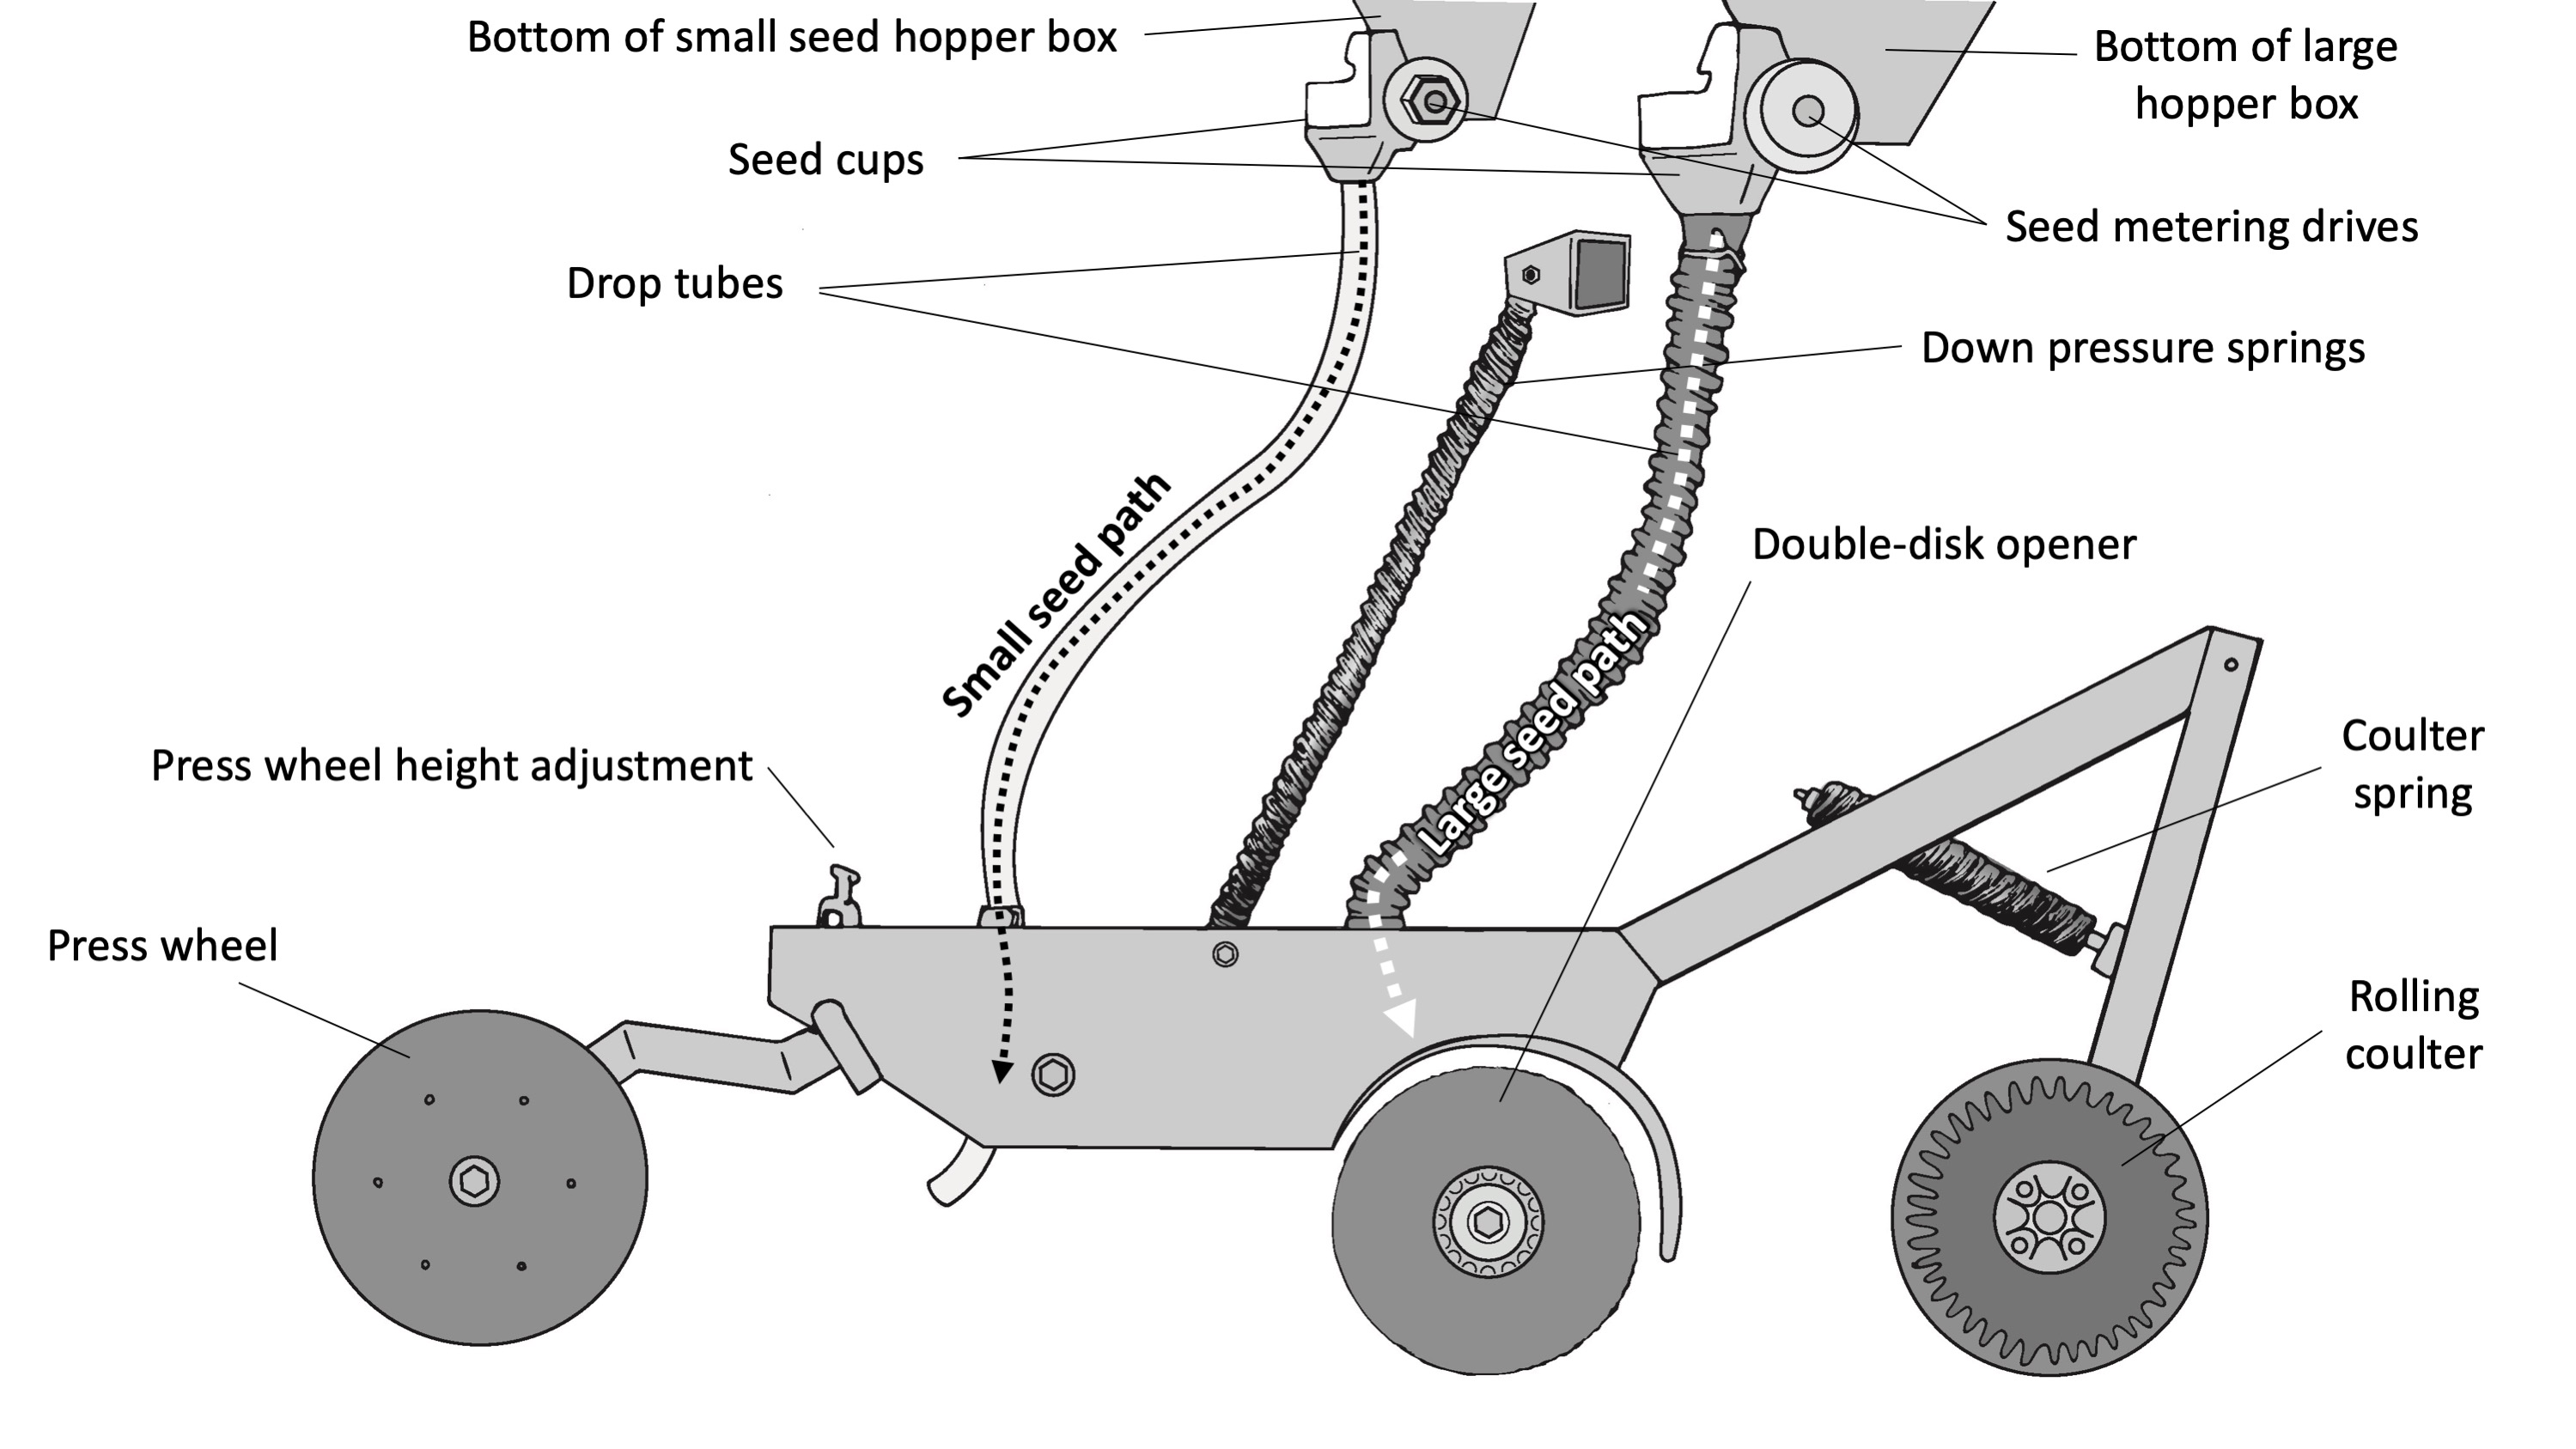
Upgrade to Double-Disc Openers for Hard Soil
For compacted ground or no-till gardens, use two 6-inch notched discs angled to form a “V” trench. Mount them on a single axle with a spring-loaded down pressure arm. Critical adjustment: The discs should overlap by 1/8 inch at the bottom to slice cleanly through residue. Test in your field—seeds should drop into a 1/2-inch wide slot at consistent depth.
Connect Ground Drive Wheels to Seed Metering Shafts

Mismatched drive ratios cause erratic seed spacing—a 10% speed variation creates doubles or gaps. Get this connection right for reliable performance.
Size Your Sprocket Ratio Correctly
Calculate your target seed spacing: For 6-inch corn spacing with 8-inch wheels, you need 1.5 seed drops per wheel revolution (6″ spacing ÷ (π × 8″ wheel) = 0.24 rotations per inch → 4.17 inches per drop → adjust sprockets accordingly). Time-saver: Start with equal-sized sprockets, then test with colored sand. If spacing is too wide, increase the drive wheel sprocket size; if too narrow, decrease it. Always include a shear pin in the drive shaft to prevent jam damage.
Calibrate Seeding Rate: 3-Step Field Test Method
Your drill could look perfect but still plant too sparse or dense. Calibrate for your specific seeds—this takes 10 minutes but saves entire crops.
Measure Output Per Wheel Rotation
Fill the hopper with actual seeds, lift the drive wheel, and rotate it 10 times while collecting drops. For a 30-inch row spacing, 10 rotations = 21.8 feet of travel (standard calibration distance). Weigh the seeds and calculate pounds per acre: (collected weight × 43,560) ÷ (row width in feet × travel distance). Critical formula: Target rate for beans is 60-80 lbs/acre; adjust your gate opening until you hit this.
Verify Spacing in Real Soil Conditions
Plant a 10-foot test row, then dig up seeds every foot. Ideal spacing for lettuce is 4 inches—measure gaps between seeds. If inconsistent, check for seed clumping in the hopper or misaligned metering cups. Pro tip: Dust small seeds with flour to prevent static cling that causes clumping.
Stop Seed Skips: Adjust Double-Disc Opener Alignment
Skips occur when seeds bounce out of the trench or get blocked by soil. Fix this common failure point with simple tweaks.
Align Discs to Prevent Seed Bouncing
The seed tube must discharge seeds 1/2 inch above the opener’s point of contact with soil. If seeds ricochet off hard ground, lower the tube outlet. Visual check: After planting, seeds should sit centered in the “V” trench—not pushed to one side by misaligned discs. Rotate discs to ensure their notches face forward for clean cutting.
Add a Seed Firmer Tube Extension
Cut a 6-inch section of 1/2-inch PVC pipe and attach it vertically to the opener’s rear. This guides seeds straight down into the trench bottom, eliminating skips in rocky soil. Warning: Never let the firmer touch soil—it will clog. Maintain 1/4-inch clearance above the trench floor.
Add Press Wheels for Reliable Germination in Dry Soil
Skipping this step causes 30% germination failure in arid conditions. Press wheels firm soil over seeds without compacting—critical for moisture retention.
Mount Adjustable Press Wheels Behind Openers
Use solid rubber wheels (4-6 inches diameter) on spring-loaded arms that apply 5-10 pounds of downward pressure. Key detail: The wheel must contact soil immediately after seed drop—position it 2 inches behind the opener. For clay soil, reduce pressure; for sandy soil, increase it. Test by checking if a seed imprint remains in firmed soil.
Prevent Clogging in Wet Conditions
If mud cakes on wheels, add a wiper made from an old windshield blade secured with hose clamps. Troubleshooting: If seeds get pushed sideways, angle the press wheel slightly inward toward the row center.
No-Till Seed Drill Upgrades: Coulter and Down Pressure Tips

Transform your basic drill for residue-covered fields with these modifications that slash planting time by 50%.
Install a Fluted Coulter Ahead of Openers
Weld a 10-inch notched disc 3 inches in front of your furrow opener—it slices through crop residue like a knife. Must-have: Add down pressure springs (minimum 50 lbs per row unit) to ensure the coulter penetrates hard soil. Test by planting through 1-inch residue; seeds should be covered without residue wrapping the opener.
Create a Drag Chain Cover System
Attach a 2-foot chain section behind the press wheel—it gently covers seeds in no-till conditions without disturbing soil structure. Pro tip: For heavy residue, add a second chain angled backward to sweep debris away from the seed trench.
Final Note: Building your own seed drill requires careful attention to metering precision and soil interaction, but the payoff—perfectly spaced, consistently planted crops—is worth the effort. Start with a simple hand-pushed model for your garden, master calibration techniques, and you’ll soon plant like a pro. Remember to store your drill in a dry place with seed hoppers emptied to prevent moisture damage. For larger operations, explore university extension plans for multi-row tractor drills—the USDA’s “Small Farm Equipment” guide offers free blueprints. With your new seed drill, every planting season becomes more efficient, more productive, and far less frustrating.


