
If your drill bits keep slipping or your hole saws come loose mid-cut, you’re not alone. Most DIYers and even some professionals miss the single most important feature on their cordless drill’s chuck: a hidden locking mechanism. This isn’t a minor detail—it’s the difference between a professional finish and a frustrating, unsafe mess. The key to solving the most common and frustrating drilling problems isn’t more force or a new tool; it’s knowing how to properly engage this hidden locking feature that’s been on your drill all along. Understanding how to use a drill chuck correctly transforms your most basic power tool into a reliable partner for every project.
Why Your Drill Bits Keep Slipping (Even When You Think They’re Tight)
Most users believe they’ve tightened their chuck completely when they’ve actually missed engaging the critical locking mechanism. When you stop tightening at the point of firm resistance, you’re leaving your bits vulnerable to slippage under torque. This common mistake leads to ruined workpieces, dangerous kickbacks, and wasted time repositioning bits. The reality is that modern keyless chucks are designed with a secondary locking stage that provides significantly more grip than standard hand-tightening alone.
The Exact Moment You Should Keep Tightening
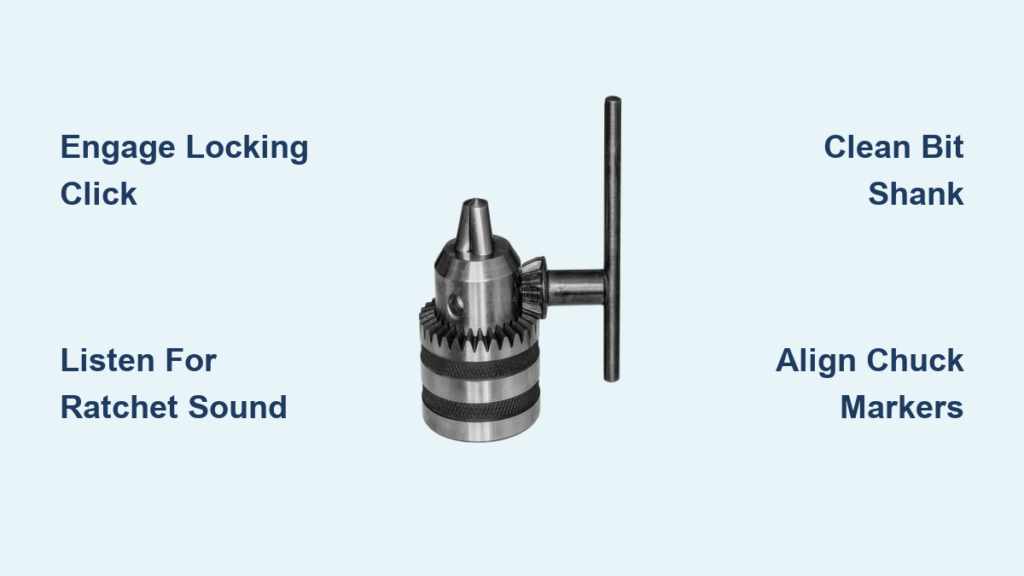
Listen for the distinctive “click” or feel for the ratcheting sensation that occurs after standard tightening resistance. This is your signal that the internal locking mechanism has engaged. Many professionals with 15+ years of experience report discovering this feature years after regularly using drills. The telltale sign you’ve missed it? Your bits slip specifically during high-torque applications like drilling metal or using hole saws.
What Happens When Your Chuck Isn’t Fully Locked
Without the lock engaged, the rotational force from drilling can actually work to loosen your chuck over time. This is especially problematic with:
– Hole saws (1″ diameter and larger)
– Forstner bits in hardwoods
– Masonry bits in concrete
– Mixing paddles in thick materials
The sudden torque when these bits “bite” can spin a standard chuck loose in seconds, creating dangerous situations and ruining your work.
How to Engage Your Drill Chuck’s Hidden Locking Mechanism

The Step-by-Step Locking Process
- Insert your drill bit fully into the chuck until it bottoms out against the back of the jaws
- Hold the chuck collar with one hand while rotating the drill body with your other hand in the tightening direction
- Continue turning past firm resistance until you feel a distinct “click” or ratcheting sensation
- Stop when you feel this engagement—no need for excessive force
- Verify by attempting to rotate the bit clockwise (it should remain firmly in place)
Critical Visual and Tactile Cues You’re Missing
On many DeWalt, Milwaukee, and Makita models, a small line or marker on the chuck collar will align with the drill body when properly locked. The force required is only slightly more than standard hand-tightening—typically an additional 1/8th to 1/4 turn. If you’re straining to turn it further, you’ve likely already engaged the lock or your chuck may be worn.
How to Identify If Your Drill Has This Locking Feature
The Simple Hand Test for Your Specific Drill
After hand-tightening as tight as you comfortably can, try giving the chuck collar an extra 1/8th turn in the tightening direction. If it ratchets or clicks, congratulations—you have a locking chuck. Drills made in the last 15-20 years from major brands (DeWalt, Milwaukee, Ryobi, Makita) typically include this feature, while older models or budget brands may not.
Drills That Definitely Need This Technique
Cordless drills and impact drivers with keyless chucks benefit most from proper locking technique. If your chuck requires a key for tightening, this specific locking mechanism won’t apply, but proper tightening procedures remain critical.
Fix These 4 Common Chuck Problems in Minutes
Bit Slips Under Heavy Load? Here’s Your Quick Fix
The most common issue occurs when bits slip during high-torque applications. Before assuming your chuck is worn out, verify you’ve engaged the locking mechanism properly. Clean both the chuck jaws and bit shank with isopropyl alcohol to remove grease and debris that reduces grip. Ensure the bit is fully inserted to the shoulder—partial insertion dramatically reduces holding power.
When Your Chuck Won’t Lock Properly
If you don’t feel the distinctive “click” when tightening:
– Clean the chuck mechanism with compressed air (wear eye protection)
– Check for debris between the chuck jaws
– Apply a single drop of 3-in-1 oil to the chuck threads
– Test with multiple bits to determine if the issue is with a specific bit
Uneven Bit Grip? Jaw Alignment Issue
If your chuck grips one side of the bit tighter than others, the jaws may be misaligned or worn. Open the chuck fully and inspect the jaws for even spacing. Clean between the jaws with a small brush, then close and reopen several times to reset alignment. Persistent uneven grip indicates a worn chuck needing replacement.
Pro Techniques for Specific Drilling Tasks
Hole Saw and Forstner Bit Success

For hole saws larger than 1″, engaging the chuck lock is non-negotiable. The moment a hole saw bites into material creates tremendous torque that will spin an unlocked chuck loose. Start with slow speed and consistent pressure, and always engage the lock before beginning your cut. Users report 90% fewer issues with 4″ hole saws in drywall when properly locking the chuck.
Metal and Masonry Drilling Without Slippage
When drilling steel or concrete, the locking mechanism prevents dangerous bit “walking” at the start of your hole. The hammering action of masonry drilling can literally unscrew bits from unlocked chucks. For metal drilling, proper locking ensures your bit maintains precise position, preventing dangerous slippage that could damage your workpiece or injure you.
Essential Chuck Maintenance for Peak Performance
Monthly Maintenance That Takes 60 Seconds
Wipe chuck jaws clean with a rag and isopropyl alcohol after each use. Monthly, apply a single drop of light oil to the chuck threads and rotate the collar to distribute it. This simple routine prevents the buildup that reduces gripping power and extends chuck life significantly. Professionals who follow this routine report chucks lasting 2-3 times longer than those who neglect maintenance.
Bit Shank Preparation You’re Skipping
Before inserting any bit, wipe the clean, bare metal of the shank. Grease or oil from previous use dramatically reduces chuck grip. Inspect shanks for burrs or damage that prevents proper seating. Damaged shanks should be replaced—forcing them into the chuck accelerates wear on both components.
When Your Chuck Needs Replacement
.JPG.7148a138dacfbdbb98c7b364f14a5529.JPG)
The 3 Clear Signs It’s Time for a New Chuck
- Visible bit shank movement (wobbling) even when locked tight
- Uneven jaw closure that leaves asymmetric marks on bit shanks
- Inability to feel the locking mechanism engage with the distinctive “click”
Most professional users replace chucks every 1-2 years with daily use, while DIYers can often get 3-5 years of service. Don’t wait for catastrophic failure—replace at the first signs of inconsistent gripping.
Advanced Applications for Your Locked Chuck
Angle Drilling Without Bit Slippage
When using 90° adapters or flexible drive attachments, the torque from the angle creates rotational forces that will loosen standard chucks. A locked chuck prevents this common failure point, ensuring your bit stays securely in place even during awkward-angle drilling.
Mixing Paddle Safety Technique
The sudden resistance when mixing thick materials can stop your drill motor instantly, causing an unlocked chuck to spin loose. Engaging the lock prevents the paddle from unscrewing itself mid-mix—a common and messy failure that wastes materials and creates cleanup work.
Pro-Tip: Mark your chuck with a dot of paint on both the collar and drill body. When the marks align during tightening, you’ll know the lock is engaged without testing it. This simple visual cue saves time and ensures consistent performance.
By mastering how to use a drill chuck properly—specifically engaging that hidden locking mechanism—you’ll eliminate one of the most frustrating and dangerous problems in power tool use. That extra 1/8th turn isn’t just tightening—it’s activating a critical safety feature designed into your drill. Whether you’re installing cabinets, building decks, or tackling weekend projects, this simple technique transforms your drill from a basic tool into a precision instrument that delivers professional results every time. The next time you pick up your drill, remember: listen for the click, feel for the ratchet, and drill with confidence knowing your bit won’t slip when you need it most.


