
You’ve just purchased a powerful rotary hammer drill for your home renovation project, but now you’re staring at this intimidating tool wondering how to actually use it properly. Unlike standard drills, rotary hammer drills deliver serious pounding force that can make quick work of concrete and masonry—but only if you know the right techniques. When improperly used, these tools can damage your materials, break bits, or even cause injury. This guide will transform you from a nervous first-time user into a confident operator who can drill clean holes in concrete walls, set anchors securely, and tackle demolition tasks safely. By the time you finish reading, you’ll understand exactly how to select the right settings, maintain proper technique, and avoid the most common mistakes that frustrate beginners.
Essential Safety Gear for Rotary Hammer Drill Operation

Before you even plug in your rotary hammer drill, proper safety preparation is non-negotiable. These powerful tools generate significant vibration, noise, and hazardous dust when working with concrete. Start with ANSI Z87.1-rated safety glasses to protect your eyes from flying debris—regular sunglasses won’t cut it when concrete chips are ricocheting at high speed. Next, equip yourself with a NIOSH-approved N95 respirator or better, because concrete drilling produces crystalline silica dust that can cause serious respiratory issues with prolonged exposure. Don’t skip hearing protection either; most rotary hammers operate between 95-110 decibels, which can cause permanent hearing damage in under 15 minutes of continuous use. Finally, wear vibration-dampening gloves to reduce hand fatigue and the risk of developing hand-arm vibration syndrome from extended operation. Take 60 seconds to check these safety items before every use—your long-term health depends on it.
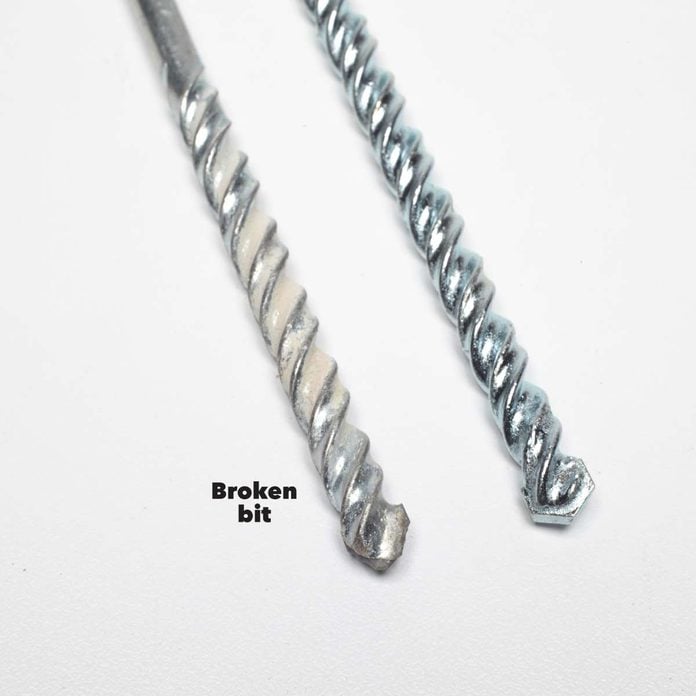
Why Standard Drill Bits Fail in Rotary Hammer Drills
Many beginners make the critical mistake of using regular masonry bits in their rotary hammer drill, only to watch them shatter within seconds. Rotary hammers require SDS-Plus or SDS-Max bits specifically designed to withstand the intense hammering action. Standard twist bits lack the specialized shank design that locks securely into the SDS chuck system and can’t handle the rapid pounding motion. When a standard bit is used, the hammer mechanism pounds directly on the bit’s flute instead of the tip, causing immediate failure. Always verify your bit has the SDS designation stamped on the shank before installation. The slight extra cost of proper bits pays for itself when you complete your project without wasting time and money replacing broken bits.
Proper Work Area Assessment and Marking Techniques
Locating Hidden Hazards Before Drilling
Never start drilling without thoroughly inspecting your work area—this single step prevents countless accidents. Use a high-quality stud finder with AC wire detection capabilities to scan at least 6 inches beyond your intended hole location. Concrete walls often contain electrical conduits, plumbing pipes, or rebar reinforcement that could cause electrocution, flooding, or dangerous tool kickback if struck. For older buildings, assume hazards exist even if your stud finder doesn’t detect them. When in doubt, consult building blueprints or hire a professional to verify safe drilling locations. Remember: taking 5 extra minutes to check for hazards prevents hours of emergency repairs or potential injury.
Creating the Perfect Drill Starting Point
After confirming your drilling location is safe, create a precise starting point using a center punch and ball-peen hammer. Place the sharp tip of the center punch exactly where you want your hole, then strike it firmly with the hammer to create a small dimple in the concrete surface. This indentation serves two critical purposes: it prevents the drill bit from “walking” across the smooth concrete surface when you begin drilling, and it gives the bit immediate purchase to start cutting rather than skidding. For larger diameter holes (1/2 inch or greater), consider starting with a smaller pilot bit first before switching to your final size—this technique dramatically improves accuracy and reduces strain on both you and the tool.
Optimizing Rotary Hammer Drill Settings for Different Materials
Understanding Mode Selector Functions
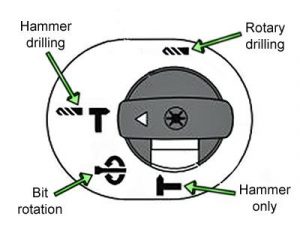
Rotary hammer drills feature three primary operating modes that many beginners confuse: rotation only, hammer and rotation, and hammer only. For standard concrete drilling, always select the hammer and rotation mode (typically shown as a drill bit icon with hammer strikes). This setting engages both the rotational drilling action and the percussive hammering mechanism that pulverizes concrete ahead of the bit. The rotation only mode (drill bit icon alone) should only be used for drilling into wood or metal where hammer action would damage the material. The hammer only mode (chisel icon) disengages rotation entirely and is exclusively for chiseling or light demolition work—never use this setting for creating clean holes.
Adjusting Speed and Power for Optimal Performance
Most rotary hammer drills feature variable speed triggers and sometimes additional speed settings. Counterintuitively, slower speeds often work better for harder materials. When drilling into dense concrete, start at lower RPM settings (typically 400-800 RPM) which provides more torque per hammer blow. As you progress deeper into the material, you may increase speed slightly if the drill seems to be bogging down. Always begin with light pressure and let the tool’s hammering action do the work—forcing the drill creates excessive vibration, accelerates bit wear, and increases the risk of binding. If you notice the drill struggling or the bit smoking, stop immediately, clear the hole of debris, and restart with less pressure.
Mastering Drilling Technique for Clean, Straight Holes
Two-Handed Grip for Maximum Control
Proper hand positioning makes the difference between a clean hole and a dangerous situation. Grip the main handle firmly with your dominant hand, with your index finger on the trigger for precise speed control. Place your other hand on the auxiliary side handle, not on the drill body itself. This two-handed grip provides critical stability against the powerful rotational forces and hammer action. Keep your elbows slightly bent and your stance wide for balance—imagine you’re preparing to absorb the recoil of a firearm. Never brace yourself against a wall or fixed object; instead, position your body so you can move with the tool’s natural motion.
The Rocking Motion Technique for Efficient Drilling
As you begin drilling, apply steady but moderate downward pressure—about the weight of the tool itself plus 10-15 pounds of additional force. After the bit establishes a 1/4-inch deep hole, incorporate a subtle side-to-side rocking motion while maintaining forward pressure. This technique serves three purposes: it helps clear dust from the hole, prevents the bit from binding in the material, and actually speeds up the drilling process by creating a slightly wider channel for the bit to advance. Periodically pull the bit completely out of the hole to clear accumulated debris, especially when drilling deep holes. For holes deeper than 2 inches, use a shop vacuum with a narrow nozzle attachment to keep the hole clean as you work.
Rotary Hammer Drill Maintenance for Longevity
Post-Use Cleaning Protocol
After completing your project, dedicate 5 minutes to proper tool maintenance before storing your rotary hammer drill. First, remove the bit and blow out all air vents with compressed air—concrete dust will quickly clog these vents and cause overheating. Wipe down the exterior with a dry cloth to remove dust and debris, paying special attention to the chuck area. Some models require periodic lubrication of the chuck mechanism; consult your manual for specific requirements. Store the tool in a dry location with the battery removed (if cordless) to prevent accidental discharge.
Bit Storage and Sharpening Practices
Store your SDS bits vertically in a dedicated rack rather than tossing them in a toolbox where they can get damaged. When bits become dull (indicated by excessive heat generation, slow progress, or smoking), either replace them or have them professionally sharpened—attempting to sharpen masonry bits with standard grinding wheels often ruins their specialized carbide tips. A sharp bit not only drills faster but significantly reduces vibration and user fatigue. Most quality SDS bits should last for dozens of holes in standard concrete before needing replacement.
Critical Mistakes That Damage Tools and Compromise Safety
The Over-Force Error That Breaks Bits
The most common mistake beginners make is applying excessive downward pressure in an attempt to speed up drilling. Rotary hammer drills are designed to use their own hammering action to pulverize material—you’re only providing guidance, not muscle. Forcing the drill creates dangerous kickback, accelerates wear on the internal hammer mechanism, and frequently causes bits to shatter. If you’re not making progress, stop and investigate why: you may have hit rebar, need a sharper bit, or require a different drilling technique. Let the tool work at its natural pace—good concrete drilling progresses at about 1 inch per minute for standard 1/2-inch holes.
The Cord Management Hazard
For corded models, improper cord management causes countless accidents. Never wrap the power cord around your wrist or body while operating the drill. Keep the cord positioned behind you and away from your work area to prevent accidentally cutting through it with the drill bit. When working at height, secure the cord to prevent tripping hazards. For extended use, consider using a cord with a built-in strain relief to prevent damage at the plug connection point.
By following these precise techniques and safety protocols, you’ll transform from a hesitant beginner into a confident rotary hammer drill operator. Remember that this powerful tool demands respect but rewards proper technique with professional results. Start with small practice holes in scrap concrete to build your confidence before tackling critical projects. With each successful hole, you’ll develop the muscle memory and intuition that separates novice users from skilled operators. Now that you know exactly how to use a rotary hammer drill safely and effectively, you’re ready to tackle those concrete projects that have been waiting in the wings.


