
That first time you hold a power drill, it can feel intimidating—will you drill crooked holes, strip screw heads, or worse, injure yourself? You’re not alone. Over 68% of DIY beginners struggle with basic drill operation, but mastering this essential tool unlocks countless home projects. Knowing how to use a hand drill properly transforms frustrating attempts into clean, precise holes every time. This guide cuts through confusing jargon to deliver exactly what you need: a step-by-step roadmap from safety checks to your first flawless hole, with pro techniques you won’t find in the manual.
Stop guessing which settings to use or why your bits keep slipping. You’ll learn the exact clutch setting for driving deck screws without stripping them, how to prevent “bit walk” on smooth metal surfaces, and why your drill suddenly stops mid-task (it’s not broken). Whether you’re hanging shelves or building furniture, these techniques apply to every cordless drill on the market. By the end, you’ll confidently select the right bit, adjust settings for any material, and drill straight holes like a professional—saving hours of frustration and costly mistakes.
Critical Safety Gear You Must Wear Before Using a Hand Drill

Skipping safety gear turns a simple drilling task into a potential emergency. Your eyes face immediate danger from flying debris—wood splinters can embed permanently, while metal shavings cause corneal abrasions in 0.2 seconds. Start with ANSI Z87.1-rated safety glasses, not sunglasses or prescription lenses alone. For overhead drilling or masonry work, upgrade to a full face shield that seals against dust and fragments.
Essential protective equipment checklist:
– Eye protection: Safety glasses with side shields (minimum) or polycarbonate face shield
– Hand positioning: Grip the drill body firmly with both hands—never hold near the chuck
– Clothing restrictions: Remove rings, watches, and loose sleeves that could catch the rotating chuck
– Footwear: Closed-toe shoes with rubber soles prevent slips if you lose balance
Secure your workpiece before touching the trigger. Clamping wood to a workbench stops dangerous kickback when the bit binds. For metal drilling, use a vise with non-marring jaws to prevent material spin. Never hold small pieces in your hand—this causes 32% of drill-related hand injuries. Check electrical safety: corded drills require GFCI outlets near water sources, while cordless models need fully charged batteries inserted correctly (listen for the click).
Hand Drill Components Every Beginner Must Recognize
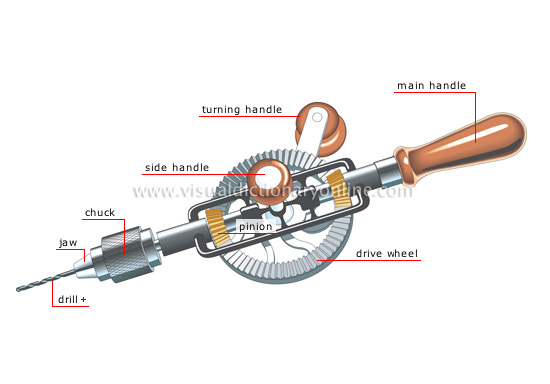
Your drill isn’t just a trigger and chuck—each component controls precision. Ignoring the torque ring causes stripped screw heads, while misusing the direction switch snaps bits. Locate these critical parts before your first project:
Why the Chuck Type Changes Your Technique
Keyless chucks (most modern drills) tighten by hand—rotate counter-clockwise to open, clockwise to secure the bit. Keyed chucks require the L-shaped tool stored in your drill’s battery compartment. Insert the key into each slot and turn counter-clockwise to open. Always tighten all three slots evenly to prevent bit wobble. When inserting bits, push the shank fully into the chuck—exposed shanks cause slippage and dangerous vibration.
Decoding the Torque Ring Settings
That numbered dial near the chuck isn’t random—it measures inch-pounds of rotational force. Start at setting 3 for small screws in softwood, 8 for deck screws in pressure-treated lumber, and maximum (drill symbol) for actual drilling. Test settings on scrap wood: if the screw drives too deep, lower the number; if it won’t sink fully, increase it. For drywall anchors, use setting 5—higher torque cracks the anchor housing.
Drilling Your First Hole: Step-by-Step Technique
Why Center Punching Prevents 90% of Drilling Mistakes
Skipping this 5-second step causes bits to skate across surfaces. On wood, tap a nail at your mark to create a starter dimple. For metal or tile, use a center punch with a hammer—this creates a precise indentation that guides the bit. Professional woodworkers always punch through both sides of material to prevent exit tear-out. Without this guide, even light pressure sends bits wandering off-course.
The Correct Hand Position for Straight Holes
Place your dominant hand on the grip with index finger on the trigger. Your support hand grips the front housing—not the chuck—applying forward pressure. For pistol-grip drills, tuck your elbow against your hip for stability. Two critical mistakes beginners make:
– Holding too far back: Causes top-heaviness and wobble
– Applying sideways pressure: Creates angled holes (check with a speed square)
Start drilling at 30% trigger pressure to establish the hole. Once the bit bites, increase to 60-70%—never full throttle on initial penetration. If the drill jerks left, you’re applying uneven pressure; reset and try again. For deep holes (>2″), “peck drill” by pulling out every 1/2″ to clear chips—this prevents overheating and bit breakage.
Fixing Common Drill Problems Before They Ruin Your Project

Why Your Drill Suddenly Stops Mid-Task (And How to Restart It)
That abrupt halt usually means the clutch disengaged—a safety feature, not a malfunction. For screw driving, this occurs when resistance exceeds your torque setting. Solution: Back out slightly in reverse, then restart at a higher clutch setting. If drilling stops, you’re likely forcing the bit—reduce pressure and let the sharp bit cut naturally. Persistent stopping indicates dull bits or low battery—check both before continuing.
Stop Bit Slippage With This Pro Technique
Loose bits wobble, creating oversized holes. After inserting the bit, tighten the chuck in three stages:
1. Hand-tighten fully
2. Squeeze trigger in reverse for 2 seconds
3. Hand-tighten again
For stubborn bits, grip the chuck with a rubber jar opener while tightening. Never use pliers—they mar the chuck surface. If bits still slip, debris has built up inside the chuck jaws; clean with a toothpick and compressed air.
Driving Screws Perfectly: Clutch Settings You Need to Know
The Exact Torque Setting for Every Screw Type
Using maximum torque strips screw heads instantly. Match settings to screw diameter:
– #6 screws (light fixtures): Setting 4-5
– #8 screws (cabinets): Setting 6-7
– #10 deck screws: Setting 8-9
– Lag bolts: Maximum (drill symbol)
Test on scrap wood first—drive until the head sits 1/16″ below the surface. If the clutch slips too early, increase by one setting. For pre-drilled holes, reduce torque by 2 settings. Driving into metal? Use setting 3-4 with self-tapping screws to avoid stripping.
Preventing Stripped Screw Heads: Three Critical Steps
- Use the right bit size: A #2 Phillips fits most wood screws—test by twisting the bit in the screw head; it shouldn’t wobble
- Apply downward pressure: Lean into the drill with your body weight as you drive
- Stop at resistance: When you feel increased force, release the trigger immediately
Damaged screws waste time and materials. If a head strips, tap a rubber mallet on a correctly sized bit inserted into the screw, then reverse slowly. For severe cases, use a screw extractor kit—never force it with pliers.
Material-Specific Drilling Techniques That Prevent Costly Mistakes

Drilling Clean Holes in Wood Without Tear-Out
Place masking tape over your mark before drilling—this prevents surface splintering. For exit holes, clamp a sacrificial board behind your workpiece. Use brad-point bits for precise woodworking: the center spur scores the wood fibers before the cutting lips remove material. Always drill with the grain when possible—cross-grain drilling increases tear-out risk by 40%.
Metal Drilling Without Breaking Bits
Standard twist bits overheat instantly on metal. Use cobalt or titanium-coated bits designed for metal. Apply cutting fluid (3-in-1 oil works for steel) and drill at half the speed you’d use for wood. Start with a center punch dimple, then drill at low speed with light pressure. For thick metal, “peck” every 1/4″ to clear chips. Aluminum requires higher speeds but frequent clearing—its softness causes rapid bit clogging.
Beginner Drill Projects That Build Real Confidence
Practice Task: Drill Perfectly Aligned Holes in 15 Minutes
Grab a 2×4 scrap piece and mark five dots in a straight line 2″ apart. Use a 1/4″ brad-point bit and follow these steps:
1. Punch all marks with a nail
2. Set drill to maximum torque and low speed
3. Position drill perpendicular to wood (use a speed square as guide)
4. Start each hole at 30% trigger pressure
5. Increase to 60% once bit bites
Your goal: five identical holes with clean edges on both sides. Repeat until you can drill through without exit tear-out. This builds muscle memory for straight drilling faster than any tutorial.
Hanging a Shelf Without Finding Studs
When studs don’t align with your shelf brackets:
1. Mark bracket holes on wall
2. Drill pilot holes with masonry bit (1/8″ diameter)
3. Insert plastic anchors until flush
4. Drive screws at torque setting 5
5. Test load capacity with light items first
This technique works on drywall up to 50 lbs per anchor. For heavier shelves, locate at least one stud using a magnet (screws into metal studs hold 100+ lbs).
Drill Maintenance Habits That Extend Tool Life
Wipe the chuck clean after each use with a dry cloth—sawdust buildup causes slippage. Store bits in a labeled case to prevent damage. For cordless drills, remove batteries after use and store at 40-60% charge (not full). Never leave batteries on the charger overnight—this degrades lithium-ion cells by 20% annually. Clean motor vents monthly with compressed air to prevent overheating failures.
Your first drill project should build confidence, not frustration. Remember these three non-negotiables: always wear eye protection, secure your workpiece, and start with the clutch set low. Master center punching and proper hand positioning before tackling complex projects. Within a week of practice, you’ll drill straight holes instinctively and drive screws perfectly every time. Now grab that drill, clamp some scrap wood, and make your first clean hole—then share your progress with #FirstPerfectHole on social media. The next step? Try building a simple shelf using the hanging technique we covered—your newly drilled holes will hold it securely for years.


