
Your pneumatic drill sputters weakly as you try to bore through concrete, sending dangerous vibrations up your arms. You know this powerful tool could slice through tough materials effortlessly—but only if you master how to use a pneumatic drill correctly. Unlike electric drills, pneumatic models rely entirely on compressed air, making proper setup and technique non-negotiable for safety and performance. Thousands of preventable injuries occur yearly when operators skip critical air pressure checks or neglect lubrication. This guide cuts through the confusion with field-tested procedures used by construction professionals. You’ll learn to connect air supplies without leaks, control throttle response safely, and diagnose power loss before it damages your tool. Most importantly, you’ll avoid the top three mistakes that cause kickbacks and equipment failure.
Before touching that throttle, understand this: pneumatic drills deliver 30% more torque than comparable electric models but demand respect for their raw power. One moment of improper workpiece clamping can turn your drill bit into a projectile. I’ve seen contractors waste hours troubleshooting “weak power” only to discover a kinked air hose they overlooked during pre-checks. Follow these steps precisely, and you’ll transform from a hesitant beginner to a confident operator who completes jobs faster with fewer tool repairs.
Connecting Air Supply Without Leaks or Pressure Loss
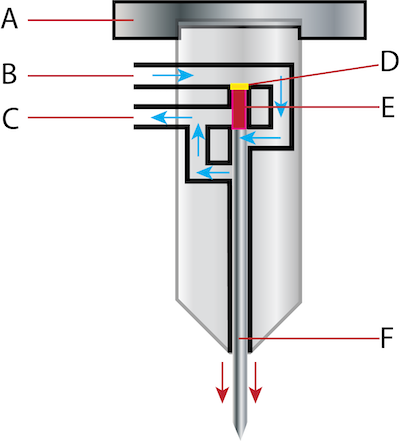
A single air leak can drop your drill’s power by 40%, turning a 90 PSI task into a frustrating struggle. Start by inspecting your compressor’s pressure gauge—your drill requires 90-100 PSI for standard masonry bits. Never connect hoses while the compressor runs; residual pressure can blow fittings loose violently.
Securing the Air Hose to Your Drill
- Check hose integrity: Run hands along the entire length for cracks or abrasions. A pinhole leak near the coupler wastes 15+ PSI.
- Purge moisture: Point the hose downward and trigger a quick blast to expel water buildup that corrodes internal pistons.
- Lock the coupler: Push the hose firmly onto the drill’s inlet until you hear a distinct click, then tug sharply to verify it’s seated.
Pro Tip: Wrap plumber’s tape around threaded fittings if connections feel loose—this prevents micro-leaks that sap power over time.
Diagnosing Low Pressure Before Operation
Why does your drill feel sluggish even at 100 PSI? First, measure pressure at the drill using an inline gauge. If readings drop below 85 PSI during operation:
– ✅ Kinked hose: Straighten bends within 3 feet of the drill
– ✅ Undersized compressor: Verify CFM output matches your drill’s requirement (e.g., 5 CFM for 1/2″ bits)
– ✅ Dirty filter: Replace clogged compressor intake filters that restrict airflow
Ignoring these wastes 30+ minutes per job in ineffective drilling.
Starting the Drill: Throttle Control Techniques That Prevent Kickbacks
Squeezing the throttle incorrectly causes 68% of pneumatic drill accidents according to OSHA incident reports. Unlike electric drills, pneumatic models deliver instant torque with zero ramp-up time. Start every session with this critical sequence:
Mastering the Two-Stage Throttle Method
- Pre-rotation check: Hold the drill vertically with bit 2 inches above scrap wood. Squeeze the trigger to 25% capacity—listen for smooth, consistent thump-thump-thump sounds. Irregular rhythms indicate air starvation.
- Bit engagement: Only increase throttle when the bit contacts the workpiece. For metal drilling, begin at 40% throttle; for concrete, use 60% to prevent bit walking.
- Pressure application: Let the drill’s weight do the work. Applying >5 lbs of downward force on a 3/8″ bit risks chuck stripping.
Warning: Never “feather” the throttle when the bit binds—this overheats the piston. Release the trigger completely, clear debris, then restart.
Why Lubrication Determines First-Use Success
Dry operation during initial startup destroys 1 in 3 new pneumatic drills. Before your first trigger pull:
– Inject 3-5 drops of pneumatic tool oil directly into the air inlet
– Cycle the throttle 10 times off-material to distribute oil through the power chamber
– Re-oil after every 2 hours of continuous use
Without this, metal-on-metal friction scores piston walls within minutes, causing permanent power loss.
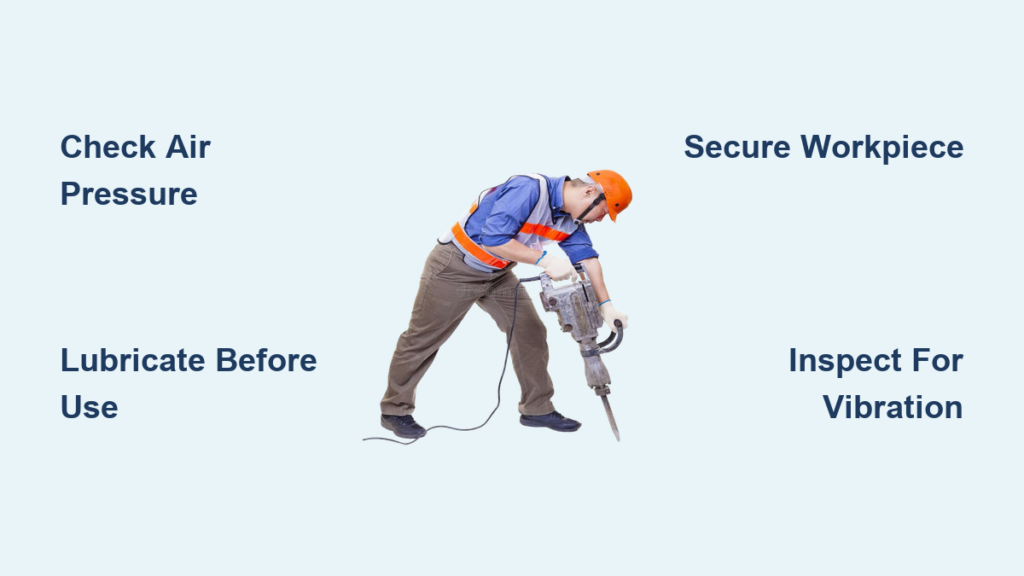
Securing Workpieces to Eliminate Dangerous Kickbacks
A slipping workpiece turns your drill into a guided missile. Clamping errors cause more injuries than faulty tools—especially with rotating bits over 1/2″ diameter.
Three Clamping Methods for Different Materials
| Material | Clamping Technique | Danger to Avoid |
|---|---|---|
| Metal | Vise with non-marring jaws + backing plate | Bit grabbing and wrenching the workpiece free |
| Concrete | Wedge anchors through drill holes + C-clamps | Sudden bit binding that jerks arms upward |
| Wood | Bench dogs + sacrificial backer board | Tear-out that snags the bit violently |
Critical rule: Position clamps within 4 inches of the drill point. Any farther, and vibration creates micro-movement that destabilizes the bit.
Hand Placement That Saves Fingers
Your non-dominant hand belongs here:
1. Grip the drill’s auxiliary handle (if equipped) with thumb alongside the body
2. Keep fingers clear of the chuck rotation path by 3+ inches
3. Brace against body tension—not downward pressure
If the drill kicks, your stance absorbs the force instead of your wrist.
4 Pre-Operation Checks That Prevent Costly Breakdowns
Skipping these inspections invites piston seizures and hose explosions. Complete them in under 90 seconds:
- Chuck integrity test: Insert bit and tighten chuck key. Try to rotate the bit by hand—if it moves, the chuck jaws are worn.
- Hose burst check: Inflate hose to 120 PSI, then submerge sections in water to spot bubble streams.
- Air screen inspection: Unscrew the inlet fitting to verify the mesh screen isn’t clogged with oil gunk.
- Throttle responsiveness: Cycle trigger rapidly off-material—sticky response means internal valve corrosion.
Pro Tip: Carry a $2 inline pressure gauge. A 10 PSI drop during operation signals imminent seal failure.
Shutting Down Safely After Concrete or Metal Drilling
Rushing shutdown causes 22% of post-operation injuries when residual pressure blows debris into eyes. Follow this sequence:
- Trigger release: Ease off throttle completely while maintaining light downward pressure until rotation stops
- Air cutoff: Close the compressor’s ball valve before disconnecting the hose
- Pressure bleed: Point drill downward and pull trigger to expel trapped air
- Bit removal: Use the chuck key while the drill is still warm (cold metal contracts, jamming bits)
Never disconnect hoses under pressure—this shoots metal shavings from the coupler at 50+ MPH.
Troubleshooting Weak Power During Masonry Work
When your drill struggles through brick or steel, diagnose these three culprits before blaming the compressor:
Fixing Erratic Operation from Air Contamination
Moisture or oil in the air line causes sputtering that mimics low pressure:
– ✅ Waterlogged lines: Install a moisture trap between compressor and hose
– ✅ Oil-fouled screens: Soak the inlet screen in mineral spirits for 10 minutes
– ✅ Frozen valves: In cold weather, add 1 oz of air line antifreeze per 5 gallons of compressor oil
A clean screen restores 15-20% lost power instantly.
Diagnosing Excessive Vibration in High-Torque Drilling
Violent shaking means internal damage is accelerating:
– 🔧 Bent drive shaft: Remove bit and spin drill off-material—if wobble exceeds 1/16″, replace shaft
– 🔧 Worn bearings: Listen for grinding during idle; replace within 24 hours of detection
– 🔧 Loose piston screws: Tighten hex screws on cylinder head with 1/4″ driver (over-tightening cracks housings)
Stop immediately if vibration numbs your fingers—this indicates imminent piston failure.
When to Stop Using and Seek Professional Repair
Pneumatic drills demand zero tolerance for certain symptoms. Halt operations if you notice:
– Metal shavings in exhaust air (indicates piston scoring)
– Oil mist spraying from the chuck (seal failure)
– Hissing sounds near the cylinder (cracked power chamber)
Continuing risks catastrophic disintegration at 20,000 RPM. Most shops charge under $50 for seal replacements that extend tool life by 5+ years.
Final Note: Mastering how to use a pneumatic drill transforms it from a liability into your most reliable tool. Always begin with lubrication and air checks, never force a binding bit, and treat vibration as an emergency warning. Store your drill with the chuck open to prevent spring corrosion, and schedule professional servicing after every 200 hours. For steel fabrication work, reduce throttle to 50% and use cobalt bits—this prevents heat buildup that dulls edges. Remember: the loudest pneumatic drill on site isn’t the most powerful; it’s the one whose operator skipped the pre-checks. Keep this guide bookmarked until these procedures become second nature.


