

Your drill bit leaves a hole that wobbles when you insert a dowel pin. The bearing rattles in its housing. These frustrating precision failures stem from one common oversight: skipping the reamer drill step. Unlike standard drilling that creates rough, slightly undersized holes, a reamer drill is the finishing tool that shaves microscopic layers to deliver laser-straight, dimensionally perfect bores. This critical secondary operation transforms sloppy fits into precision assemblies for bearings, pins, and aerospace components. You’ll learn exactly how to calculate pre-drill sizes, avoid costly chatter marks, and select cutting fluids that affect hole size by mere tenths of a thousandth. Stop guessing—master the reamer drill process that professionals rely on for flawless results.
Why Drill Bits Alone Fail Precision Hole Requirements
Standard drill bits create holes with inherent flaws that ruin tight-tolerance assemblies. The chisel point forces material unevenly, leaving tapered walls, surface tears, and diameters typically 0.001″ to 0.003″ undersized. Worse, heat buildup during drilling causes slight work hardening in metals like stainless steel, creating a “work-hardened skin” that deflects cutting tools. This explains why your press-fit pins won’t seat fully or bearings develop premature wear. A reamer drill solves this by using multiple precision-ground flutes to remove just 0.003″ to 0.010″ of material per side—enough to eliminate taper and roughness while maintaining perfect roundness. Crucially, it cuts with its side edges, not the tip, ensuring uniform material removal across the entire hole depth. This isn’t just “smoothing”—it’s dimensional correction that bridges the gap between rough drilling and micrometer-accurate engineering.
Selecting Your Reamer Drill: Material, Type, and Size Decoded
Choosing the wrong reamer guarantees failure before you start the spindle. Match these three critical factors to your specific job:
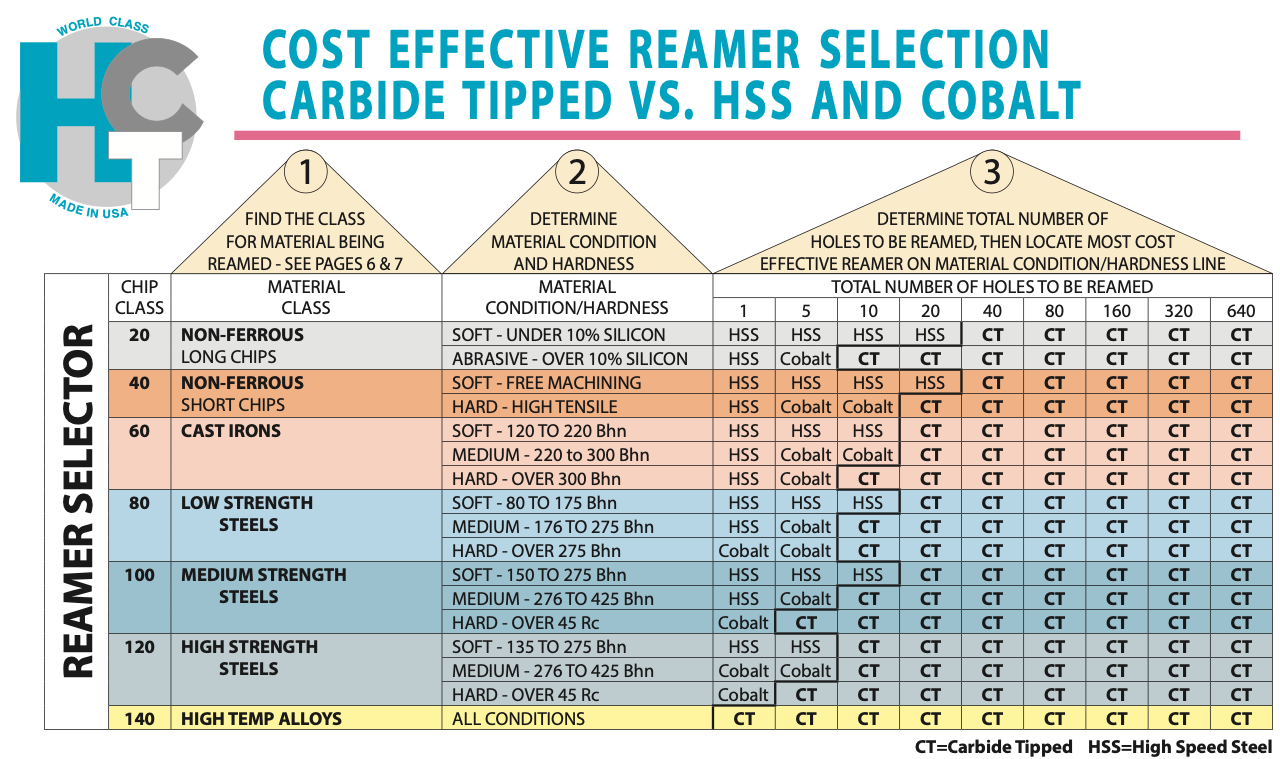
High-Speed Steel vs. Carbide for Material Compatibility
For most steel and aluminum jobs, HSS reamers deliver the best balance of cost and performance. But when machining abrasive materials like cast iron or hardened tool steels, switch to solid carbide—they resist wear 3x longer despite higher cost. Never use standard HSS on titanium; cobalt-HSS or carbide-tipped reamers prevent rapid edge chipping. Remember: a dull reamer causes oversizing and tearing, so inspect flutes under 10x magnification for nicks before critical work.
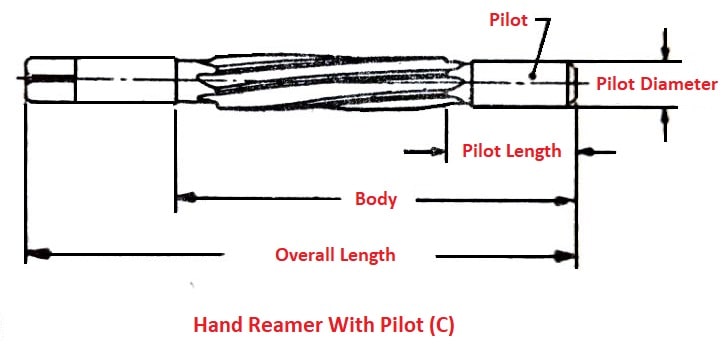
Machine vs. Hand Reamers: Critical Design Differences
Machine (chucking) reamers feature a 45° lead-in taper and straight shank for drill presses or mills—they demand perfect alignment but cut faster. Hand reamers solve alignment issues with their 30° long taper that self-centers in misaligned holes, plus a square drive for T-handles. Use hand reamers for field repairs or soft materials like brass; machine reamers for production runs. Never force a hand reamer backward to “back out”—this blunts cutting edges instantly.
The Exact Pre-Drill Size Formula (Per Side Calculation)
Your pre-drilled hole determines 90% of reaming success. Drill undersized by precisely 0.003″ to 0.010″ per side—any less causes burnishing; any more overloads the reamer. Here’s the foolproof calculation:
- For holes under 1/4″: Drill 3% undersized (e.g., 0.234″ for a 1/4″ final hole)
- For 1/4″ to 1/2″ holes: Subtract 0.006″ total (0.003″ per side)
- For holes over 1/2″: Subtract 0.020″ total (0.010″ per side)
Critical Pro Tip: For a 1/2″ hole, use a Q-drill (0.332″)—not a 15/32″ (0.4685″). The wrong pre-drill creates bell-mouthing or chatter. Always deburr both hole entrances with a countersink; sharp edges deflect the reamer on entry.
Machine Reaming Setup: Alignment and Speed for Zero Bell-Mouthing
Misalignment causes flared hole entrances (bell-mouthing) in 70% of failed reaming jobs. Fix this with three non-negotiable steps:
Achieve Perfect Tool Alignment in 60 Seconds
Mount your workpiece in a machinist’s vise, then lower the reamer into the pre-drilled hole without spinning. If it binds on one side, shim the vise until the reamer drops freely through the hole. For critical work, install a floating reamer holder—it compensates for 0.005″ misalignment by letting the reamer “find its own center.”
Set Correct Speeds and Feeds to Prevent Chatter
Run reamers at half your drilling RPM. For a 1/2″ HSS reamer in steel:
– Speed: 300-450 RPM (calculate as RPM = (3.82 × 35 SFM) ÷ 0.5″)
– Feed: 0.002-0.004″ per revolution—firm but smooth pressure
Too slow? The reamer skates and glazes. Too fast? Chatter ruins surface finish. Always flood the hole with cutting oil; air blasts won’t cool the tool adequately.
Hand Reaming Mastery: Avoiding the Backward Rotation Trap
Hand reaming demands technique over power. Start by securing your workpiece vertically in a bench vise—any tilt causes uneven cutting. Apply cutting fluid liberally (use lard oil for aluminum to prevent galling), then insert the reamer’s long taper into the hole. Rotate clockwise with a T-handle using two hands: one for downward pressure, one for steady turning. Apply only enough pressure to feel consistent resistance—forcing it deflects the tool. Crucially, never reverse direction to back out; this chips micro-edges on the flutes. Instead, complete the full clockwise rotation through the hole, then withdraw while still turning forward. For deep holes, retract every 1/4″ to clear chips and reapply lubricant.
Cutting Fluid Choices: How Oil Affects Final Hole Size by Tenths

The wrong lubricant alters hole dimensions by up to 0.0005″—enough to ruin a Class H7 fit. Match fluid to material:
- Steel/stainless: Sulfurized cutting oil (reduces heat-induced expansion)
- Aluminum/brass: Kerosene or light mineral oil (prevents galling)
- Cast iron: Dry reaming (oil traps abrasive chips)
Proven Test: Measure a hole reamed with soluble oil vs. straight lard oil—you’ll see a 0.0002″ size difference. For critical aerospace holes, document your fluid type; thermal effects from coolant can shift dimensions during inspection.
Fixing 3 Common Reaming Failures: Oversized Holes, Chatter, and Tearing
Why Your Hole is Oversized (and the 2-Minute Fix)
Oversized holes almost always stem from a dull reamer or excessive runout. Test: measure hole size mid-depth vs. exit—if it’s larger at the exit, your pre-drill was oversized. If uniform oversize, inspect reamer flutes for wear. Fix runout by chucking the reamer directly into the drill press spindle (no drill chuck adapters) and checking TIR with a dial indicator.
Eliminating Chatter Marks in 3 Steps
Spiral chatter patterns indicate vibration. Immediately:
1. Shorten tool overhang to under 3x reamer diameter
2. Increase feed rate by 20% (e.g., from 0.002″ to 0.0024″ IPR)
3. Reduce RPM by 25% to move out of resonant frequencies
Rigid setups with minimal overhang prevent 95% of chatter issues.
Stopping Torn Surface Finish on Aluminum
Tearing occurs when chips weld to flutes. Solution: use a right-hand spiral reamer with positive rake angles, plus kerosene cutting fluid. For stubborn cases, increase speed to 600+ SFM—aluminum requires faster cutting than steel to shear cleanly.
Blind Hole Reaming: The Pecking Cycle Technique That Prevents Binding
Blind holes trap chips, causing reamer binding and breakage. Follow this pecking cycle:
1. Feed reamer 1x its diameter deep (e.g., 1/4″ for a 1/4″ reamer)
2. Fully retract to clear chips and reapply cutting fluid
3. Repeat, reducing depth by 10% each pass
Use a right-hand spiral reamer—it ejects chips upward as it rotates. Drill the hole 1/8″ deeper than needed to create a chip pocket. Never force through resistance; binding means chips are packed—retract immediately.
Mastering the reamer drill transforms “close enough” holes into precision-engineered features. Remember the golden rules: always leave 0.003″-0.010″ per side stock, never reverse rotation, and match cutting fluid to your material. For critical work, invest in a floating holder—it pays for itself in saved scrap parts. Now inspect your reamer’s flutes for sharpness, verify your pre-drill size with the formula provided, and make that next hole dimensionally perfect. Your bearings, pins, and assemblies will run smoother, last longer, and eliminate costly field failures.


