
Struggling to dig deep, clean holes for fence posts or deck footings with a shovel leaves most DIYers exhausted after just a few holes. You’ve probably experienced the frustration of hitting compacted soil or roots that bring manual digging to a halt. A drill auger transforms this back-breaking chore into an efficient process that takes minutes instead of hours. Learning how to use a drill auger properly ensures you create stable, professional-looking holes without damaging your equipment or risking injury. This guide delivers the exact techniques professionals use to drill perfect holes for fence posts, deck footings, and tree plantings—saving you time, effort, and potential headaches.
Essential Safety Gear and Precautions Before You Start
Skipping proper safety measures when operating a drill auger leads to preventable accidents that sideline projects and cause injuries. The combination of high torque and rotating equipment demands your full attention and proper protection from the moment you unpack your tools.
Protective Gear is Non-negotiable: Your eyes need maximum protection from soil and debris flying at high speed—always wear safety glasses with side shields or a full-face shield. Heavy-duty, puncture-resistant work gloves prevent blisters and protect hands from sharp edges on the auger flights. Steel-toe boots and long pants create a barrier between your body and potential hazards. For extended projects, add hearing protection to prevent noise-induced hearing damage from gas-powered augers.
Beware of the Torque Reaction: When your drill auger hits resistance underground, the entire assembly can twist violently in your hands. Maintain a firm two-handed grip with your dominant hand on the drill trigger and your other hand on the side handle for maximum control. Stand with feet shoulder-width apart in a stable stance that allows you to absorb sudden movements. Never operate a drill auger while wearing loose clothing, jewelry, or gloves with dangling strings that could catch in the rotating mechanism—these become dangerous entanglement hazards.
Choosing the Right Drill Auger for Your Specific Project
Selecting the wrong auger type for your soil conditions or hole requirements turns a simple project into a frustrating battle against equipment limitations. The right match between your drill, auger bit, and soil type determines whether you’ll breeze through the job or struggle with constant jams and poor performance.
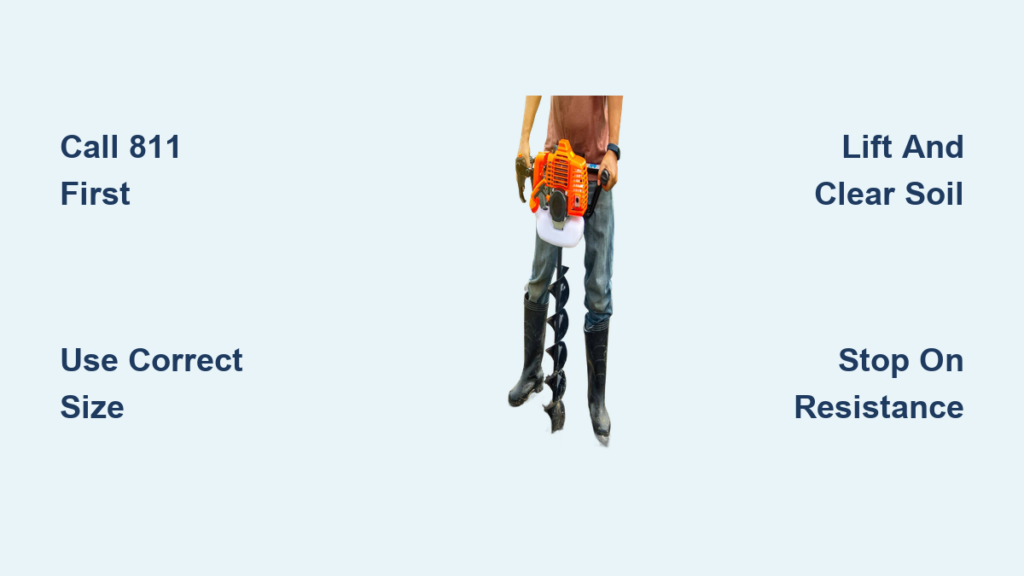
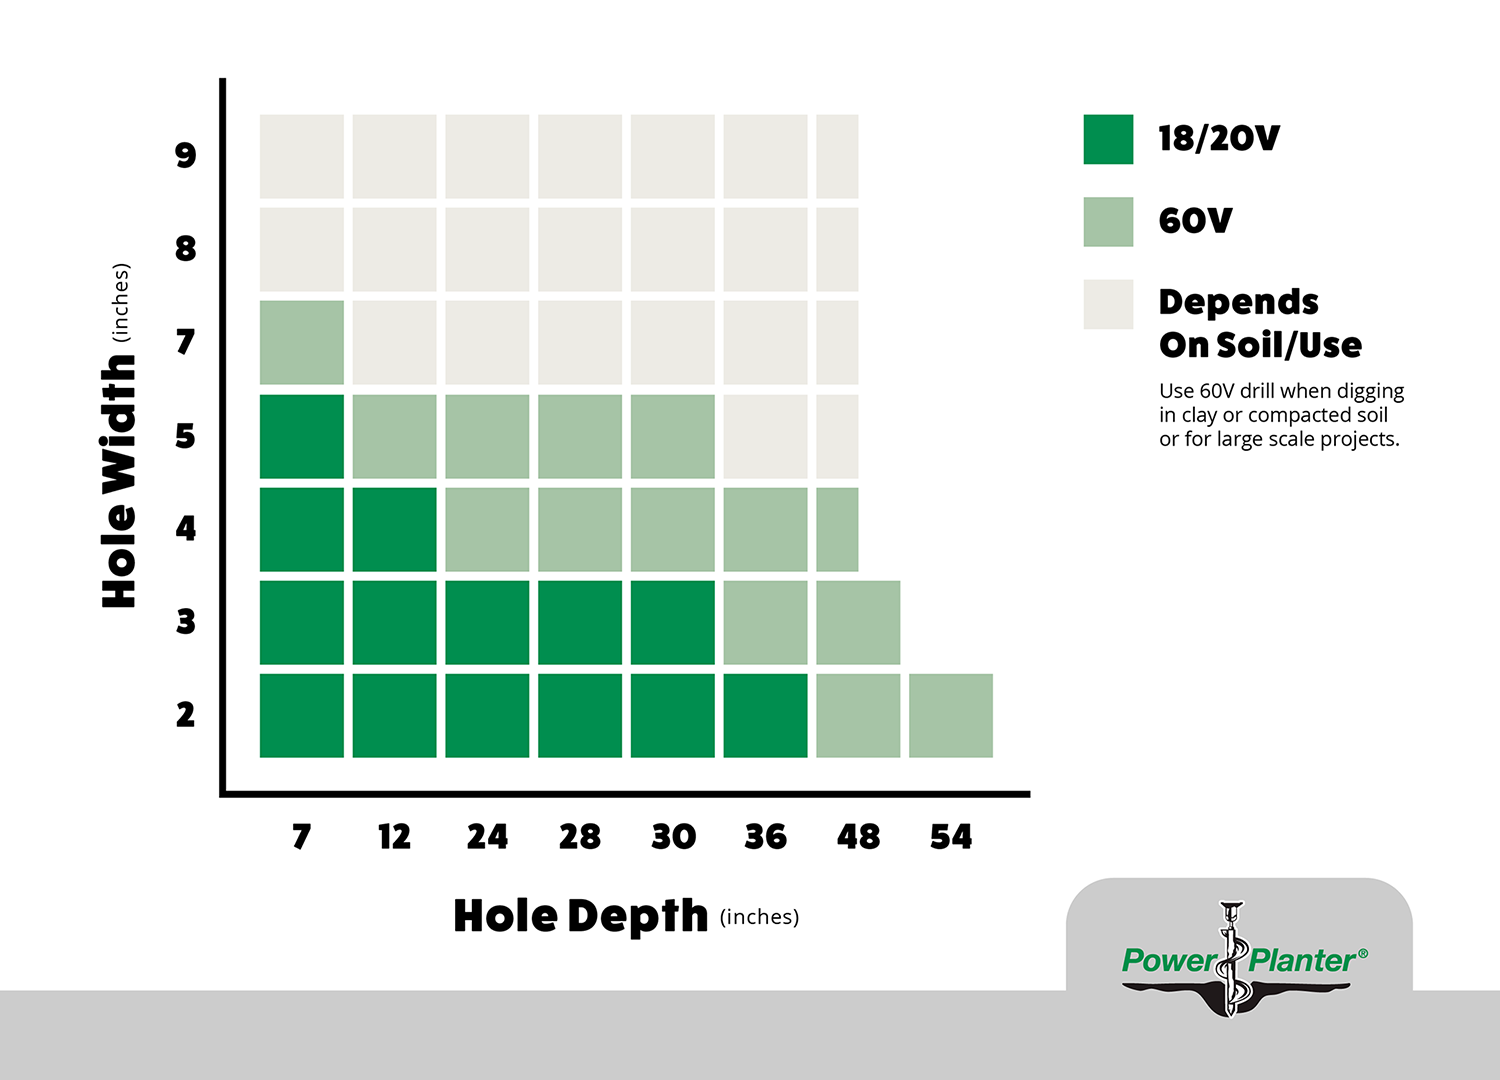
Match Auger Size to Your Drill’s Power Capacity: A common mistake is using a 6-inch or larger auger bit with a standard homeowner’s drill. For holes 2-4 inches in diameter, a high-torque (800+ inch-pounds) 20V or 40V cordless drill works well. Attempting to use a 6-inch or larger auger requires a dedicated gas-powered auger or a commercial-grade drill (50V+) specifically designed for earth boring. Using an undersized drill leads to overheating, stripped gears, and incomplete holes.
Soil Type Determines Auger Design: In soft, loamy soil, standard auger bits with single flighting work efficiently. For clay-heavy soil that sticks to the bit, choose an auger with wider flighting spacing to prevent clogging. Rocky terrain demands a specialized rock auger with replaceable carbide teeth that can chip through small stones without damaging the bit. If you’re working in areas with many tree roots, consider a root-clearing auger with serrated edges that cut through fibrous material rather than getting tangled.
Step-by-Step Guide to Operating Your Drill Auger Correctly
Proper Hole Location Verification and Equipment Setup
Call 811 Before You Dig—It’s the Law: Before marking a single hole, contact your local utility locator service (811 in North America) to have underground utilities marked. This free service prevents catastrophic strikes to gas, water, or electrical lines that could cost thousands in repairs or cause serious injury. Wait the required 2-3 business days for markings before proceeding—rushing this step risks life-threatening accidents.
Equipment Setup for Optimal Performance: For drill-powered augers, insert the auger’s hex shank securely into your drill chuck and tighten completely. Attach the side handle to the drill and position it for comfortable two-handed operation. On gas-powered augers, check fuel levels and oil, prime the engine if needed, and set the choke according to temperature conditions. Ensure all safety features—including emergency stop switches and blade guards—are functioning properly before starting.
Mastering the Drilling Technique for Clean, Straight Holes
Creating the Perfect Pilot Hole: Position the auger bit precisely over your marked spot with the shaft perfectly vertical. Start drilling at the lowest speed setting while applying gentle downward pressure—let the screw point pull the auger into the ground naturally. Resist the urge to force it; excessive pressure causes binding and uneven holes. After establishing a 2-3 inch pilot hole, increase speed slightly while maintaining vertical alignment.
The Critical Lift-and-Clear Method: Every 6-8 inches of depth, stop drilling and lift the auger partially from the hole to clear accumulated soil from the flights. This prevents “hydraulic lock” where packed soil traps the auger underground. For deep holes (over 24 inches), use a systematic approach: drill 6 inches, lift to clear, drill 4 more inches, lift again. This technique works especially well in clay soils that compact easily and reduces physical strain significantly.
Navigating Underground Obstacles Safely: When you encounter resistance from roots or rocks, immediately stop drilling and reverse direction to back the auger out. Inspect the hole to determine if you can work around the obstruction or need to remove it with a digging bar. Never force the auger through hard objects—this risks damaging the bit teeth or stripping the drive mechanism. For persistent rock layers, consider using a rock-point auger or switching to manual digging for that specific hole.
Troubleshooting Common Drill Auger Problems on the Spot

Freeing a Stuck Auger Without Damage: If your auger binds in heavy clay soil, stop immediately and reverse the drill direction slowly. Gently rock the auger back and forth while applying slight upward pressure—this breaks the suction holding it in place. For stubborn cases, pour a small amount of water around the shaft to lubricate the soil (but avoid creating mud that could worsen the situation). Never use pry bars or excessive force that could bend the auger shaft.
Correcting Drifting Holes Mid-Process: If your hole starts deviating from vertical, stop drilling immediately. Remove the auger and inspect for rocks or roots causing the deflection. Clear the obstruction, then restart the hole slightly offset from the original position. For deep holes that have drifted significantly, fill the hole with loose soil and start fresh—trying to correct a severely angled hole wastes more time than beginning again.
Post-Drilling Maintenance That Extends Your Equipment’s Lifespan
Immediate Cleaning Prevents Costly Damage: After completing your last hole, thoroughly clean all soil from the auger flights, bit teeth, and connection points before the mud dries. Use a stiff brush and hose—not a pressure washer that could force water into bearings. Pay special attention to the hex shank connection point where dirt can cause premature wear on your drill chuck.
Proper Storage Ensures Next-Time Reliability: Before storing your auger, apply a light coat of oil to metal surfaces to prevent rust, especially on the cutting teeth. Store the auger vertically in a dry location to prevent warping. For gas-powered units, run the engine until it stalls to clear the carburetor or add fuel stabilizer if storing for more than 30 days. Check and sharpen dull teeth with a metal file before your next project—sharp teeth cut cleaner holes with less effort.
When to Call Professionals Instead of Pushing Your Limits
Recognizing Unsafe or Unmanageable Conditions: If you encounter repeated utility markings in your hole locations, extremely rocky soil requiring constant digging bar use, or need holes deeper than 36 inches, stop and consider hiring a professional. Attempting deep holes with undersized equipment risks equipment failure and creates unstable holes that compromise your project’s structural integrity.
Cost-Benefit Analysis for Larger Projects: For fence installations requiring more than 10 holes, calculate whether renting a professional-grade auger or hiring a service would save time and physical strain. The rental cost of a commercial one-man auger ($50-75/day) often pays for itself in reduced fatigue and faster completion compared to struggling with inadequate equipment.
Mastering how to use a drill auger transforms one of the most dreaded landscaping tasks into a manageable, even satisfying process. By following these precise techniques for equipment selection, safe operation, and problem-solving, you’ll create professional-quality holes that ensure your fence posts and deck footings remain stable for years. Remember that proper preparation, consistent technique, and respect for the equipment’s limitations separate successful projects from frustrating failures. Before your next digging project, review these steps to work smarter, not harder—your back (and your timeline) will thank you. For ongoing success, keep your auger bit sharp, always verify underground utilities, and never compromise on safety gear when operating this powerful earth-moving tool.


