

That stubborn drill bit refusing to budge can derail your project in seconds. Whether you’re installing shelves or building furniture, a seized bit transforms your reliable Black & Decker drill into a frustrating paperweight. This happens more often than you’d think—especially when bits get overtightened or corroded from workshop humidity. You’ll learn exactly how to free stuck bits using proven techniques tailored to your specific Black & Decker model, whether you’re facing a mildly stubborn bit or a completely frozen chuck. No more forcing pliers or risking damage—we’ll walk through safe, step-by-step solutions that preserve your tool’s lifespan.
The key to solving this problem lies in understanding your drill’s chuck type, as removal methods vary dramatically between models. Black & Decker primarily uses two chuck designs across their corded and cordless lines, and applying the wrong technique can worsen the situation. Before grabbing tools, identify your chuck type—this determines whether you’ll use a simple hand twist or specialized leverage methods. Most importantly, never resort to hammering or excessive force; these drills have precision mechanisms that tolerate surprisingly little abuse. Let’s break down exactly how to diagnose and resolve your stuck bit situation.
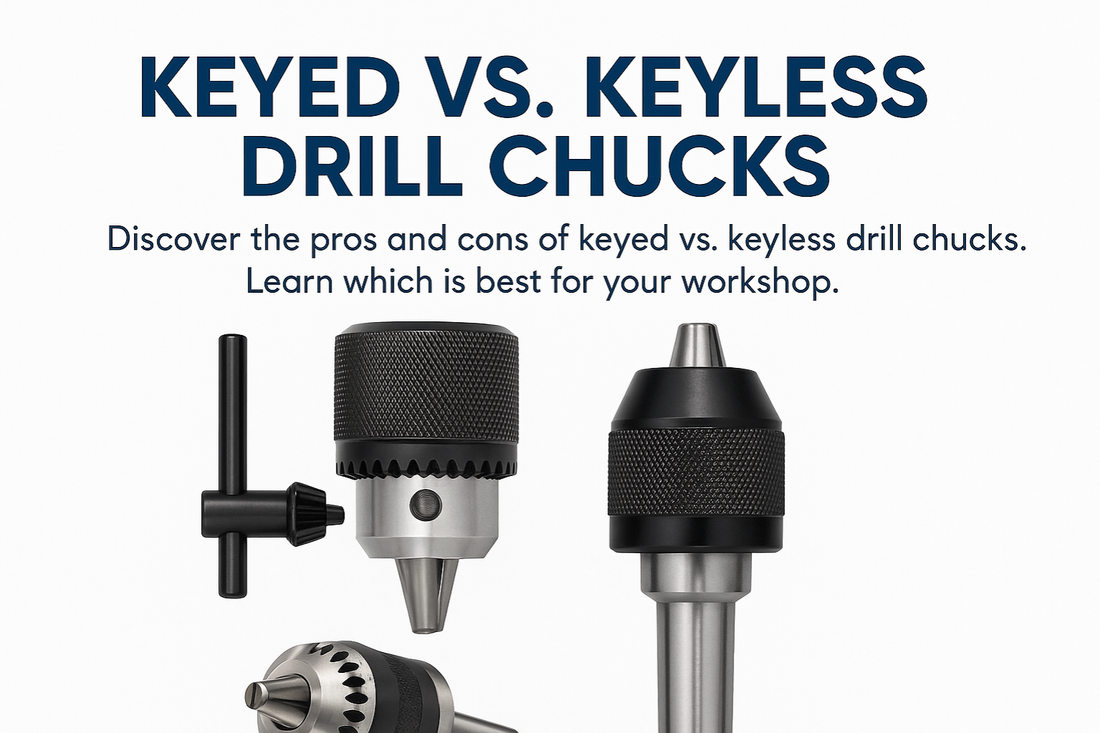
Identifying Your Black & Decker Chuck Type
Your drill’s chuck design dictates the entire removal strategy. Misidentifying this wastes time and risks damage—so examine your chuck carefully before proceeding.
Keyed Chucks: When Your Drill Requires a Separate Tool
If you spot three small keyholes on the chuck’s collar, you’re working with a keyed chuck (common on older Black & Decker corded models like the 3/8″ 5.2A). This design demands its dedicated T-shaped key for operation. Insert the key fully into any keyhole, then turn it counter-clockwise while gripping the drill body firmly. The key provides significant leverage, making it ideal for stubborn bits. Crucially, never use pliers or improvised tools on the keyholes—they’ll strip the soft metal teeth. If your chuck key is missing, visit a hardware store with your drill; they often stock universal keys matching Black & Decker’s 1/4″ hex pattern.
Keyless Chucks: Mastering the Two-Handed Technique
Most modern Black & Decker drills (including all 20V MAX cordless models) use keyless chucks—but there are two distinct subtypes requiring opposite motions.
Single-Sleeve Chucks feature one rotating collar. Hold the drill body steady with your dominant hand, then grip the knurled front collar with your other hand. Turn it counter-clockwise (as if unscrewing a jar lid) to open the jaws. This intuitive motion works for models like the BDC series.
Two-Sleeve Chucks (standard on Black & Decker’s industrial lines) require counter-intuitive movement. With the bit pointing away from you:
– Grip the rear collar (closest to the drill body) firmly with one hand
– Rotate the front collar clockwise with your other hand
This “righty-loosy” action unlocks the mechanism. Attempting standard counter-clockwise rotation here only tightens the chuck further—a common mistake that turns minor resistance into a fully seized bit.
Step-by-Step Removal for Stuck Drill Bits
Now that you’ve identified your chuck type, apply these targeted solutions starting with the least aggressive method. Always wear ANSI-rated safety glasses—metal shavings or sudden releases can cause eye injuries.
Basic Method: Using Your Drill’s Reverse Function
This works for mildly stuck bits on both keyed and keyless chucks. First, set the directional switch to reverse (the left position when facing the chuck). Firmly grip the chuck body—not the rotating sleeve—with a leather work glove or non-slip rubber pad. Squeeze the trigger for one second maximum at the lowest speed setting. The motor’s reverse torque often breaks initial resistance without tools. If your model has a torque ring (like the 20V MAX), set it to the lowest #1 setting first. Repeat twice if needed, but never hold the trigger longer—excessive spinning heats the chuck and worsens seizing.
Moderate Solutions for Stubborn Bits
When the drill’s motor alone fails, combine mechanical advantage with penetration. Apply 3-4 drops of penetrating oil (PB Blaster works best) directly into the chuck jaws where the bit meets the metal. Let it soak for 30 minutes—this dissolves rust and lubricates threads. Meanwhile, wrap a rubber jar opener around the chuck for better grip. For two-sleeve chucks, use the dual-wrench technique:
1. Hold the rear collar steady with padded channel-lock pliers
2. Grip the front collar with a strap wrench
3. Apply steady counter-rotational pressure (front clockwise, rear counter-clockwise)
Never jerk the wrenches—smooth, increasing force prevents jaw damage. If you hear a faint “ping,” the bit is breaking loose; stop immediately and finish by hand.
Emergency Methods for Frozen Bits

For bits seized for months or damaged by overtightening, escalate carefully. The two-strap wrench method is your safest nuclear option:
– Position one strap wrench on the chuck body
– Place a second strap wrench on the front collar
– Apply opposing force gradually (like opening a stubborn pickle jar)
If resistance remains, add controlled vibration: Tap the chuck jaws lightly with a rubber mallet while rotating it 90 degrees between taps. The micro-impacts disrupt corrosion bonds. As a last resort, apply a heat gun on low setting (max 250°F) to the metal chuck body only for 45 seconds—never near plastic components. Immediately attempt loosening while warm; the thermal expansion creates microscopic gaps. Stop if you smell burning plastic—this indicates overheating.
Preventing Future Stuck Bits
A well-maintained Black & Decker chuck rarely seizes. Implement these habits after every project:
The 30-Second Chuck Care Routine
- Wipe bits clean before storage—sawdust and metal shavings accelerate corrosion
- Never fully tighten by hand—snug the chuck until it clicks, then stop (overtightening is the #1 cause of seized bits)
- Monthly lubrication: Spray 1-second burst of silicone lubricant into the jaws, then work the chuck open/closed
Critical Maintenance Schedule

| Task | Frequency | Black & Decker-Specific Tip |
|——|———–|—————————–|
| Clean chuck jaws | After 10 uses | Use a pipe cleaner dipped in isopropyl alcohol |
| Lubricate mechanism | Every 3 months | Apply 3-in-1 oil to threads on keyed chucks only |
| Check for runout | Monthly | Spin chuck empty—if wobble exceeds 1/16″, service needed |
Avoid the temptation to “just get it tight” with pliers or vise grips. Black & Decker’s plastic chuck components (common on models like the 20V MAX) crack under excessive force, requiring full chuck replacement. If you hear grinding during operation, stop immediately—this indicates worn jaws that will soon seize.
When to Stop and Seek Professional Help
Know your limits to avoid turning a repairable issue into a totaled drill. Stop immediately if you encounter:
– Visible hairline cracks in the chuck body (common on BDC series after overtightening)
– The chuck spins freely but won’t open (signaling broken internal teeth)
– More than 2mm of wobble when spinning the empty chuck
– Burning smells or smoke during removal attempts
These indicate internal damage requiring specialized service. Black & Decker authorized centers charge $45–$80 for chuck replacement—a fraction of a new drill’s cost. Attempting advanced disassembly (like removing the reverse-thread chuck screw) often voids warranties and risks shearing the spindle. Remember: If moderate force hasn’t worked after three methods, professional intervention is smarter than risking further damage.
With these techniques, you’ll conquer even the most stubborn drill bits while protecting your Black & Decker investment. The secret lies in matching the solution to your specific chuck type and resisting the urge to rush the process. Most stuck bits yield within 15 minutes using the reverse method combined with penetrating oil—saving you a service trip. Implement the prevention habits after each project, and you’ll rarely face this frustration again. For immediate help with your model, consult Black & Decker’s online service manuals; they provide chuck-specific diagrams for every drill they’ve manufactured since 2005. Now get that bit out and get back to building!


